

Today I’m bringing you a pattern for crocheting a Santa hat for kids or adults. It’s so simple that anyone with beginner crochet knowledge can make it by following the steps below. It’s a quick project you’ll have it done in no time. So let’s get started!
Skill level: Beginner
Terms: US crochet terms throughout
Finished size: Long stocking-style Santa hat. The fabric is stretchy; as written it fits most children / a small adult (approx. 46–54 cm / 18–21 in head circumference). Fully adjustable — see Sizing.
Approx. length: About 45 cm / 18 in from tip to brim before folding (adjust by adding or removing straight rounds).
Gauge (approx.): About 14 dc × 7 rounds = 10 cm / 4 in. Gauge is not critical for this relaxed hat, but it affects final size — go up a hook size for a bigger hat, down for a smaller one.Time: A quick project — most makers finish in an evening or two.
Materials & Tools
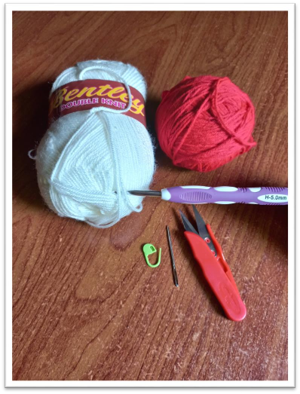
- Yarn (DK / double-knit weight) — red for the hat and white for the brim and pompom. Roughly one DK ball of each is plenty.
- Crochet hook — 5.0 mm (H)
- Tapestry (yarn) needle — for sewing the pompom on and weaving in ends
- Scissors
- Stitch marker
- A little fiberfill or yarn scraps — to stuff the pompom
Abbreviations (US terms)
This pattern uses these stitches:
- ch — chain
- dc — double crochet
- sl st — slip stitch (used to join rounds)
- inc — increase (work 2 dc into the same stitch)
- st(s) — stitch(es)
- rep — repeat
- ( ) ×n — repeat the instructions inside the brackets n times
Note: this is a US-terms pattern. If you usually crochet in UK terms, remember that this “double crochet (dc)” is the tall stitch worked with one yarn-over the stitch UK patterns call treble (tr).
Quick Stitch Guide
Slip knot
Wrap the yarn around your index finger and thumb, bring the working yarn through the lower loop and snug it up. Place the loop on your hook and gently tighten.
Magic ring
Wrap the yarn around two fingers to form a loop (cross the yarn so it can be pulled closed). Insert your hook into the loop, yarn over and pull a loop through, then work your first round of stitches into the ring. Pull the tail to close the center.
Chain (ch)
Yarn over and pull through the loop on your hook. Each pull-through makes one chain.
Double crochet (dc)
Yarn over, insert the hook into the stitch, yarn over and pull up a loop (3 loops on hook). Yarn over and pull through 2 loops, yarn over and pull through the last 2 loops.
Slip stitch (sl st)
Insert the hook into the stitch, yarn over and pull through both the stitch and the loop on your hook in one motion. Used here to join the end of each round.
How This Hat Is Worked
The hat is worked in joined rounds from the pointed tip down to the opening, then the white brim and pompom are added.
- Start each round with ch 3 — this counts as the first dc of the round.
- End each round with a sl st into the top of that beginning ch-3 to close the round.
- inc = 2 dc worked into the same stitch.
- The stitch count at the end of every round is shown in (grey) so you can check your work as you go.
Crown & Body
Begin with a magic ring.
Round 1: ch 3 (counts as first dc), 5 more dc in the ring, sl st to join. (6 dc)
Round 2: ch 3, dc in each st around, sl st to join. (6 dc)
Round 3: ch 3, then (dc in next st, inc in next st) — rep to end, sl st to join. (9 dc)
Round 4: ch 3, dc in each st around, sl st to join. (9 dc)
Round 5: ch 3, then (dc in next 2 sts, inc) — rep to end, sl st to join. (12 dc)
Round 6: ch 3, dc in each st around, sl st to join. (12 dc)
Round 7: ch 3, then (dc in next 3 sts, inc) — rep to end, sl st to join. (15 dc)
Round 8: ch 3, dc in each st around, sl st to join. (15 dc)
Round 9: ch 3, then (dc in next 4 sts, inc) — rep to end, sl st to join. (18 dc)
Round 10: ch 3, dc in each st around, sl st to join. (18 dc)
Keep going in the same rhythm: every odd round is an increase round (one more plain dc between increases each time), and every even round is worked straight (dc in each st). The stitch count grows by 3 on each increase round.
Round 11: ch 3, (dc 5, inc) — rep, join. (21 dc)
Round 13: ch 3, (dc 6, inc) — rep, join. (24 dc)
Round 15: ch 3, (dc 7, inc) — rep, join. (27 dc)
Round 17: ch 3, (dc 8, inc) — rep, join. (30 dc)
Round 19: ch 3, (dc 9, inc) — rep, join. (33 dc)
Round 21: ch 3, (dc 10, inc) — rep, join. (36 dc)
Round 23: ch 3, (dc 11, inc) — rep, join. (39 dc)
Round 25: ch 3, (dc 12, inc) — rep, join. (42 dc)
Round 27: ch 3, (dc 13, inc) — rep, join. (45 dc)
Round 29: ch 3, (dc 14, inc) — rep, join. (48 dc)
Round 31: ch 3, (dc 15, inc) — rep, join. (51 dc)
(Rounds 12, 14, 16, 18, 20, 22, 24, 26, 28 and 30 are all straight: ch 3, dc in each st around, join — the count stays the same as the increase round before it.)
Rounds 32–36: ch 3, dc in each st around, sl st to join. Work these 5 rounds straight (no increases). (51 dc)
At the end of Round 36, sl st and fasten off the red yarn. The main body of the hat is complete.
Stitch-count reference
Use this table to check your work at a glance:
| Round | What you do | Stitch count |
| 1 | 6 dc in magic ring | 6 |
| 2 | dc in each st | 6 |
| 3 | (dc 1, inc) ×3 | 9 |
| 4 | dc in each st | 9 |
| 5 | (dc 2, inc) ×3 | 12 |
| 6 | dc in each st | 12 |
| 7 | (dc 3, inc) ×3 | 15 |
| 8 | dc in each st | 15 |
| 9 | (dc 4, inc) ×3 | 18 |
| 10 | dc in each st | 18 |
| 11 | (dc 5, inc) ×3 | 21 |
| 12 | dc in each st | 21 |
| 13 | (dc 6, inc) ×3 | 24 |
| 14 | dc in each st | 24 |
| 15 | (dc 7, inc) ×3 | 27 |
| 16 | dc in each st | 27 |
| 17 | (dc 8, inc) ×3 | 30 |
| 18 | dc in each st | 30 |
| 19 | (dc 9, inc) ×3 | 33 |
| 20 | dc in each st | 33 |
| 21 | (dc 10, inc) ×3 | 36 |
| 22 | dc in each st | 36 |
| 23 | (dc 11, inc) ×3 | 39 |
| 24 | dc in each st | 39 |
| 25 | (dc 12, inc) ×3 | 42 |
| 26 | dc in each st | 42 |
| 27 | (dc 13, inc) ×3 | 45 |
| 28 | dc in each st | 45 |
| 29 | (dc 14, inc) ×3 | 48 |
| 30 | dc in each st | 48 |
| 31 | (dc 15, inc) ×3 | 51 |
| 32–36 | dc in each st (5 rounds, straight) | 51 |
Sizing It Up or Down
Because the fabric stretches, this hat suits a range of head sizes as written. To change the fit:
- Smaller (baby / toddler): stop the increases earlier — for example end the increase rounds at Round 23 (39 dc) or 25 (42 dc), then work your straight rounds. You can also use a 4.0–4.5 mm hook.
- Larger (teen / adult): keep the increase pattern going past Round 31 (Round 33: dc 16, inc; Round 35: dc 17, inc; and so on, +3 each time) until the opening comfortably fits around the head, then work 5 straight rounds and the brim.
- Longer or shorter tail: add or remove straight rounds anywhere in the body before the brim.
Tip: try the opening around the head (or measure against a hat that fits) before adding the brim. The brim should sit snugly, since it’s the part that grips.
The White Brim
Attach the white yarn to any stitch of the final round (Round 36).
Round 1: ch 3 (counts as first dc), then dc into the same stitch the white yarn is attached to.
Rounds 1–8: dc in each st around, sl st to join at the end of each round. Work 8 rounds in white, keeping the same stitch count as the body (no increases). (51 dc)
Sl st to join after the last round and fasten off, leaving a tail to weave in.
Fold the white brim up (you can fold up about half of it) to form the classic turned-up Santa cuff. Press or steam lightly if you’d like a crisper fold.
The Pompom
This is a small crocheted ball worked in a spiral. Use white yarn and mark the first stitch of each round with your stitch marker, moving it up as you go.
Round 1: 6 sc in a magic ring. (6 sc)
Round 2: inc (2 sc) in each st around. (12 sc)
Round 3: (sc in next st, inc) — rep to end. (18 sc)
Rounds 4–5: sc in each st around (2 rounds straight). (18 sc)
Round 6: (sc in next st, dec) — rep to end. (12 sc)
Stuff the ball firmly with fiberfill or yarn scraps now, before it closes up.
Round 7: dec around until the opening closes. (6 → closed)
Fasten off, leaving a long tail. Use the tail to close any remaining gap and to sew the pompom securely to the tip of the hat with your tapestry needle.
(If you prefer, you can skip the crocheted ball and make a simple wrapped-yarn pompom instead.)
Finishing
- Sew the pompom firmly to the pointed tip of the hat.
- Weave in all loose ends with the tapestry needle.
- Fold up the white brim and give the hat a light press or steam if needed.
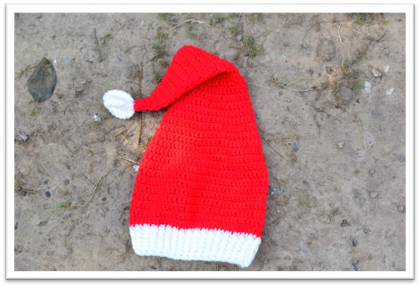
And that’s it your Santa hat is finished! Here’s the finished result: