If you’ve just picked up a hook and it feels awkward in your hand — good news, that’s completely normal, and it fixes itself fast. How you hold your hook is the very first crochet skill, and getting comfortable with it makes every stitch afterward easier. This guide walks you through both grips, how to hold your yarn, and how to crochet without tiring your hands.
Quick answer: There are two main ways to hold a crochet hook — the pencil grip (held over the top like a pencil, using your thumb, index, and middle fingers) and the knife grip (held in your palm like a table knife, with your hand over the hook). Neither is “more correct.” Try both and keep whichever feels most relaxed and causes the least strain.
First, get to know your crochet hook
Before you grip it, it helps to know the parts you’ll be holding. A standard crochet hook has five parts:
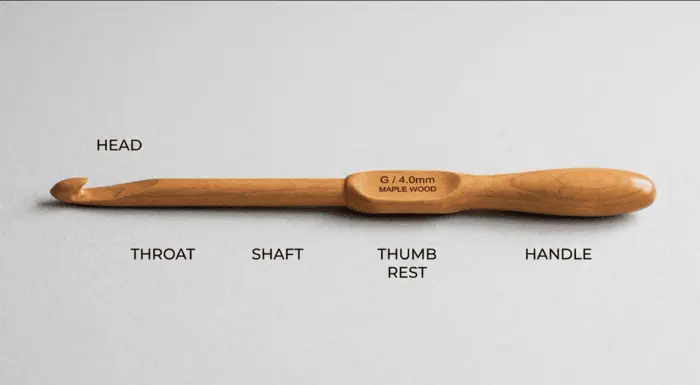
- Head — the hooked tip that catches the yarn.
- Throat — the slanted part just below the head that guides the loop onto the shaft.
- Shaft — the straight body of the hook; this is what determines your stitch size.
- Thumb rest — the flat section in the middle where your thumb and finger naturally sit for control.
- Handle — the end of the hook that rests against your hand or palm.
When instructions say “hold near the thumb rest,” this is what they mean. Most of your control comes from that flat middle section.
The two main ways to hold a crochet hook
You’ll hold your hook in your dominant hand (right hand if you’re right-handed, left if you’re left-handed). There are two standard grips, and both do exactly the same job — they just suit different hands and yarns.
The pencil grip
Hold the hook exactly as you’d hold a pencil to write: resting it on top between your thumb and index finger, with your middle finger supporting underneath, roughly an inch or so back from the head near the thumb rest. Your hand sits over the hook (an underhand style).
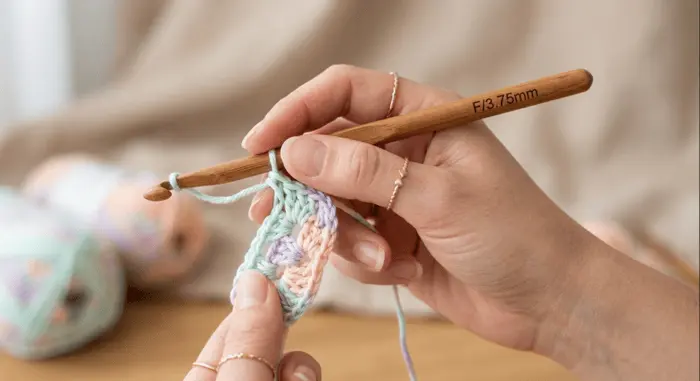
- Best for: fine detail, thinner yarns and cotton, and crocheters who want precise control.
- Watch out for: it can tire the fingers faster during long sessions, since the grip is smaller and more pinched.
The knife grip
Hold the hook the way you’d hold a table knife to spread butter: your palm comes over the top of the hook, the handle rests toward your palm, and you grip with your thumb and index finger while the rest of your fingers curl loosely around the handle (an overhand style).
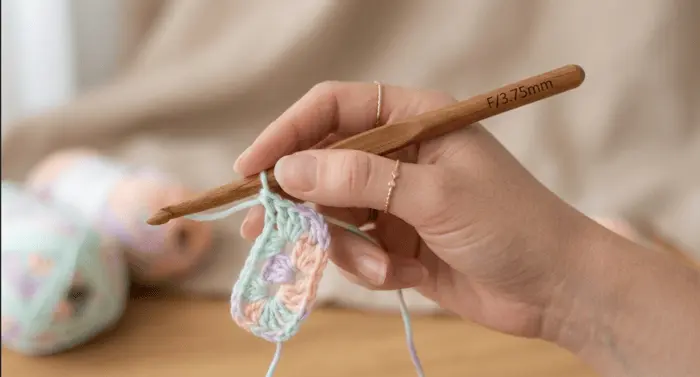
- Best for: thicker and bulky yarns, longer crochet sessions, and anyone who finds the pencil grip strains their fingers. The index finger resting along the top gives extra guiding control, which many beginners find easier.
- Watch out for: it can feel slightly less precise at first for very fine work.
Which should you pick? There’s no winner. Crochet a few rows with each and notice which keeps your hand more relaxed. Most people naturally settle on one within a few projects and plenty switch depending on the yarn.
A quick way to match grip to yarn
A tip most beginner guides skip: thin yarn → pencil grip; thick or bulky yarn → knife grip. The chunkier the yarn and the longer you’re working, the more the knife grip tends to protect your hand.
How to hold your yarn (the tension hand)
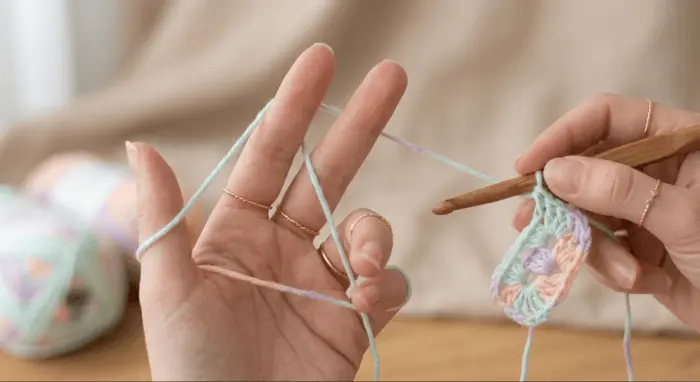
Your other hand the non-dominant hand holds the yarn and controls tension, which is how tightly or loosely the yarn feeds as you stitch. This matters just as much as the hook grip, because tension decides how even your stitches look.
A common, reliable method:
- With your palm facing up, drape the working yarn over your pinky, then weave it under your two middle fingers and up over your index finger.
- Let your index finger lift slightly to hold the yarn out, giving you a steady, even feed.
- Pinch the start of your work between your thumb and middle finger to keep it stable.
If that feels fiddly, try simpler variations: yarn just over the index finger, or wrapped once around the pinky for a bit more grip. There’s no single correct yarn hold the right one is whatever lets you keep steady, even tension without clenching.
How your grip affects tension and gauge
Here’s the part that makes this skill genuinely important, not just a formality. Your grip and yarn hold directly control your tension, and tension controls your gauge the number of stitches and rows that fit in a given measurement.
- Grip and tension too tight, and your stitches come out small and cramped, your finished piece turns out smaller than the pattern intends, and your hands tire quickly.
- Grip and tension too loose, and your stitches look sloppy and loose, and it gets harder to count them.
The sweet spot is a relaxed but controlled hold. Don’t chase perfect tension on day one — it develops naturally through muscle memory as you practice. A handy rule experienced crocheters share: if it feels loose enough, loosen a little more; most beginners grip far too tight.
How to crochet without hurting your hands
Crochet should never leave you in pain. If your wrist aches or your fingers tingle after stitching, the usual culprit is a too-tight “death grip” or an awkward wrist angle — both easy to fix.
- Keep your wrist as straight and neutral as possible — avoid bending it sharply.
- Loosen up. Hold the hook firmly enough to control it, but not clenched.
- Sit with good posture — back supported, shoulders relaxed, work resting on a table or a pillow on your lap rather than hunched over.
- Take breaks and stretch your hands every 20–30 minutes.
- Use good lighting, so you don’t hunch toward your work (a surprising cause of neck and shoulder strain).
- Try ergonomic hooks with soft, cushioned handles if you crochet for long stretches or have sensitive joints.
Pain is useful information, not something to push through. If discomfort doesn’t ease after rest, or you have a condition like carpal tunnel syndrome, check in with a doctor or an occupational therapist before continuing long sessions.
Left-handed crochet
If you’re left-handed, simply reverse everything: hold the hook in your left hand and control the yarn with your right. Some left-handers find it easier to learn by mirroring a tutorial (watch a right-handed demo in a mirror, or look for left-handed videos). The grips themselves — pencil and knife — work exactly the same way.
Your next steps
Once holding the hook feels natural, you’re ready to make your first stitches. Work through these in order:
- How to make a slip knot
- How to chain (the foundation chain)
- How to single crochet
- How to read a crochet pattern
Then put it all to use with an easy beginner project
Frequently Asked Questions
Is it better to hold your crochet hook like a pencil or a knife?
Neither is better — both produce the same results. The pencil grip gives more precise control and suits thinner yarn, while the knife grip is often more comfortable for long sessions and thicker yarn. Try both and keep whichever keeps your hand most relaxed.
Is there a proper way to hold a crochet hook?
There’s no single “correct” way. The two standard, time-tested methods are the pencil grip and the knife grip. The proper hold is simply the one that lets you crochet comfortably with even tension and no hand strain.
What is the correct hand position for crocheting?
Hold the hook in your dominant hand using a pencil or knife grip, and hold the yarn in your other hand to control tension. Keep your wrist straight and neutral, your grip relaxed, and your shoulders loose. Your yarn hand feeds the yarn while your hook hand does the stitching.
Is it better to crochet tight or loose?
Aim for relaxed, even tension — neither extreme. Too tight makes stitches cramped, shrinks your finished size, and tires your hands; too loose makes stitches sloppy and hard to count. Most beginners crochet too tightly, so if in doubt, loosen up. Consistency matters more than being tight or loose.
How can I make my own crochet hook grip?
You can add a cushioned grip to a plain hook cheaply: mold air-dry or oven-bake polymer clay around the thumb-rest area to fit your hand, slip on a foam pencil grip or a piece of foam tubing, or wrap the handle with self-adhesive bandage wrap (vet wrap). These DIY grips thicken the handle so your hand stays more relaxed and reduce fatigue during long sessions.
Is crocheting good or bad for your hands?
For most people it’s fine and can even be relaxing, but repetitive stitching with a too-tight grip can cause wrist and finger strain over time. You can keep it hand-friendly by loosening your grip, keeping your wrist neutral, taking regular breaks, and using ergonomic hooks. See a professional if you have ongoing pain or a condition like carpal tunnel.
What does crocheting do to your body?
Crocheting is a gentle, repetitive activity that many people find calming — it can reduce stress and support focus and mindfulness, and it keeps the hands and fingers active. The main physical downside is potential strain in the hands, wrists, neck, and shoulders from long sessions or poor posture, which good ergonomics prevents.
What is the hardest crochet to do?
Many crocheters consider fine thread crochet and intricate lace among the hardest, because they use very thin thread and tiny steel hooks that demand precise tension and good eyesight. Tunisian crochet, overlay crochet, and complex amigurumi are also commonly named as advanced, since they involve more complex techniques and stitch counting.
Which crochet stitch is not a yarn eater?
Taller and more open stitches use less yarn to cover the same area, so they’re not yarn eaters — the double crochet and treble crochet, and open designs like mesh or filet crochet, stretch your yarn furthest. The biggest yarn eater is the single crochet, because it’s short and dense, packing far more stitches (and yarn) into the same space.