
Free Crochet Tools for This Pattern
Check your gauge, estimate yarn and plan your make before you cast on.
Free PDF Pattern Download
Download the Ruby Cascade Off-Shoulder Dress pattern as a PDF – the same pattern, diagrams and links, ready to print or save. No email required.
In This Pattern
- 1. Skill Level – Advanced Garment Construction
- 2. Finished Size
- 3. Materials
- 4. Stitch Abbreviations
- 5. Parts List
- 6. Construction Overview
- 7. Gauge
- 8. Bodice Panel
- 9. Upper Bodice Shaping
- 10. Halter Casing
- 11. Halter Cord
- 12. Waist Panel
- 13. Skirt Foundation
- 14. First Ruffle Tier
- 15. Second Ruffle Tier
- 16. Third Ruffle Tier
- 17. Skirt Edge
- 18. Detached Sleeves
- 19. Sleeve Expansion
- 20. Cuff
- 21. Underarm Elastic Loop
- 22. Placement Order
- 23. Overlap Order
- 24. Assembly
- 25. Final Checklist
- Crochet Dress Diagrams, Charts and Size Details
- More Free Crochet Tools for Garment Makers
- Off-Shoulder Crochet Dress Pattern FAQ
- More Free Crochet Clothing Patterns
About This Off-Shoulder Crochet Dress Pattern
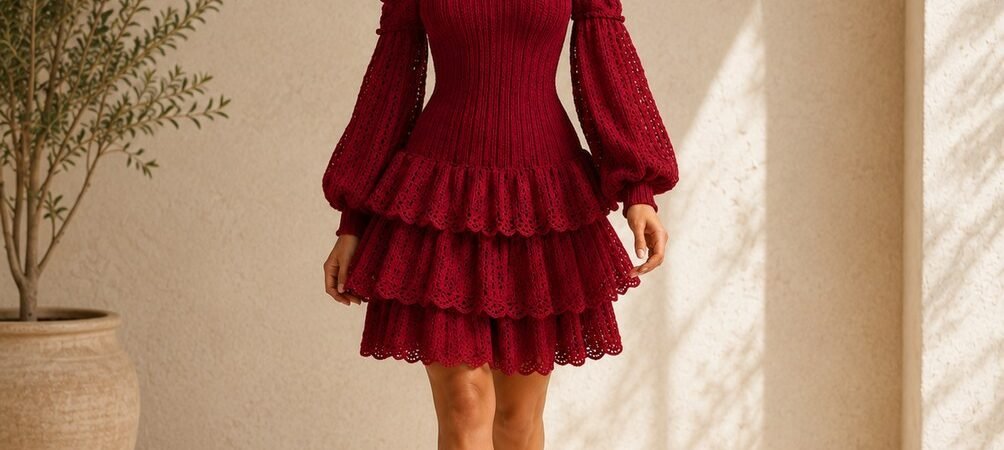
This off-shoulder crochet dress pattern makes a fitted ribbed bodice, a sculpted waist panel, three scalloped skirt ruffles and a pair of detached balloon sleeves, all in ruby red DK cotton blend. The bodice is crocheted vertically in back-loop-only single crochet, joined into a tube and shaped with linked double crochet and post stitches, then finished with an elastic neckline casing and a crossed halter cord. It is written for sizes XS (S, M, L, XL) in US crochet terms with a 4 mm hook, and the finished dress is 27 in / 69 cm long. It is rated advanced garment construction, so before you cast on, check your tension with the crochet gauge calculator, work out your yardage with the crochet yarn calculator and refresh the basics in our guide to how to read crochet patterns. If you love garment patterns, you will also like our Striped Maxi Dress, Granny Square Top and Skirt Set and Open-Lace Crochet Cardigan, or browse every free crochet pattern and all of our free crochet clothing and wearable patterns.
| Pattern at a glance | |
|---|---|
| Skill level | Advanced garment construction |
| Sizes | XS (S, M, L, XL) |
| Finished bust | 30 (34, 38, 42, 46) in |
| Dress length | 27 in / 69 cm |
| Yarn | DK weight cotton blend, 1450 (1600, 1780, 1950, 2200) yds |
| Hooks | 4 mm main hook, 3.5 mm edging hook |
| Gauge | 15 ldc × 10 rows = 4 × 4 in / 10 × 10 cm |
| Time | 24–34 hours |
| Terms | US crochet terms |
1. Skill Level – Advanced Garment Construction
This is an advanced garment pattern. Required techniques:
- Garment shaping
- Ribbed crochet
- Linked double crochet
- Elastic casing
- Sleeve shaping
- Tiered ruffles
- Joined rounds
- Waist contour shaping
Estimated completion time: 24–34 hours. Plan your make-time and tick off each stage with our free crochet project planner. New to linked stitches? Warm up with our how to double crochet guide and the how to start a crochet chain tutorial first.
2. Finished Size
Written for XS (S, M, L, XL).
| Measurement | XS | S | M | L | XL |
|---|---|---|---|---|---|
| Finished bust (in) | 30 | 34 | 38 | 42 | 46 |
| Finished waist (in) | 24 | 28 | 32 | 36 | 40 |
| Finished hip flare (in) | 38 | 42 | 46 | 50 | 54 |
Dress length: 27 in / 69 cm. Sleeve length: 19 in / 48 cm.
3. Materials
Yarn
DK weight cotton blend in ruby red. Suggested yarns: YarnArt Jeans, Hobbii Friends Cotton Silk or Paintbox Cotton DK.
| Yardage | XS | S | M | L | XL |
|---|---|---|---|---|---|
| Yards | 1450 | 1600 | 1780 | 1950 | 2200 |
Swatching and tension change yardage, so double-check your total with the crochet yarn calculator before you buy.
Hooks
- 4 mm main hook
- 3.5 mm edging hook
Need US or UK equivalents? Use the crochet hook size converter to match 4 mm and 3.5 mm hooks to your own set.
Notions
- 8 mm elastic
- Stitch markers
- Measuring tape
- Tapestry needle
- Optional cord stoppers
4. Stitch Abbreviations
This pattern uses US crochet terms. If you usually crochet in UK terms, run it through the US/UK crochet terms converter; for any other abbreviation, check the crochet abbreviations glossary.
| Abbreviation | Meaning |
|---|---|
| MR | magic ring |
| ch | chain |
| sl st | slip stitch |
| sc | single crochet |
| hdc | half double crochet |
| dc | double crochet |
| ldc | linked double crochet |
| fpdc | front post double crochet |
| bpdc | back post double crochet |
| inc | increase |
| dec | decrease |
| RS | right side |
| WS | wrong side |
| BLO | back loop only |
| FLO | front loop only |
Stuck on a long round? Paste it into the crochet pattern decoder to see it in plain English with a stitch-count check. If you use a magic ring in other projects, see our magic ring tutorial; for increases, see how to increase in crochet.
5. Parts List
| Section | Parts |
|---|---|
| Bodice | Ribbed upper bodice, waist panel, neckline casing |
| Skirt | Main skirt base, first ruffle tier, second ruffle tier, third ruffle tier |
| Sleeves | 2 detached balloon sleeves, 2 cuff bands |
| Details | Halter cords, elastic casing, underarm support loops |
6. Construction Overview
Construction order:
- Crochet ribbed bodice vertically
- Join into tube
- Shape upper bodice
- Create neckline casing
- Insert elastic
- Add halter cord
- Crochet waist panel
- Build skirt foundation
- Add layered ruffles
- Create sleeves
- Finish edging
- Steam block lightly
7. Gauge
Using a 4 mm hook: 15 ldc × 10 rows = 4 × 4 in / 10 × 10 cm.
- Ribbing gauge: slightly stretched measurement.
- Blocking: light steam only.
- Do not overstretch ribbing.
Not sure how many stitches fit your swatch? Enter it into the crochet gauge calculator to get stitches and rows per inch, and use the hook size converter if you need to go up or down a hook size to hit gauge.
8. Bodice Panel
Worked vertically in rows.
| Row / Round | Instructions |
|---|---|
| Foundation | Ch 14 (16, 18, 20, 22). |
| Row 1 | Starting in 2nd ch from hook: sc across. Total: 13 (15, 17, 19, 21) sts. |
| Row 2 | Ch 1, turn, BLO sc across. |
| Rows 3–84 (92, 100, 108, 116) | Repeat Row 2. |
Panel width after stretch: 30 (34, 38, 42, 46) in. Join short ends using sl st through BLO. This creates a ribbed tube.
9. Upper Bodice Shaping
Work around the upper edge.
| Row / Round | Instructions |
|---|---|
| Round 1 | Sc evenly around. Total: 84 (92, 100, 108, 116) sts. Place markers at front center, back center and side seams. |
| Round 2 | Ldc around. |
| Round 3 | (Sc 12, dec) repeat around. Total: 78 (85, 92, 99, 106) sts. |
| Round 4 | Ldc around. |
| Round 5 | Fpdc around. |
| Round 6 | Bpdc around. |
Repeat Rounds 5–6 for 4 total rounds. This creates a sculpted rib texture.
10. Halter Casing
| Row / Round | Instructions |
|---|---|
| Round 7 | BLO hdc around. Creates the fold line. |
| Round 8 | Sc around. |
Fold the casing inward and sew neatly. Insert 8 mm elastic. Elastic length: bust minus 2–3 inches. Optional: insert a hidden support cord inside the casing.
11. Halter Cord
Foundation: Ch 180. Thread through the neckline casing and tie the ends securely. Optional: add cord stoppers.
12. Waist Panel
Attach yarn at the lower bodice edge.
| Row / Round | Instructions |
|---|---|
| Round 1 | Ldc around. |
| Round 2 | (Sc 12, dec) repeat around. Total: 72 (78, 84, 90, 96) sts. |
| Round 3 | Fpdc around. |
| Round 4 | Bpdc around. |
Repeat Rounds 3–4 for 4 total rounds. Waist height: 2.5 in / 6.5 cm.
13. Skirt Foundation
| Row / Round | Instructions |
|---|---|
| Round 1 | (1 ldc, inc) repeat around. Creates a gradual flare. |
| Round 2 | Ldc evenly around. |
| Round 3 | (2 ldc, inc) repeat around. Creates smooth volume without excessive weight. |
| Round 4 | Ldc evenly around. |
14. First Ruffle Tier
| Row / Round | Instructions |
|---|---|
| Rounds 5–10 | Alternate: ldc rounds; fpdc rib texture every 6 stitches. |
| Round 11 – Expansion | (Sc 6, inc) repeat around. Creates controlled fullness. |
| Rounds 12–15 | Ldc evenly. |
15. Second Ruffle Tier
Attach yarn inside Round 8 FLO.
| Row / Round | Instructions |
|---|---|
| Round 1 | (2 ldc in every 4th stitch). Creates a medium layered ruffle. |
| Rounds 2–5 | Ldc evenly. |
Tier depth: 4 in / 10 cm.
16. Third Ruffle Tier
Attach yarn inside Round 12 FLO.
| Row / Round | Instructions |
|---|---|
| Round 1 | (2 ldc in every 3rd stitch). Creates fuller lower movement without excess bulk. |
| Rounds 2–5 | Ldc evenly. |
17. Skirt Edge
Final edging: sc around the entire hem. Then work 1 round of crab stitch only. Do not over-tighten the edge.
18. Detached Sleeves
Make 2.
| Row / Round | Instructions |
|---|---|
| Foundation | Ch 36 (40, 44, 48, 52). Join carefully. |
| Round 1 | Sc around. |
| Round 2 | Fpdc around. |
| Round 3 | Bpdc around. |
Repeat Rounds 2–3 for 24 rounds.
19. Sleeve Expansion
| Row / Round | Instructions |
|---|---|
| Round 25 | (Sc 5, inc) repeat around. |
| Rounds 26–28 | Ldc evenly. |
| Round 29 | (Sc 6, inc) repeat around. |
| Rounds 30–32 | Ldc evenly. |
Continue increasing every 4th round until the sleeve circumference reaches 16 (17, 18, 19, 20) in. This creates smoother balloon shaping.
20. Cuff
| Row / Round | Instructions |
|---|---|
| Rounds 40–46 | Alternate fpdc, bpdc. |
Optional: insert elastic inside the cuff. This prevents slipping.
21. Underarm Elastic Loop
Foundation: Ch 18. Join into a loop and attach to the inner upper sleeve edge. This helps the sleeves stay in position.
22. Placement Order
| Layer | Piece |
|---|---|
| Bottom layer | Main skirt panel |
| Middle layer | Second ruffle tier |
| Top layer | Third ruffle tier |
| Then add | Sleeves, neckline casing, halter cord |
23. Overlap Order
- Top ruffle overlaps middle tier: 1 in.
- Middle tier overlaps lower tier: 1.25 in.
- Sleeves sit slightly below the shoulder line.
24. Assembly
- Crochet bodice panel
- Join into tube
- Shape upper bodice
- Create neckline casing
- Insert elastic
- Add halter cord
- Crochet waist panel
- Build skirt foundation
- Add first ruffle tier
- Add second ruffle tier
- Add third ruffle tier
- Crochet sleeves
- Add cuffs
- Attach underarm loops
- Steam block lightly
25. Final Checklist
- Bodice fits snugly
- Waist shaping symmetrical
- Neckline elastic secure
- Halter centered
- Sleeve lengths equal
- Ruffle overlap balanced
- Hemline level
- No twisting in tiers
- Ribbing aligned vertically
- Elastic hidden neatly
- Ends woven securely
Crochet Dress Diagrams, Charts and Size Details
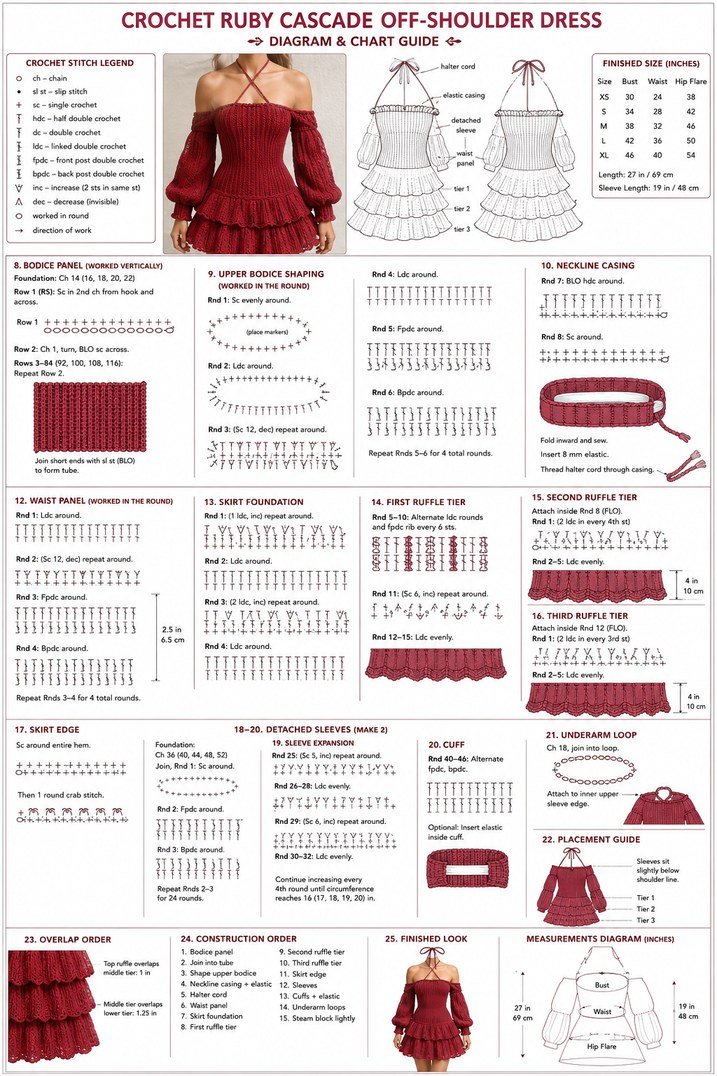
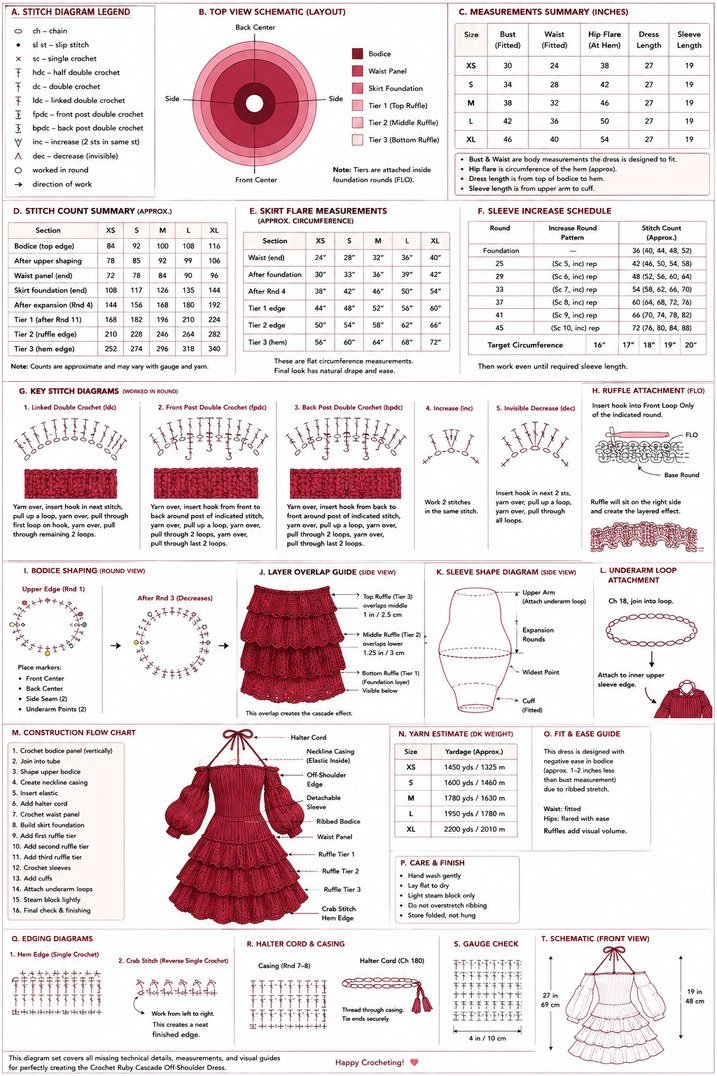
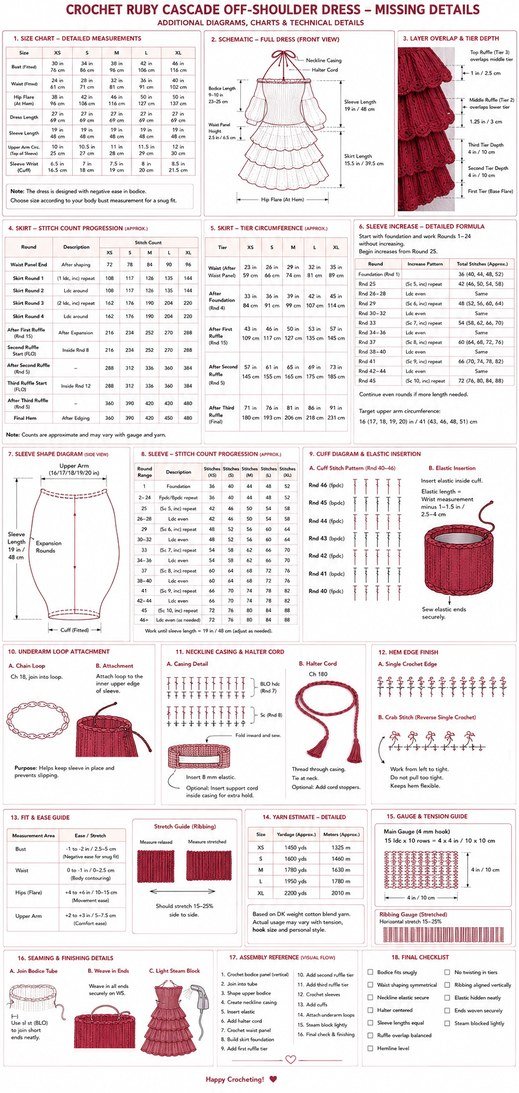
Use these charts alongside the written pattern: the first sheet shows every stitch diagram, the second covers stitch counts, flare measurements and the sleeve increase schedule, and the third adds a detailed size chart, layer overlap and elastic insertion guide. Tap an image to view it full size.
More Free Crochet Tools for Garment Makers
A garment this size rewards a little planning. Our free crochet calculators and tools include the gauge calculator, yarn calculator, hook size converter, pattern decoder and project planner. If you plan to sell finished dresses, the crochet pricing calculator adds materials, time, overhead and profit to give a fair retail price for a make that takes 24–34 hours.
Off-Shoulder Crochet Dress Pattern FAQ
What skill level is this off-shoulder crochet dress?
It is an advanced garment pattern. You will need garment shaping, ribbed crochet, linked double crochet, elastic casing, sleeve shaping, tiered ruffles, joined rounds and waist contour shaping. If linked stitches are new to you, start with our double crochet tutorial and how to read crochet patterns.
How much yarn do I need for the Ruby Cascade dress?
You need 1450 (1600, 1780, 1950, 2200) yds of DK weight cotton blend for sizes XS (S, M, L, XL). Check your own total with the crochet yarn calculator.
What hook size does the dress use?
The main hook is 4 mm and the edging hook is 3.5 mm. The crochet hook size converter shows the US and UK equivalents.
How long does the dress take to crochet?
Allow about 24–34 hours. The crochet project planner helps you estimate a finish date and keep track of each stage.
Is this pattern written in US or UK terms?
US terms. If you crochet in UK terms, paste the pattern into the US/UK crochet terms converter.
How should I block the dress?
Block with light steam only and do not overstretch the ribbing.
More Free Crochet Clothing Patterns
- Crochet Striped Maxi Dress Pattern – a fitted bodycon dress with a slit, sizes S–XL.
- Crochet Granny Square Top and Skirt Set – a free two-piece set.
- Open Lace Crochet Cardigan Pattern – a cropped puff-lace button cardigan.
- Mesh Bucket Hat Crochet Pattern – a brown openwork summer hat.
- Browse all free crochet clothing and wearables patterns, every free crochet pattern, or our crochet tutorials to build your skills.
Love wearable lace? Try our free Ivory Lace V-Neck Crochet Midi Dress Pattern – a fitted open-mesh dress with a lace diamond hem, plus more clothing and wearables crochet patterns.