
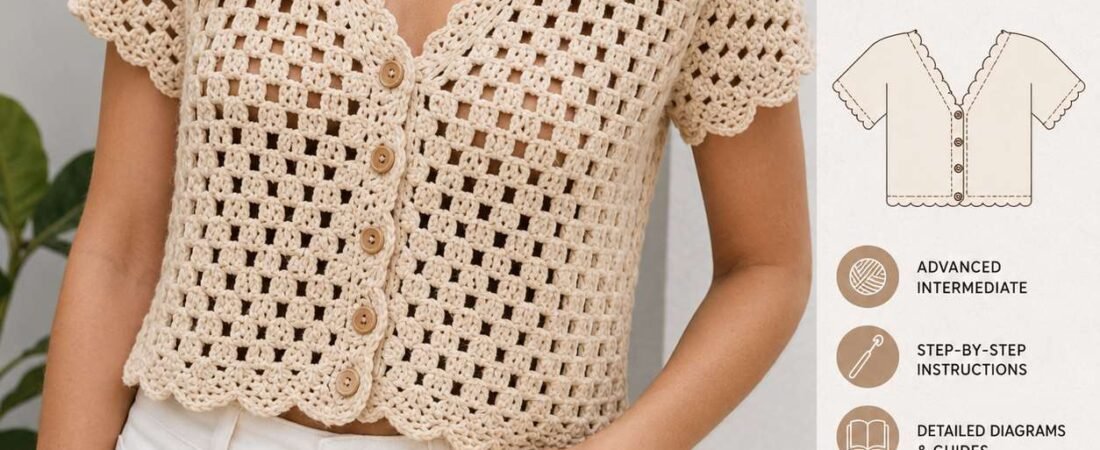
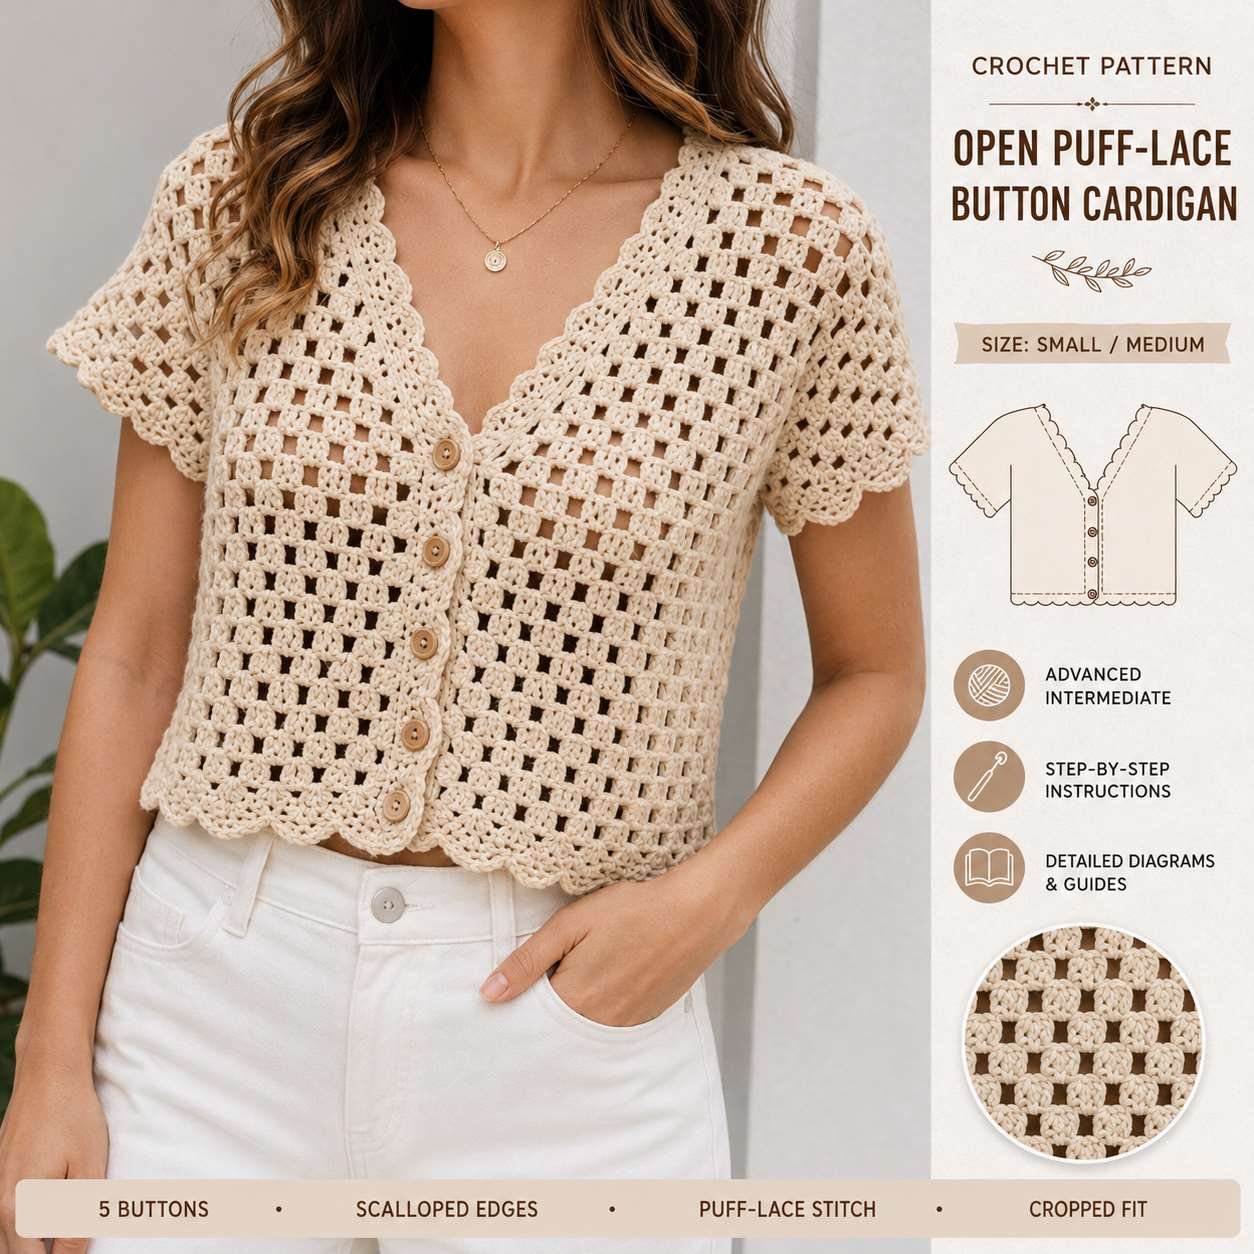
This open lace crochet cardigan pattern makes a cropped, short-sleeved button cardigan in natural cream cotton. It is worked in an airy open puff-lace stitch with a deep V-neck, scalloped neckline, scalloped hem, scalloped sleeve edging and five wooden buttons. The pieces are worked flat with a 4 mm hook and DK cotton yarn, and the finished Small / Medium cardigan fits a 36–38 in / 91.5–96.5 cm bust and measures 16.25 in / 41 cm long.
The pattern is written in US crochet terms with row-by-row stitch counts, a full crochet diagram and step-by-step tutorials. It is rated advanced intermediate because it combines puff-lace, V-neck and armhole shaping, button bands and scalloped edging. If you are new to lace, start with our guide to how to read crochet patterns, refresh your double crochet and foundation chain, then browse more free crochet patterns, including our Granny Square Top and Skirt Set, Striped Maxi Dress and Mesh Bucket Hat, or the full free crochet cardigan and top patterns collection.
Jump to: Skill level | Size and gauge | Materials | Abbreviations | Construction | Back panel | Front panels | Sleeves | Button bands | Scalloped edging | Assembly | Checklist | Diagrams | FAQ
Free Crochet Tools for This Pattern
Use our free calculators to check your gauge (16 pattern positions = 4 in), estimate the 360–430 g of DK cotton you need, convert the 4 mm body hook and 3.5 mm edging hook to your local size, and decode puff, sc2tog and BLO in this open lace cardigan pattern.

Save This Open-Lace Crochet Cardigan Pattern to Pinterest
Pin this free open lace crochet cardigan pattern to your crochet clothing or summer crochet board so it is ready when you want to start, and follow Crochet Patterns Hub for more free patterns.
About This Open Lace Crochet Cardigan Pattern
| Project | Detail |
|---|---|
| Pattern type | Cropped short-sleeved button cardigan in open puff-lace with V-neck, scalloped neckline, hem and sleeve edging. |
| Skill level | Advanced intermediate (see skill level). |
| Crochet terms | US crochet terminology (see how to read crochet patterns) |
| Finished size | Single adult women’s size Small / Medium, 36–38 in / 91.5–96.5 cm bust, 16.25 in / 41 cm long. |
| Yarn and hooks | 360–430 g DK cotton or cotton-blend yarn, 4 mm hook for the body, 3.5 mm hook for bands and edging. |
| Construction | Back, left front and right front worked flat from the hem up, shoulders and sides seamed, sleeves worked directly into the armholes, bands and scalloped borders added last. |
This pattern includes written row-by-row stitch counts plus a crochet diagram and tutorial charts. Block every piece before seaming so the puff-lace stays open and the scalloped edges lie flat.
1. Skill Level – Advanced Intermediate Crochet Cardigan
Advanced intermediate.
This pattern uses open puff-lace fabric, separate front and back panels, V-neck shaping, short sleeves, button band, buttonhole band, scalloped neckline, scalloped hem, scalloped sleeve edging, and full garment assembly.
2. Finished Size and Gauge
Single adult women’s size: Small / Medium.
| Area | Finished Measurement |
|---|---|
| Bust circumference | 36–38 in / 91.5–96.5 cm |
| Back width | 18.25 in / 46.5 cm |
| Each front width before band | 9.25 in / 23.5 cm |
| Body length from shoulder | 16.25 in / 41 cm |
| Length from hem to underarm | 10.5 in / 26.5 cm |
| Armhole depth | 7 in / 18 cm |
| Shoulder width each side | 4.25 in / 11 cm |
| Back neck width | 6.25 in / 16 cm |
| Front V-neck depth | 7.25 in / 18.5 cm |
| Sleeve length from armhole | 5.75 in / 14.5 cm |
| Sleeve opening circumference | 13.75 in / 35 cm |
| Button band width | 0.75 in / 2 cm |
| Buttons | 5 |
Gauge after blocking:
| Gauge Area | Measurement |
|---|---|
| Open puff-lace fabric | 16 pattern positions = 4 in / 10 cm |
| Open puff-lace rows | 11 rows = 4 in / 10 cm |
| Single crochet edging | 18 sc = 4 in / 10 cm |
Gauge tip: lace stretches a lot when blocked, so swatch the open puff-lace and measure after blocking. Enter your swatch into our free Gauge Calculator to see how many pattern positions and rows you need if your gauge is off.
3. Materials for the Open Lace Crochet Cardigan
| Material | Amount |
|---|---|
| DK cotton or cotton-blend yarn, natural cream | 360–430 g |
| Crochet hook for body | 4 mm |
| Crochet hook for bands and edging | 3.5 mm |
| Wooden or coconut buttons, 14–16 mm | 5 |
| Stitch markers | 18 |
| Yarn needle | 1 |
| Sewing needle and matching thread | Required |
| Blocking pins | Required |
| Measuring tape | Required |
Recommended yarn: firm cotton, cotton-bamboo, or cotton-linen blend. The fabric needs enough structure to keep the scalloped edges visible.
Yarn and hook tip: use our Yarn Estimator to check how much yarn you need if you adjust the size, and the Hook Size Converter to match the 4 mm and 3.5 mm hooks to your local sizing. Not sure which cotton to buy? See our guide to the best yarn for crochet projects.
4. Stitch Abbreviations and Stitch Definitions
US crochet terms.
| Abbreviation | Meaning |
|---|---|
| ch | chain |
| sl st | slip stitch |
| sc | single crochet |
| hdc | half double crochet |
| dc | double crochet |
| puff | puff stitch |
| sc2tog | single crochet 2 together |
| BLO | back loop only |
| st / sts | stitch / stitches |
| sp | space |
| rnd | round |
| RS | right side |
| WS | wrong side |
| sk | skip |
| FO | fasten off |
Stuck on a line? Paste any row into our Pattern Decoder, search puff, sc2tog or BLO in the Abbreviation Lookup, or use the US / UK Detector to confirm your terms match this US-term pattern.
Stitch Definitions
Single Crochet:
Insert hook into indicated stitch or space, yarn over, pull up loop, yarn over, pull through both loops.
Half Double Crochet:
Yarn over, insert hook into indicated stitch or space, yarn over, pull up loop, yarn over, pull through all 3 loops.
Double Crochet:
Yarn over, insert hook into indicated stitch or space, yarn over, pull up loop, yarn over and pull through 2 loops, yarn over and pull through final 2 loops.
Puff Stitch:
Yarn over, insert hook into indicated stitch or space, yarn over and pull up loop 3 times in the same place. There will be 7 loops on hook. Yarn over and pull through all 7 loops. Ch 1 to close. The closing ch does not count as a separate stitch.
sc2tog:
Insert hook into next stitch, yarn over, pull up loop. Insert hook into following stitch, yarn over, pull up loop. Yarn over and pull through all 3 loops.
Back Loop Only Single Crochet:
Work sc into the back loop only of the indicated stitch.
Reverse Single Crochet:
Working from left to right, insert hook into previous stitch, yarn over, pull up loop, yarn over, pull through both loops.
Picot:
Ch 3, sl st into the same stitch where the ch-3 began.
Pattern Position
For this pattern, one “pattern position” means one vertical placement point in the lace row. A mesh row contains dc posts and ch-1 spaces. A puff row contains sc posts, puff posts, and ch-2 bridges. The written count after each row is the full row width in pattern positions.
Open Puff-Lace Setup Mesh Row
Worked over an odd number of stitches.
Ch 4, turn. Ch 4 counts as first dc and ch-1. Sk next st, *dc in next st, ch 1, sk next st; repeat from * across to final st, dc in final st.
Count remains the same number of pattern positions as the previous row.
Example over 73 stitches: 37 dc posts and 36 ch-1 spaces.
Open Puff-Lace Puff Row
Worked into a mesh row.
Ch 1, turn. Sc in first dc, *ch 2, puff in next dc, ch 2, sc in next dc; repeat from * across.
For 73 pattern positions: 19 sc, 18 puff stitches, and 36 ch-2 spaces.
For 37 pattern positions: 10 sc, 9 puff stitches, and 18 ch-2 spaces.
Open Puff-Lace Recovery Mesh Row
Worked into a puff row.
Ch 3, turn. Ch 3 counts as dc in first sc, *ch 1, dc in next puff, ch 1, dc in next sc; repeat from * across.
Count remains the same number of pattern positions.
Open Puff-Lace Round
Worked over an even stitch count.
Mesh Round:
Ch 4, sk next st, *dc in next st, ch 1, sk next st; repeat from * around. Sl st to 3rd ch of beginning ch-4.
Puff Round:
Ch 1, *sc in next dc, ch 2, puff in next dc, ch 2; repeat from * around. Sl st to first sc.
Recovery Mesh Round:
Ch 3, *ch 1, dc in next puff, ch 1, dc in next sc; repeat from * around. Sl st to top of beginning ch-3.
Scallop Edge
Worked over a multiple of 4 stitches.
*Sc in next st, sk next st, 5 dc in next st, sk next st; repeat from *.
One repeat creates 1 scallop over 4 base stitches.
5. Parts List
| Part | Quantity | Color |
|---|---|---|
| Back panel | 1 | Cream |
| Left front panel | 1 | Cream |
| Right front panel | 1 | Cream |
| Short sleeves | 2 | Cream |
| Right button band as worn | 1 | Cream |
| Left buttonhole band as worn | 1 | Cream |
| Front and neckline scallop border | 1 continuous edging | Cream |
| Lower hem scallop border | 1 continuous edging | Cream |
| Sleeve scallop borders | 2 | Cream |
| Buttons | 5 | Wood / coconut |
6. Construction Overview – How the Cardigan Is Made
- Crochet the back panel from lower hem upward.
- Shape the back armholes.
- Shape the back neck and shoulders.
- Crochet the left front panel from lower hem upward.
- Shape the left V-neck and armhole.
- Crochet the right front panel as a mirror image.
- Sew shoulder seams.
- Sew side seams, leaving armholes open.
- Work both short sleeves directly into the armholes.
- Work the right button band.
- Work the left buttonhole band.
- Work scalloped edging around the front opening and neckline.
- Work scalloped edging around the lower hem.
- Work scalloped edging around both sleeve openings.
- Sew buttons opposite buttonholes.
- Block the cardigan to final measurements.
7. Part-by-Part Crochet Cardigan Instructions
Tip: the puff-lace rows repeat in a simple Puff Row, Recovery Mesh Row sequence. If a line is confusing, paste it into the Pattern Decoder and keep our guide to reading crochet patterns open while you work.
Back Panel – Open Puff-Lace Crochet Cardigan
Use cream yarn and 4 mm hook.
Foundation: Ch 74. (New to starting a chain? See how to start a crochet chain.)
Row 1 RS: Sc in 2nd ch from hook and in each ch across.
Count: 73 sc.
Row 2 WS: Work Open Puff-Lace Setup Mesh Row.
Count: 73 pattern positions.
Rows 3-30: Work in established open puff-lace pattern as follows:
| Row | Row Type | Count |
|---|---|---|
| 3 | Puff Row | 73 |
| 4 | Recovery Mesh Row | 73 |
| 5 | Puff Row | 73 |
| 6 | Recovery Mesh Row | 73 |
| 7 | Puff Row | 73 |
| 8 | Recovery Mesh Row | 73 |
| 9 | Puff Row | 73 |
| 10 | Recovery Mesh Row | 73 |
| 11 | Puff Row | 73 |
| 12 | Recovery Mesh Row | 73 |
| 13 | Puff Row | 73 |
| 14 | Recovery Mesh Row | 73 |
| 15 | Puff Row | 73 |
| 16 | Recovery Mesh Row | 73 |
| 17 | Puff Row | 73 |
| 18 | Recovery Mesh Row | 73 |
| 19 | Puff Row | 73 |
| 20 | Recovery Mesh Row | 73 |
| 21 | Puff Row | 73 |
| 22 | Recovery Mesh Row | 73 |
| 23 | Puff Row | 73 |
| 24 | Recovery Mesh Row | 73 |
| 25 | Puff Row | 73 |
| 26 | Recovery Mesh Row | 73 |
| 27 | Puff Row | 73 |
| 28 | Recovery Mesh Row | 73 |
| 29 | Puff Row | 73 |
| 30 | Recovery Mesh Row | 73 |
Back Armhole Shaping
Row 31 RS: Sl st across first 5 pattern positions, work Puff Row across to final 5 pattern positions, leave final 5 pattern positions unworked.
Count: 63 pattern positions.
Row 32 WS: Work Recovery Mesh Row even.
Count: 63 pattern positions.
Row 33 RS: Sl st across first 3 pattern positions, work Puff Row across to final 3 pattern positions, leave final 3 pattern positions unworked.
Count: 57 pattern positions.
Rows 34-43: Work even in established lace pattern.
| Row | Row Type | Count |
|---|---|---|
| 34 | Recovery Mesh Row | 57 |
| 35 | Puff Row | 57 |
| 36 | Recovery Mesh Row | 57 |
| 37 | Puff Row | 57 |
| 38 | Recovery Mesh Row | 57 |
| 39 | Puff Row | 57 |
| 40 | Recovery Mesh Row | 57 |
| 41 | Puff Row | 57 |
| 42 | Recovery Mesh Row | 57 |
| 43 | Puff Row | 57 |
Back Neck and Shoulder Split
Row 44 WS: Work Recovery Mesh Row across first 17 pattern positions for right back shoulder. Leave center 23 pattern positions unworked for back neck. Join a second strand of yarn after the 23 unworked neck positions and work Recovery Mesh Row across final 17 pattern positions for left back shoulder.
Counts: 17 right shoulder / 23 back neck / 17 left shoulder.
Rows 45-47: Work each shoulder separately.
| Row | Row Type | Count Per Shoulder |
|---|---|---|
| 45 | Puff Row | 17 |
| 46 | Recovery Mesh Row | 17 |
| 47 | Puff Row | 17 |
FO both shoulders.
Back panel measurement before edging: 18.25 in wide x 16.25 in long.
Left Front Panel as Worn
Use cream yarn and 4 mm hook.
Foundation: Ch 38.
Row 1 RS: Sc in 2nd ch from hook and in each ch across.
Count: 37 sc.
Row 2 WS: Work Open Puff-Lace Setup Mesh Row.
Count: 37 pattern positions.
Rows 3-20: Work in established open puff-lace pattern.
| Row | Row Type | Count |
|---|---|---|
| 3 | Puff Row | 37 |
| 4 | Recovery Mesh Row | 37 |
| 5 | Puff Row | 37 |
| 6 | Recovery Mesh Row | 37 |
| 7 | Puff Row | 37 |
| 8 | Recovery Mesh Row | 37 |
| 9 | Puff Row | 37 |
| 10 | Recovery Mesh Row | 37 |
| 11 | Puff Row | 37 |
| 12 | Recovery Mesh Row | 37 |
| 13 | Puff Row | 37 |
| 14 | Recovery Mesh Row | 37 |
| 15 | Puff Row | 37 |
| 16 | Recovery Mesh Row | 37 |
| 17 | Puff Row | 37 |
| 18 | Recovery Mesh Row | 37 |
| 19 | Puff Row | 37 |
| 20 | Recovery Mesh Row | 37 |
The outer edge is the armhole side.
The inner edge is the center front V-neck edge.
Left V-Neck Shaping
Row 21 RS: Work Puff Row across to final 2 pattern positions at center front edge. Leave final 2 positions unworked.
Count: 35 pattern positions.
Row 22 WS: Work Recovery Mesh Row even.
Count: 35 pattern positions.
Row 23 RS: Work Puff Row across to final 2 pattern positions at center front edge. Leave final 2 positions unworked.
Count: 33 pattern positions.
Row 24 WS: Work Recovery Mesh Row even.
Count: 33 pattern positions.
Row 25 RS: Work Puff Row across to final 2 pattern positions at center front edge. Leave final 2 positions unworked.
Count: 31 pattern positions.
Row 26 WS: Work Recovery Mesh Row even.
Count: 31 pattern positions.
Row 27 RS: Work Puff Row across to final 2 pattern positions at center front edge. Leave final 2 positions unworked.
Count: 29 pattern positions.
Row 28 WS: Work Recovery Mesh Row even.
Count: 29 pattern positions.
Row 29 RS: Work Puff Row across to final 2 pattern positions at center front edge. Leave final 2 positions unworked.
Count: 27 pattern positions.
Row 30 WS: Work Recovery Mesh Row even.
Count: 27 pattern positions.
Left Armhole and Neck Shaping
Row 31 RS: Sl st across first 5 pattern positions at armhole edge, work Puff Row across to final 1 pattern position at center front edge, leave final 1 position unworked.
Count: 21 pattern positions.
Row 32 WS: Work Recovery Mesh Row even.
Count: 21 pattern positions.
Row 33 RS: Sl st across first 3 pattern positions at armhole edge, work Puff Row across to final 1 pattern position at center front edge, leave final 1 position unworked.
Count: 17 pattern positions.
Rows 34-47: Work even in established lace pattern.
| Row | Row Type | Count |
|---|---|---|
| 34 | Recovery Mesh Row | 17 |
| 35 | Puff Row | 17 |
| 36 | Recovery Mesh Row | 17 |
| 37 | Puff Row | 17 |
| 38 | Recovery Mesh Row | 17 |
| 39 | Puff Row | 17 |
| 40 | Recovery Mesh Row | 17 |
| 41 | Puff Row | 17 |
| 42 | Recovery Mesh Row | 17 |
| 43 | Puff Row | 17 |
| 44 | Recovery Mesh Row | 17 |
| 45 | Puff Row | 17 |
| 46 | Recovery Mesh Row | 17 |
| 47 | Puff Row | 17 |
FO, leaving a 16 in / 40 cm shoulder-seaming tail.
Right Front Panel as Worn
Use cream yarn and 4 mm hook.
Foundation: Ch 38.
Row 1 RS: Sc in 2nd ch from hook and in each ch across.
Count: 37 sc.
Row 2 WS: Work Open Puff-Lace Setup Mesh Row.
Count: 37 pattern positions.
Rows 3-20: Work in established open puff-lace pattern.
| Row | Row Type | Count |
|---|---|---|
| 3 | Puff Row | 37 |
| 4 | Recovery Mesh Row | 37 |
| 5 | Puff Row | 37 |
| 6 | Recovery Mesh Row | 37 |
| 7 | Puff Row | 37 |
| 8 | Recovery Mesh Row | 37 |
| 9 | Puff Row | 37 |
| 10 | Recovery Mesh Row | 37 |
| 11 | Puff Row | 37 |
| 12 | Recovery Mesh Row | 37 |
| 13 | Puff Row | 37 |
| 14 | Recovery Mesh Row | 37 |
| 15 | Puff Row | 37 |
| 16 | Recovery Mesh Row | 37 |
| 17 | Puff Row | 37 |
| 18 | Recovery Mesh Row | 37 |
| 19 | Puff Row | 37 |
| 20 | Recovery Mesh Row | 37 |
The inner edge is the center front V-neck edge.
The outer edge is the armhole side.
Right V-Neck Shaping
Row 21 RS: Leave first 2 pattern positions at center front edge unworked. Join yarn in next pattern position and work Puff Row across remaining positions.
Count: 35 pattern positions.
Row 22 WS: Work Recovery Mesh Row even.
Count: 35 pattern positions.
Row 23 RS: Leave first 2 pattern positions at center front edge unworked. Join yarn in next pattern position and work Puff Row across remaining positions.
Count: 33 pattern positions.
Row 24 WS: Work Recovery Mesh Row even.
Count: 33 pattern positions.
Row 25 RS: Leave first 2 pattern positions at center front edge unworked. Join yarn in next pattern position and work Puff Row across remaining positions.
Count: 31 pattern positions.
Row 26 WS: Work Recovery Mesh Row even.
Count: 31 pattern positions.
Row 27 RS: Leave first 2 pattern positions at center front edge unworked. Join yarn in next pattern position and work Puff Row across remaining positions.
Count: 29 pattern positions.
Row 28 WS: Work Recovery Mesh Row even.
Count: 29 pattern positions.
Row 29 RS: Leave first 2 pattern positions at center front edge unworked. Join yarn in next pattern position and work Puff Row across remaining positions.
Count: 27 pattern positions.
Row 30 WS: Work Recovery Mesh Row even.
Count: 27 pattern positions.
Right Armhole and Neck Shaping
Row 31 RS: Leave first 1 pattern position at center front edge unworked. Join yarn in next pattern position, work Puff Row across to final 5 pattern positions at armhole edge, leave final 5 positions unworked.
Count: 21 pattern positions.
Row 32 WS: Work Recovery Mesh Row even.
Count: 21 pattern positions.
Row 33 RS: Leave first 1 pattern position at center front edge unworked. Join yarn in next pattern position, work Puff Row across to final 3 pattern positions at armhole edge, leave final 3 positions unworked.
Count: 17 pattern positions.
Rows 34-47: Work even in established lace pattern.
| Row | Row Type | Count |
|---|---|---|
| 34 | Recovery Mesh Row | 17 |
| 35 | Puff Row | 17 |
| 36 | Recovery Mesh Row | 17 |
| 37 | Puff Row | 17 |
| 38 | Recovery Mesh Row | 17 |
| 39 | Puff Row | 17 |
| 40 | Recovery Mesh Row | 17 |
| 41 | Puff Row | 17 |
| 42 | Recovery Mesh Row | 17 |
| 43 | Puff Row | 17 |
| 44 | Recovery Mesh Row | 17 |
| 45 | Puff Row | 17 |
| 46 | Recovery Mesh Row | 17 |
| 47 | Puff Row | 17 |
FO, leaving a 16 in / 40 cm shoulder-seaming tail.
Shoulder Seams
Use cream yarn and yarn needle.
- Place front and back panels RS together.
- Sew left front shoulder 17 pattern positions to left back shoulder 17 pattern positions.
- Sew right front shoulder 17 pattern positions to right back shoulder 17 pattern positions.
- Leave the center 23-pattern-position back neck opening unsewn.
- Weave all seam ends into WS.
Shoulder seam count per side: 17 pattern positions.
Side Seams
Use cream yarn and yarn needle.
Left side seam:
- Sew from Row 1 through Row 30.
- Leave Rows 31-47 open for armhole.
Right side seam:
- Sew from Row 1 through Row 30.
- Leave Rows 31-47 open for armhole.
Each armhole opening has:
| Area | Count |
|---|---|
| Front armhole row-edge sections | 17 |
| Back armhole row-edge sections | 17 |
| Total row-edge sections | 34 |
Left Sleeve – Short Puff-Lace Sleeve with Scalloped Edge
Sleeve is worked directly into the armhole.
Use cream yarn and 4 mm hook.
Join yarn at underarm seam.
Round 1 Pickup Round: Ch 1. Work 2 sc into each of the 34 armhole row-edge sections. Sl st to first sc.
Count: 68 sc.
Round 2 Mesh Round: Ch 4, sk next st, *dc in next st, ch 1, sk next st; repeat from * around. Sl st to 3rd ch of beginning ch-4.
Count: 68 pattern positions.
Round 3 Puff Round: Ch 1, *sc in next dc, ch 2, puff in next dc, ch 2; repeat from * around. Sl st to first sc.
Count: 17 sc, 17 puffs, 34 ch-2 spaces.
Round 4 Recovery Mesh Round: Ch 3, *ch 1, dc in next puff, ch 1, dc in next sc; repeat from * around. Sl st to top of beginning ch-3.
Count: 68 pattern positions.
Round 5 Puff Round: Repeat Round 3.
Count: 17 sc, 17 puffs, 34 ch-2 spaces.
Round 6 Recovery Mesh Round: Repeat Round 4.
Count: 68 pattern positions.
Round 7 Puff Round: Repeat Round 3.
Count: 17 sc, 17 puffs, 34 ch-2 spaces.
Round 8 Recovery Mesh Round: Repeat Round 4.
Count: 68 pattern positions.
Round 9 Stabilizing Round: Ch 1. Sc in each dc and each ch-1 sp around. Sl st to first sc.
Count: 68 sc.
Round 10 Scallop Edge: Ch 1. *Sc in next st, sk next st, 5 dc in next st, sk next st; repeat from * 17 times. Sl st to first sc.
Count: 17 scallops.
FO.
Right Sleeve
Work same as left sleeve.
Counts:
| Round | Count |
|---|---|
| 1 | 68 sc |
| 2 | 68 pattern positions |
| 3 | 17 sc + 17 puffs + 34 ch-2 spaces |
| 4 | 68 pattern positions |
| 5 | 17 sc + 17 puffs + 34 ch-2 spaces |
| 6 | 68 pattern positions |
| 7 | 17 sc + 17 puffs + 34 ch-2 spaces |
| 8 | 68 pattern positions |
| 9 | 68 sc |
| 10 | 17 scallops |
FO.
Right Button Band as Worn
Use cream yarn and 3.5 mm hook.
With RS facing, join yarn at lower right front opening.
Row 1 Pickup Row: Ch 1. Work 84 sc evenly from lower hem up the right front opening and along the right V-neck edge to the shoulder.
Count: 84 sc.
Pickup distribution:
| Section | Count |
|---|---|
| Lower straight front edge | 40 sc |
| V-neck slope | 39 sc |
| Upper shoulder edge connection | 5 sc |
| Total | 84 sc |
Row 2: Ch 1, turn. Sc in each st across.
Count: 84 sc.
Row 3: Ch 1, turn. Sc in each st across.
Count: 84 sc.
Row 4: Ch 1, turn. Sc BLO in each st across.
Count: 84 sc.
Row 5: Ch 1, turn. Sc in each st across.
Count: 84 sc.
FO.
Button placement:
| Button | Band Position |
|---|---|
| Button 1 | Between sts 11 and 12 |
| Button 2 | Between sts 27 and 28 |
| Button 3 | Between sts 43 and 44 |
| Button 4 | Between sts 59 and 60 |
| Button 5 | Between sts 75 and 76 |
Do not sew buttons until the left buttonhole band is complete.
Left Buttonhole Band as Worn
Use cream yarn and 3.5 mm hook.
With RS facing, join yarn at upper left shoulder/V-neck edge and work downward to lower hem.
Row 1 Pickup Row: Ch 1. Work 84 sc evenly down the left V-neck edge and left front opening to the lower hem.
Count: 84 sc.
Pickup distribution:
| Section | Count |
|---|---|
| Upper shoulder edge connection | 5 sc |
| V-neck slope | 39 sc |
| Lower straight front edge | 40 sc |
| Total | 84 sc |
Row 2: Ch 1, turn. Sc in each st across.
Count: 84 sc.
Row 3 Buttonhole Row: Ch 1, turn. Sc in first 10 sts, ch 2, sk next 2 sts, sc in next 14 sts, ch 2, sk next 2 sts, sc in next 14 sts, ch 2, sk next 2 sts, sc in next 14 sts, ch 2, sk next 2 sts, sc in next 14 sts, ch 2, sk next 2 sts, sc in final 8 sts.
Count: 84 sts.
Buttonhole positions:
| Buttonhole | Skipped Stitches |
|---|---|
| Buttonhole 1 | Sts 11-12 |
| Buttonhole 2 | Sts 27-28 |
| Buttonhole 3 | Sts 43-44 |
| Buttonhole 4 | Sts 59-60 |
| Buttonhole 5 | Sts 75-76 |
Row 4: Ch 1, turn. Sc in each sc and work 2 sc into each ch-2 buttonhole sp across.
Count: 84 sc.
Row 5: Ch 1, turn. Sc in each st across.
Count: 84 sc.
FO.
Front and Neckline Scallop Border
Use cream yarn and 3.5 mm hook.
Work after both button bands are complete.
With RS facing, join yarn at lower right front corner.
Round 1: Ch 1. Work 208 sc evenly around the full front and neckline edge in this order:
| Area | Count |
|---|---|
| Right front band outer edge | 84 sc |
| Right front neck transition | 10 sc |
| Back neck opening | 20 sc |
| Left front neck transition | 10 sc |
| Left front band outer edge | 84 sc |
| Total | 208 sc |
Sl st to first sc.
Round 2 Scallop Round: Ch 1. *Sc in next st, sk next st, 5 dc in next st, sk next st; repeat from * 52 times. Sl st to first sc.
Count: 52 scallops.
FO.
Lower Hem Scallop Border
Use cream yarn and 3.5 mm hook.
With RS facing, join yarn at right side seam along lower hem.
Round 1: Ch 1. Work 160 sc evenly around the lower edge, including both front lower band edges. Sl st to first sc.
Count: 160 sc.
Distribution:
| Area | Count |
|---|---|
| Back lower edge | 72 sc |
| Right front lower edge including band | 44 sc |
| Left front lower edge including band | 44 sc |
| Total | 160 sc |
Round 2 Scallop Round: Ch 1. *Sc in next st, sk next st, 5 dc in next st, sk next st; repeat from * 40 times. Sl st to first sc.
Count: 40 scallops.
FO.
Buttons
Use 5 wooden or coconut buttons.
Sew buttons to the right button band as worn.
Button positions:
- Button 1: between sts 11 and 12.
- Button 2: between sts 27 and 28.
- Button 3: between sts 43 and 44.
- Button 4: between sts 59 and 60.
- Button 5: between sts 75 and 76.
Sew each button with at least 8 secure passes of thread.
8. Stitch Counts for the Open Lace Cardigan
Back Panel
| Section | Count |
|---|---|
| Foundation chain | 74 ch |
| Row 1 | 73 sc |
| Row 2 | 73 pattern positions |
| Rows 3-30 | 73 pattern positions each row |
| Row 31 | 63 pattern positions |
| Row 32 | 63 pattern positions |
| Row 33 | 57 pattern positions |
| Rows 34-43 | 57 pattern positions each row |
| Row 44 split | 17/23/17 |
| Rows 45-47 shoulders | 17 pattern positions each shoulder |
Each Front Panel
| Row / Section | Count |
|---|---|
| Foundation chain | 38 ch |
| Row 1 | 37 sc |
| Row 2 | 37 pattern positions |
| Rows 3-20 | 37 pattern positions each row |
| Row 21 | 35 pattern positions |
| Row 22 | 35 pattern positions |
| Row 23 | 33 pattern positions |
| Row 24 | 33 pattern positions |
| Row 25 | 31 pattern positions |
| Row 26 | 31 pattern positions |
| Row 27 | 29 pattern positions |
| Row 28 | 29 pattern positions |
| Row 29 | 27 pattern positions |
| Row 30 | 27 pattern positions |
| Row 31 | 21 pattern positions |
| Row 32 | 21 pattern positions |
| Row 33 | 17 pattern positions |
| Rows 34-47 | 17 pattern positions each row |
Sleeves
| Section | Count Per Sleeve |
|---|---|
| Armhole row-edge sections | 34 |
| Pickup round | 68 sc |
| Mesh rounds | 68 pattern positions |
| Puff rounds | 17 sc + 17 puffs + 34 ch-2 spaces |
| Stabilizing round | 68 sc |
| Scallop edge | 17 scallops |
Bands and Edging
| Area | Count |
|---|---|
| Right button band | 84 sc per row |
| Left buttonhole band | 84 sc per row |
| Buttonholes | 5 |
| Buttons | 5 |
| Front/neckline border Round 1 | 208 sc |
| Front/neckline scallops | 52 |
| Lower hem Round 1 | 160 sc |
| Lower hem scallops | 40 |
9. Placement Order and Visual Layout
Bottom layer pieces:
- Back panel
- Left front panel
- Right front panel
- Left sleeve
- Right sleeve
Middle layer pieces:
- Shoulder seams
- Side seams
- Sleeve pickup rounds
- Right button band
- Left buttonhole band
Top layer pieces:
- Front and neckline scallop border
- Lower hem scallop border
- Sleeve scallop borders
- Buttons
No leaves are used.
No stems are used.
No appliqué is used.
No doily base is used.
No diagonal layout is used.
Visual Placement
- Open puff-lace fabric covers the full body and sleeves.
- Front panels form a deep V-neck opening.
- Button band sits on the wearer’s right front edge.
- Buttonhole band sits on the wearer’s left front edge.
- Scalloped border frames both front edges and the neckline.
- Scalloped lower border runs around the cropped hem.
- Scalloped sleeve edging finishes each short sleeve.
- Five buttons are centered vertically on the front opening.
10. Assembly and Blocking Instructions
1. Block panels before seaming
- Back panel: 18.25 in wide x 16.25 in long.
- Each front panel: 9.25 in wide before button band.
- Keep lace rows horizontal.
- Do not stretch puff rows flat.
2. Sew shoulder seams
- Join 17 front shoulder positions to 17 back shoulder positions on each side.
- Keep the 23-position back neck opening centered.
3. Sew side seams
- Sew Rows 1-30 on each side.
- Leave Rows 31-47 open for armholes.
- Match row edges evenly.
4. Work sleeves
- Pick up 68 sc around each armhole.
- Work 7 lace rounds plus stabilizing round.
- Finish each sleeve with 17 scallops.
5. Work button bands
- Work right button band with 84 sc per row.
- Work left buttonhole band with 84 sc per row.
- Confirm 5 buttonholes are evenly spaced.
6. Work front and neckline scallop border
- Pick up 208 sc around the front and neckline.
- Work 52 scallops.
- Keep scallops facing outward and lying flat.
7. Work lower hem scallop border
- Pick up 160 sc around the lower edge.
- Work 40 scallops.
- Center scallops at front edges and side seams.
8. Sew buttons
- Sew 5 buttons on the wearer’s right band.
- Align each button directly opposite its buttonhole.
9. Final blocking
- Button cardigan closed.
- Pin bust width to finished measurement.
- Pin V-neck edges evenly.
- Pin lower scallops downward.
- Pin sleeve scallops outward.
- Steam lightly or wet block according to yarn label.
- Let dry completely before wearing.
11. Final Checklist
- Back panel starts with ch 74.
- Back Row 1 has 73 sc.
- Back Rows 3-30 have 73 pattern positions.
- Back armhole shaping reduces to 63, then 57 pattern positions.
- Back neck split is 17 / 23 / 17.
- Each front panel starts with ch 38.
- Each front Row 1 has 37 sc.
- Front V-neck shaping begins at Row 21.
- Each front shoulder finishes with 17 pattern positions.
- Shoulder seams join 17 positions to 17 positions.
- Side seams stop after Row 30.
- Rows 31-47 remain open for armholes.
- Each sleeve pickup round has 68 sc.
- Each sleeve has 17 final scallops.
- Right button band has 84 sc per row.
- Left buttonhole band has 84 sc per row.
- Five buttonholes are made.
- Five buttons are sewn.
- Front and neckline border has 208 sc.
- Front and neckline edge has 52 scallops.
- Lower hem border has 160 sc.
- Lower hem edge has 40 scallops.
- Puff-lace texture is visible across body and sleeves.
- Scalloped edging frames neckline, front opening, hem, and sleeves.
- Finished bust circumference is 36-38 in / 91.5-96.5 cm.
- Finished body length is 16.25 in / 41 cm.
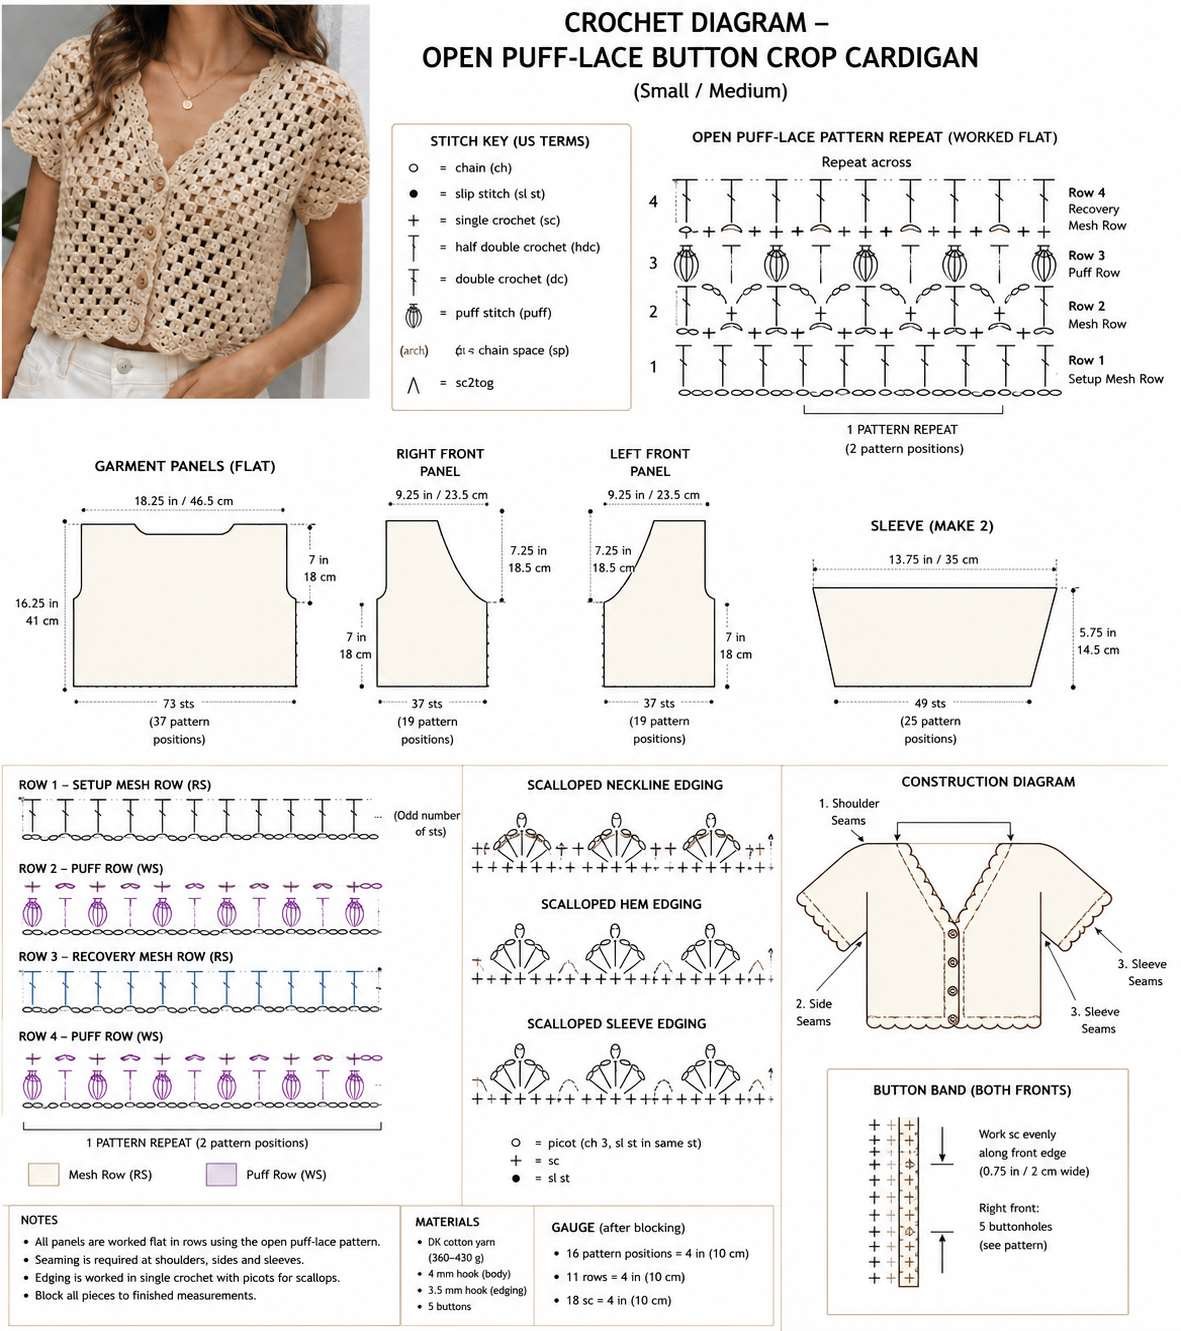
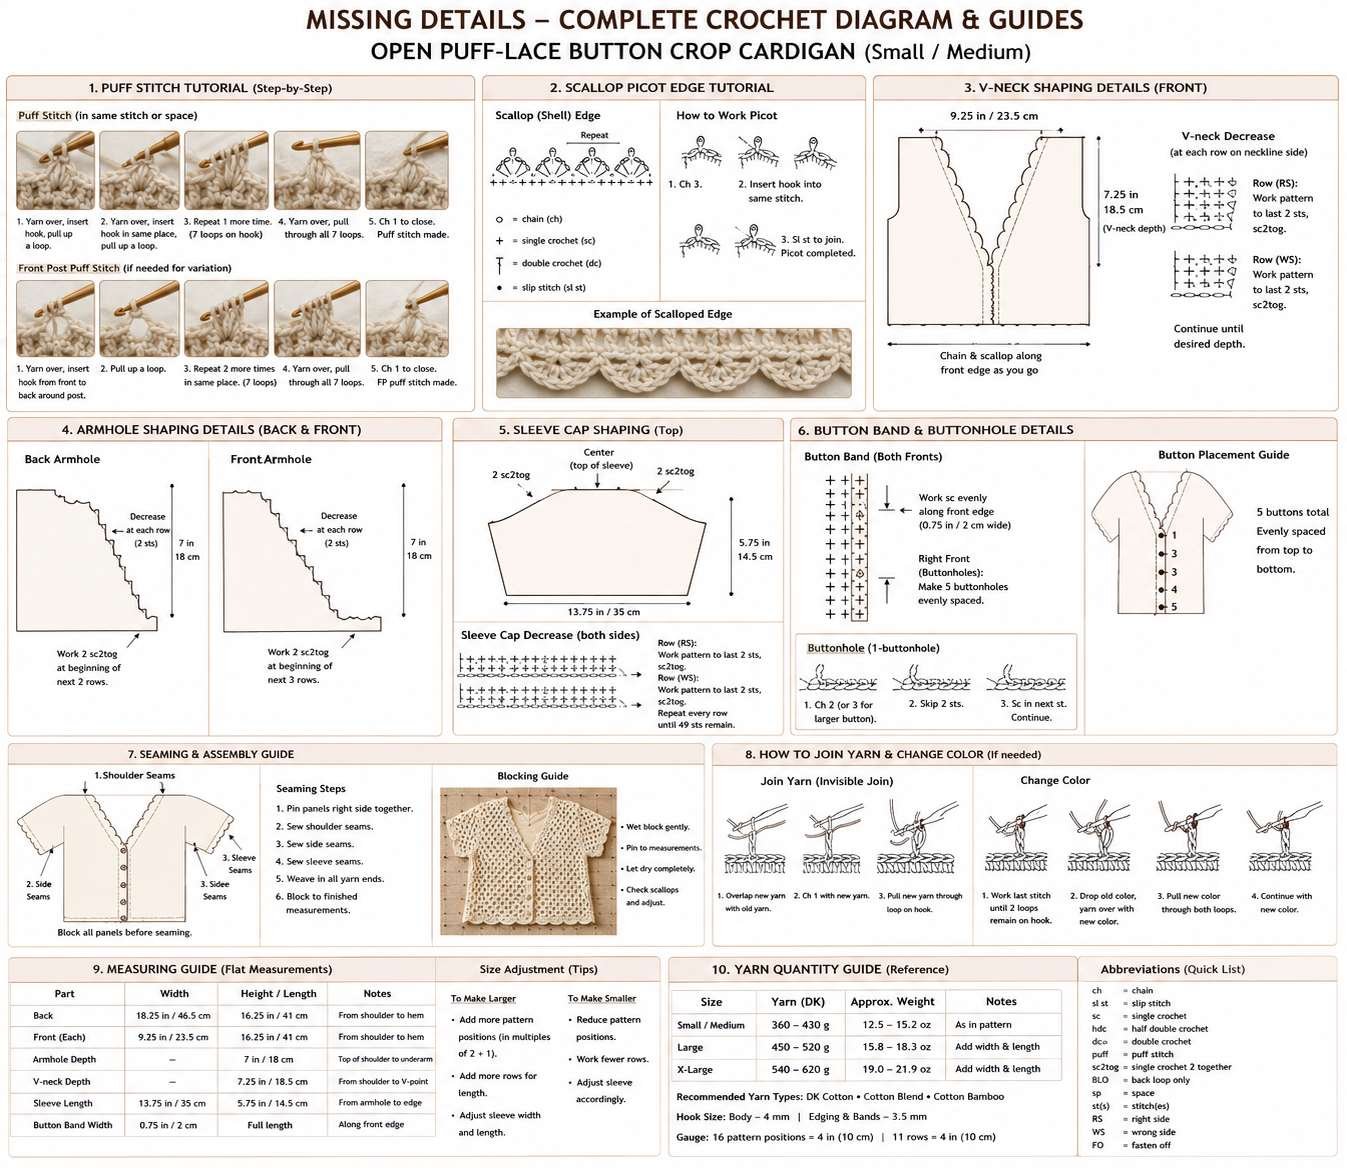
12. Crochet Diagram, Tutorials and Visual Guides
Use these charts alongside the written pattern. The diagram shows the stitch key, the open puff-lace repeat, the garment panel shapes, the scalloped neckline, hem and sleeve edging, and the construction order. The tutorial charts cover the puff stitch, scallop and picot edge, V-neck and armhole shaping, button band and buttonholes, seaming, joining yarn and blocking.
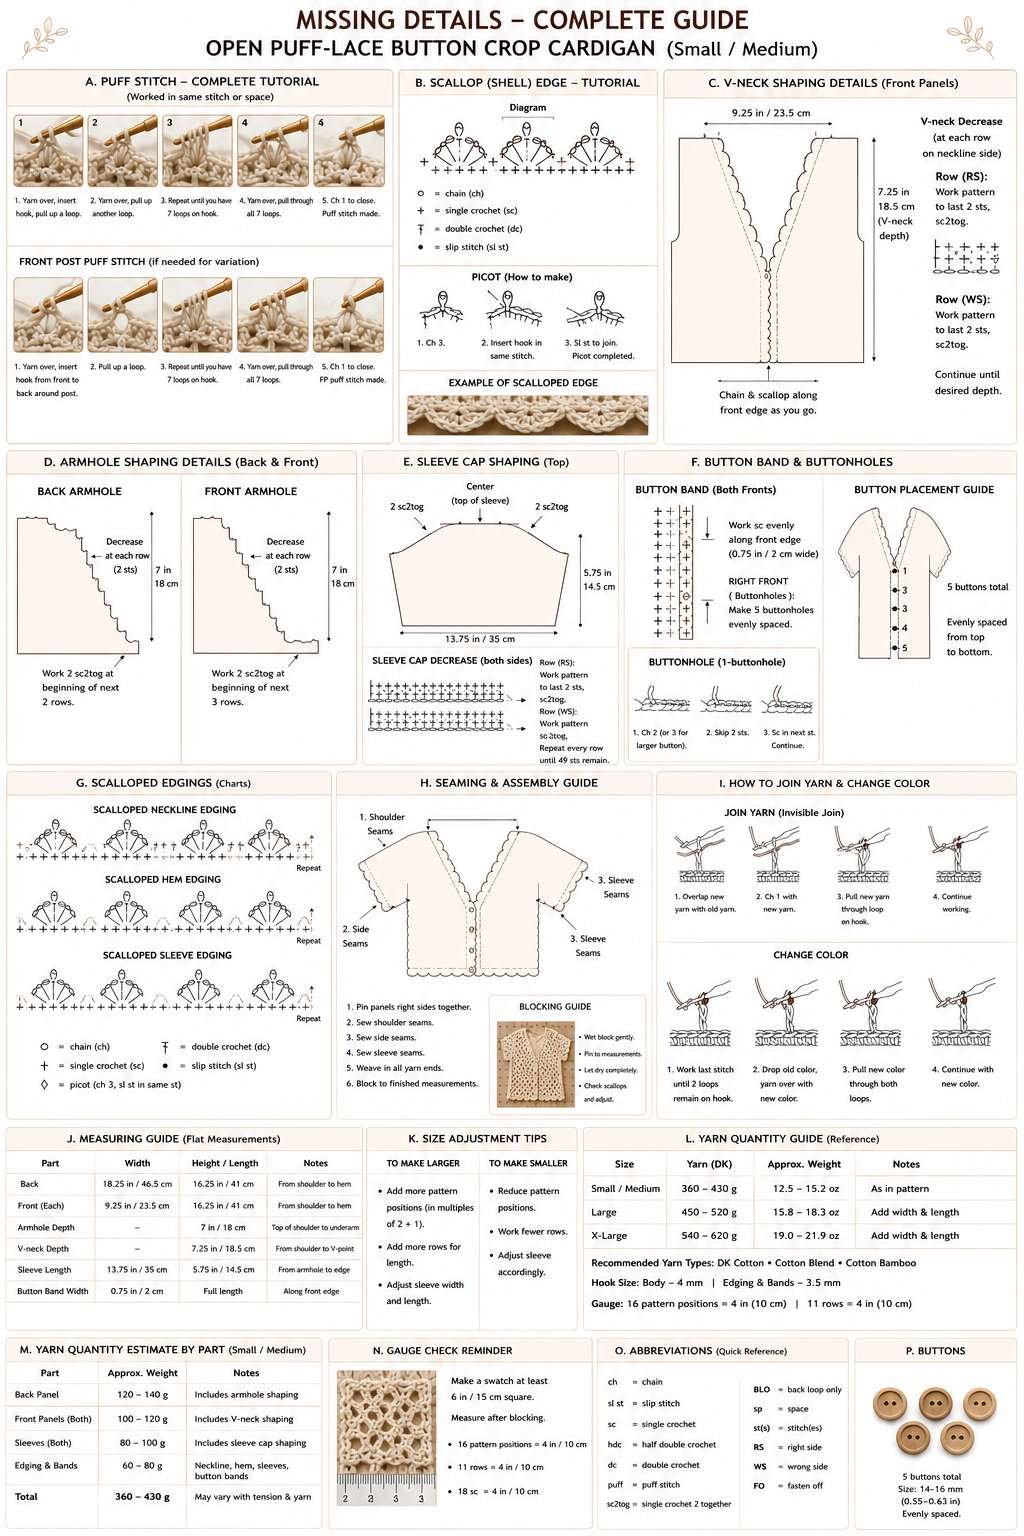
Planning your project? Use our Project Planner to track yarn, hooks and deadline for this cardigan, and see our yarn quantity guide for more help estimating yardage.
Open Lace Crochet Cardigan Pattern FAQ
What yarn and hook do I need for this open lace crochet cardigan?
You need about 360–430 g of DK cotton or cotton-blend yarn in natural cream, a 4 mm hook for the body and a 3.5 mm hook for the bands and edging. Firm cotton, cotton-bamboo or cotton-linen blends keep the scalloped edges crisp. Use the Yarn Estimator and Hook Size Converter to adapt the materials, and read our best yarn for crochet projects guide.
Is this crochet cardigan pattern beginner friendly?
This pattern is rated advanced intermediate. It uses puff stitches, V-neck and armhole shaping, buttonholes, seaming and scalloped edging, so it suits crocheters who are already comfortable with lace and garment assembly.
What size does this open puff-lace cardigan make?
The pattern makes one adult women’s size, Small / Medium, with a finished bust of 36–38 in / 91.5–96.5 cm and a cropped body length of 16.25 in / 41 cm.
How do I make the cardigan larger or smaller?
To make it larger, add pattern positions in multiples of 2 + 1, add more rows for length and adjust the sleeve width. To make it smaller, reduce the pattern positions, work fewer rows and adjust the sleeve. A Large needs about 450–520 g and an X-Large about 540–620 g of DK yarn. Always swatch first with our Gauge Calculator.
How many buttons does the cardigan need?
Five wooden or coconut buttons, 14–16 mm, evenly spaced on the right button band opposite the five buttonholes on the left band.
More Free Crochet Patterns You Will Love
Loved making this cardigan? Try these next, or browse every design on our free crochet patterns page and the free crochet cardigan and top patterns collection.
- Crochet Granny Square Top & Skirt Set – Free Pattern
- Crochet Striped Maxi Dress Pattern (Free) – Fitted Bodycon Dress With Slit
- Mesh Bucket Hat Crochet Pattern (Free) – Brown Openwork Summer Hat
- Free Crochet Vest Pattern
- Granny Square Tote Bag Crochet Pattern
Want to learn the techniques first? Visit our crochet tutorials for step-by-step lessons, and try the free crochet calculators and tools for gauge, yarn, hooks and pricing.
Made your own open lace cardigan? We would love to see it, so get in touch and share your finished make.
Thank you! This original crochet pattern is intended for personal use and handmade small-batch finished items. Please do not copy, redistribute or resell the pattern itself.