
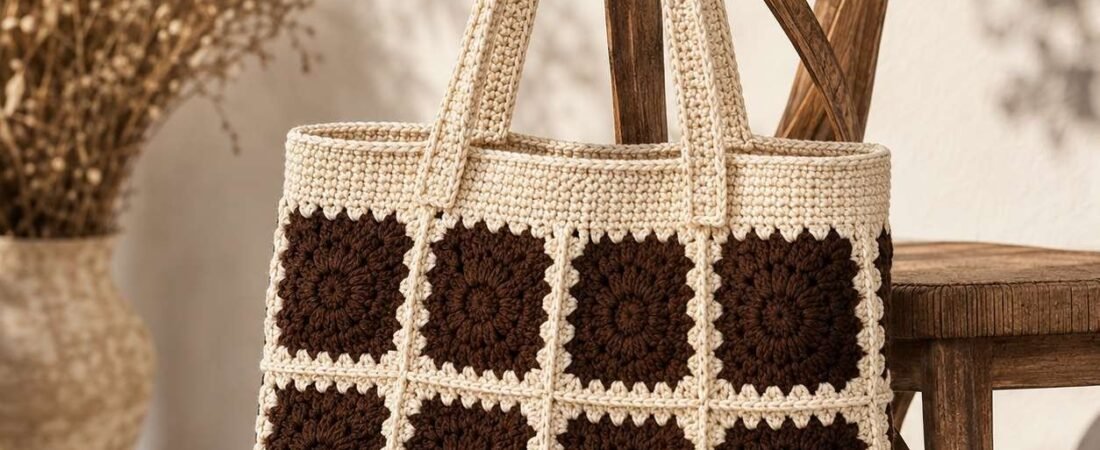
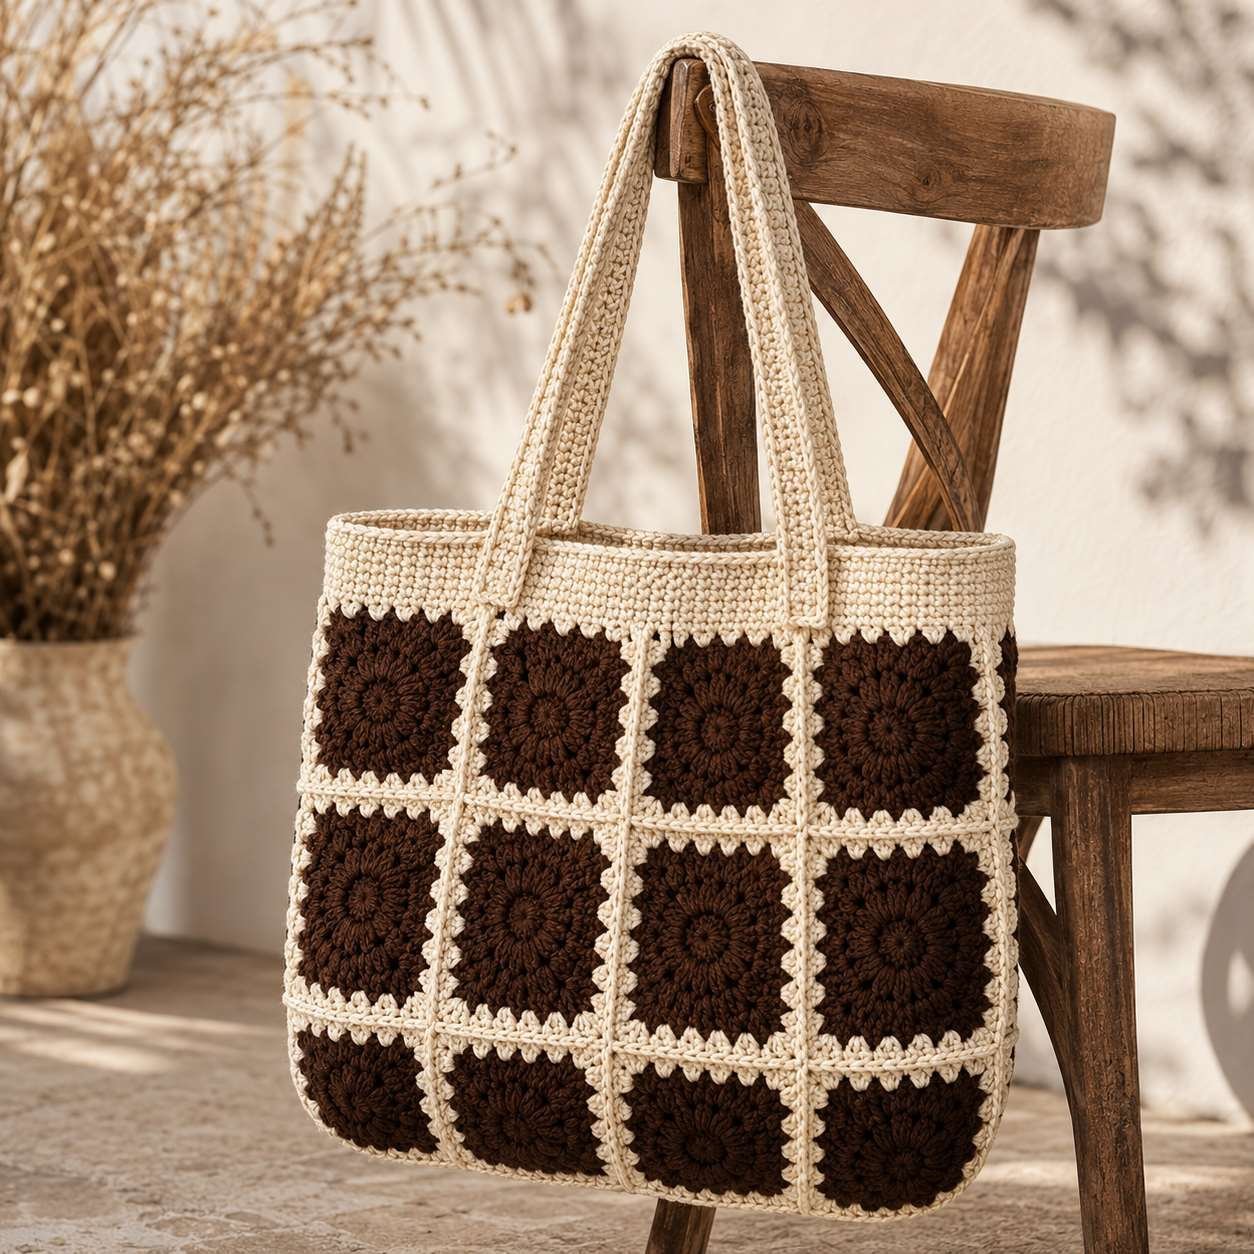
This crochet granny square tote bag is made from 19 sunburst granny squares in dark chocolate brown, finished with warm cream borders, raised seam ridges, a solid top band and two thick thermal-stitch shoulder straps. It is a roomy, structured everyday tote and a great next step once you have tried our Two Tone Market Tote or the Boho Sling Bag.
New to joining squares? Read our guide on how to attach granny squares before you start, and browse more free bag ideas in our crochet bag patterns collection.
Free Crochet Tools for This Pattern
Use our free calculators to check your gauge, estimate yarn, convert hook sizes and decode any abbreviation in this tote bag pattern.
1. Skill Level
Intermediate.
This pattern uses joined granny square construction, sunburst-style square centers, contrast-color borders, raised seam ridges, rectangular tote shaping, structured top band, and reinforced shoulder straps.
2. Finished Size
| Area | Measurement |
|---|---|
| Bag width | 12 in / 30.5 cm |
| Bag height without straps | 11.25 in / 28.5 cm |
| Bag depth | 4 in / 10 cm |
| Each granny square | 4 in x 4 in / 10 cm x 10 cm |
| Front panel layout | 3 squares wide x 2 squares high |
| Back panel layout | 3 squares wide x 2 squares high |
| Side panel layout | 1 square wide x 2 squares high |
| Bottom panel layout | 3 squares wide x 1 square deep |
| Top band height | 2.25 in / 5.75 cm |
| Strap width | 1.25 in / 3.2 cm |
| Strap length | 28 in / 71 cm |
| Strap drop | 12 in / 30.5 cm |
Gauge after blocking:
| Gauge Area | Measurement |
|---|---|
| Granny square | 4 in x 4 in / 10 cm x 10 cm |
| Single crochet | 16 sts = 4 in / 10 cm |
| Single crochet rows | 16 rows = 4 in / 10 cm |
Not matching gauge? Enter your swatch into our free gauge calculator to see exactly how your finished bag size will change.
3. Materials
| Material | Amount |
|---|---|
| Worsted weight yarn, dark chocolate brown | 260–320 g |
| Worsted weight yarn, warm cream | 180–240 g |
| Crochet hook for squares | 4.5 mm |
| Crochet hook for joins and straps | 4 mm |
| Stitch markers | 12 |
| Yarn needle | 1 |
| Blocking pins | Required |
| Measuring tape | Required |
| Optional fabric lining | 13 in x 24 in / 33 cm x 61 cm |
Choosing a worsted yarn for a bag? See our best yarn for crochet projects guide — cotton or a cotton blend keeps a tote firm and durable. If you hold your hook differently for long joining rows, our how to hold a crochet hook guide can help reduce hand strain.
4. Stitch Abbreviations
US crochet terms.
| Abbreviation | Meaning |
|---|---|
| ch | chain |
| sl st | slip stitch |
| sc | single crochet |
| hdc | half double crochet |
| dc | double crochet |
| tr | treble crochet |
| puff | puff stitch |
| cl | cluster |
| BLO | back loop only |
| st / sts | stitch / stitches |
| sp | space |
| rnd | round |
| RS | right side |
| WS | wrong side |
| rep | repeat |
| FO | fasten off |
Need a refresher on the basics? Practise with our 6 basic crochet stitches tutorial, or learn how to read crochet patterns step by step. Working from UK terms? Use the US/UK detector in our free tools.
Stitch Definitions
Single Crochet:
Insert hook into indicated stitch, yarn over, pull up loop, yarn over, pull through both loops.
Double Crochet:
Yarn over, insert hook into indicated stitch or space, yarn over, pull up loop, yarn over and pull through 2 loops, yarn over and pull through final 2 loops.
Puff Stitch:
Yarn over, insert hook into indicated stitch or space, yarn over and pull up loop 4 times in the same stitch or space. Yarn over and pull through all loops on hook. Ch 1 to close puff.
Count: 1 puff stitch.
3-dc Cluster:
Yarn over, insert hook into indicated space, yarn over, pull up loop, yarn over, pull through 2 loops. Repeat 2 more times in same space. Yarn over and pull through all 4 loops on hook.
Count: 1 cluster.
Back Loop Only Single Crochet:
Work sc into the back loop only of the indicated stitch.
Raised Seam Surface Crochet:
Hold cream yarn behind the joined seam. Insert hook from front to back and back to front through the seam line, pull up a loop, sl st loosely along the seam. Surface stitches must sit raised and must not tighten the fabric.
Thermal Single Crochet Strap:
Row 1 is standard sc. From Row 2 onward, insert hook through the back loop of the current row and the unworked loop of the row directly below, then complete sc. This creates a thick strap.
5. Parts List
| Part | Quantity | Color |
|---|---|---|
| Brown sunburst granny squares | 19 | Brown with cream border |
| Front panel | 1 | 6 squares |
| Back panel | 1 | 6 squares |
| Left side panel | 1 | 2 squares |
| Right side panel | 1 | 2 squares |
| Bottom panel | 1 | 3 squares |
| Raised seam ridges | 15 seam lines | Cream |
| Top band | 1 continuous band | Cream |
| Shoulder straps | 2 | Cream |
| Optional lining | 1 | Hidden |
Total granny squares: 19.
6. Construction Overview
- Crochet 19 identical brown sunburst granny squares with cream final borders.
- Block every square to 4 in x 4 in.
- Join 6 squares into the front panel.
- Join 6 squares into the back panel.
- Join 2 squares into each side panel.
- Join 3 squares into the bottom panel.
- Join front, back, side panels, and bottom panel into a rectangular tote.
- Work raised cream surface crochet over all visible seam lines.
- Work a solid cream top band around the upper opening.
- Crochet two reinforced cream straps.
- Attach straps to the top band and inside bag wall.
- Add optional lining.
- Block and shape the finished tote.
7. Part-by-Part Instructions
Granny Square
Make 19 identical squares.
Use dark chocolate brown yarn and 4.5 mm hook.
Center Circle
Rnd 1: Make magic ring. Ch 3, work 15 dc into ring. Sl st to top of beginning ch-3.
Count: 16 dc.
Rnd 2: Ch 2. Puff in same st, ch 1, *puff in next dc, ch 1; rep from * around. Sl st to top of first puff.
Count: 16 puff sts and 16 ch-1 spaces.
Rnd 3: Sl st into first ch-1 sp. Ch 2, work 1 cluster in same ch-1 sp, ch 2, *cluster in next ch-1 sp, ch 2; rep from * around. Sl st to first cluster.
Count: 16 clusters and 16 ch-2 spaces.
Square Conversion
Rnd 4: Sl st into first ch-2 sp. Ch 3, 2 dc in same sp, ch 2, 3 dc in same sp.
3 dc in each of next 3 ch-2 spaces.
*(3 dc, ch 2, 3 dc) in next ch-2 sp, 3 dc in each of next 3 ch-2 spaces; rep from * 3 times. Sl st to top of beginning ch-3.
Count: 60 dc and 4 ch-2 corner spaces.
Side count: 15 dc per side.
Rnd 5: Ch 1. Sc in each dc around, working 1 sc, ch 2, 1 sc in each corner ch-2 sp. Sl st to first sc.
Count: 68 sc and 4 ch-2 corner spaces.
Side count: 17 sc per side.
Change to cream yarn.
Rnd 6 Cream Border: Ch 1. Sc in each sc around, working 1 sc, ch 2, 1 sc in each corner ch-2 sp. Sl st to first sc.
Count: 76 sc and 4 ch-2 corner spaces.
Side count: 19 sc per side.
FO, leaving a 10 in / 25 cm tail.
Block each square to exactly 4 in x 4 in.
Love this sunburst square? Use the same motif to make a matching throw with our granny square blanket pattern.
Front Panel
Use 6 granny squares.
Layout:
| Row | Square Positions |
|---|---|
| Top row | F1, F2, F3 |
| Bottom row | F4, F5, F6 |
Place squares with RS facing upward.
Join with cream yarn and 4 mm hook.
Horizontal Front Joins
Join F1 to F2:
With WS together and RS facing outward, hold F1 and F2 side edges together. Join cream yarn at top corner. Sl st through the back loop of F1 edge and the back loop of F2 edge across 19 side sts. Work 1 sl st through both corner ch-2 spaces at the lower corner.
Count: 20 joining sl sts.
Join F2 to F3 the same way.
Count: 20 joining sl sts.
Join F4 to F5 the same way.
Count: 20 joining sl sts.
Join F5 to F6 the same way.
Count: 20 joining sl sts.
Tip: see all 5 joining methods with photos in how to attach granny squares.
Vertical Front Join
Join top row to bottom row.
Hold lower edge of F1-F2-F3 strip against upper edge of F4-F5-F6 strip.
Join cream yarn at right outer corner. Sl st across:
- 19 sts across F1 lower edge to F4 upper edge
- 1 sl st through shared corner spaces
- 19 sts across F2 lower edge to F5 upper edge
- 1 sl st through shared corner spaces
- 19 sts across F3 lower edge to F6 upper edge
Count: 59 joining sl sts.
FO.
Front panel completed size: 12 in wide x 8 in high.
Back Panel
Use 6 granny squares.
Layout:
| Row | Square Positions |
|---|---|
| Top row | B1, B2, B3 |
| Bottom row | B4, B5, B6 |
Join exactly as front panel.
Counts:
| Join | Count |
|---|---|
| B1 to B2 | 20 sl sts |
| B2 to B3 | 20 sl sts |
| B4 to B5 | 20 sl sts |
| B5 to B6 | 20 sl sts |
| Top row to bottom row | 59 sl sts |
Back panel completed size: 12 in wide x 8 in high.
Left Side Panel
Use 2 granny squares.
Layout:
| Position | Square |
|---|---|
| Top | L1 |
| Bottom | L2 |
Join lower edge of L1 to upper edge of L2.
With WS together and RS facing outward, sl st through back loops across 19 sts and 1 corner join.
Count: 20 joining sl sts.
Left side panel completed size: 4 in wide x 8 in high.
Right Side Panel
Use 2 granny squares.
Layout:
| Position | Square |
|---|---|
| Top | R1 |
| Bottom | R2 |
Join lower edge of R1 to upper edge of R2.
Count: 20 joining sl sts.
Right side panel completed size: 4 in wide x 8 in high.
Bottom Panel
Use 3 granny squares.
Layout:
| Position | Square |
|---|---|
| Left | D1 |
| Center | D2 |
| Right | D3 |
Join D1 to D2:
Sl st through back loops across 19 sts and 1 corner join.
Count: 20 joining sl sts.
Join D2 to D3:
Sl st through back loops across 19 sts and 1 corner join.
Count: 20 joining sl sts.
Bottom panel completed size: 12 in wide x 4 in deep.
Join Bag Body
Use cream yarn and 4 mm hook.
The bag is joined with RS facing outward.
Join Front Panel to Bottom Panel
Hold the lower edge of the front panel against one long edge of the bottom panel.
Join cream yarn at the lower right corner.
Sl st through back loops across:
- Front F4 lower edge to D1 long edge: 19 sts
- Corner join: 1 sl st
- Front F5 lower edge to D2 long edge: 19 sts
- Corner join: 1 sl st
- Front F6 lower edge to D3 long edge: 19 sts
Count: 59 joining sl sts.
FO.
Join Back Panel to Bottom Panel
Join lower edge of back panel to opposite long edge of bottom panel in the same way.
Count: 59 joining sl sts.
FO.
Join Left Side Panel
Join left side panel to the left short edge of bottom panel.
Sl st through back loops across 19 sts and 1 corner join.
Count: 20 joining sl sts.
Join front left vertical edge to left side panel front edge:
Sl st through back loops across:
- 19 sts along upper front-left square edge
- 1 center side corner join
- 19 sts along lower front-left square edge
Count: 39 joining sl sts.
Join back left vertical edge to left side panel back edge:
Count: 39 joining sl sts.
FO.
Join Right Side Panel
Join right side panel to the right short edge of bottom panel.
Count: 20 joining sl sts.
Join front right vertical edge to right side panel front edge.
Count: 39 joining sl sts.
Join back right vertical edge to right side panel back edge.
Count: 39 joining sl sts.
FO.
Raised Cream Seam Ridges
Use cream yarn and 4 mm hook.
Work with RS facing.
Work raised surface crochet over every visible joining seam.
Front Seam Ridges
- Vertical ridge between F1/F4 and F2/F5: 39 surface sl sts.
- Vertical ridge between F2/F5 and F3/F6: 39 surface sl sts.
- Horizontal ridge between top and bottom front rows: 59 surface sl sts.
Back Seam Ridges
- Vertical ridge between B1/B4 and B2/B5: 39 surface sl sts.
- Vertical ridge between B2/B5 and B3/B6: 39 surface sl sts.
- Horizontal ridge between top and bottom back rows: 59 surface sl sts.
Side Seam Ridges
- Left side horizontal center ridge: 19 surface sl sts.
- Right side horizontal center ridge: 19 surface sl sts.
- Front left vertical corner ridge: 39 surface sl sts.
- Front right vertical corner ridge: 39 surface sl sts.
- Back left vertical corner ridge: 39 surface sl sts.
- Back right vertical corner ridge: 39 surface sl sts.
Bottom Edge Ridges
- Front bottom ridge: 59 surface sl sts.
- Back bottom ridge: 59 surface sl sts.
- Bottom panel center ridges between D1/D2 and D2/D3: 40 surface sl sts total.
FO after each ridge and weave ends to inside.
Top Band
Use cream yarn and 4 mm hook.
Join cream yarn at the right side seam of the top opening.
Top opening count before band:
| Section | Count |
|---|---|
| Front top edge | 57 sts |
| Right side top edge | 19 sts |
| Back top edge | 57 sts |
| Left side top edge | 19 sts |
| Total | 152 sts |
Round 1: Ch 1. Sc in each st around. Sl st to first sc.
Count: 152 sc.
Round 2: Ch 1. Sc BLO in each st around. Sl st to first sc.
Count: 152 sc.
Round 3: Ch 1. Sc in each st around. Sl st to first sc.
Count: 152 sc.
Round 4: Ch 1. Sc in each st around. Sl st to first sc.
Count: 152 sc.
Round 5: Ch 1. Sc in each st around. Sl st to first sc.
Count: 152 sc.
Round 6: Ch 1. Sc BLO in each st around. Sl st to first sc.
Count: 152 sc.
Round 7: Ch 1. Sc in each st around. Sl st to first sc.
Count: 152 sc.
Round 8 Final Edge: Ch 1. Reverse sc in each st around. Sl st to first reverse sc.
Count: 152 reverse sc.
FO and weave in ends.
Top band height: 2.25 in / 5.75 cm.
Shoulder Straps
Make 2.
Use cream yarn and 4 mm hook.
Foundation: Ch 8.
Row 1 RS: Sc in 2nd ch from hook and in each ch across.
Count: 7 sc.
Rows 2–112: Ch 1, turn. Work 1 thermal sc in each st across.
Count each row: 7 sts.
Row 113: Ch 1, turn. Sc through both layers across to seal strap edge.
Count: 7 sc.
Do not fasten off.
Strap Border
Ch 1.
- Work 113 sc evenly along first long edge.
- Work 3 sc in first corner.
- Work 7 sc across short end.
- Work 3 sc in second corner.
- Work 113 sc evenly along second long edge.
- Work 3 sc in third corner.
- Work 7 sc across opposite short end.
- Work 3 sc in final corner.
- Sl st to first sc.
Count: 252 sc.
FO, leaving a 24 in / 61 cm sewing tail.
Finished strap:
| Area | Measurement |
|---|---|
| Width | 1.25 in / 3.2 cm |
| Length | 28 in / 71 cm |
| Border count | 252 sc |
Repeat for second strap.
8. Stitch Counts
Granny Squares
| Section | Count |
|---|---|
| Squares made | 19 |
| Rnd 1 | 16 dc |
| Rnd 2 | 16 puff sts + 16 ch-1 spaces |
| Rnd 3 | 16 clusters + 16 ch-2 spaces |
| Rnd 4 | 60 dc + 4 corner ch-2 spaces |
| Rnd 5 | 68 sc + 4 corner ch-2 spaces |
| Rnd 6 | 76 sc + 4 corner ch-2 spaces |
| Final side count | 19 sc per side |
Panels
| Panel | Square Layout | Square Count |
|---|---|---|
| Front | 3 wide x 2 high | 6 |
| Back | 3 wide x 2 high | 6 |
| Left side | 1 wide x 2 high | 2 |
| Right side | 1 wide x 2 high | 2 |
| Bottom | 3 wide x 1 deep | 3 |
| Total | 19 |
Top Band
| Section | Count |
|---|---|
| Front top edge | 57 sts |
| Back top edge | 57 sts |
| Each side top edge | 19 sts |
| Total top opening | 152 sts |
| Top band Rounds 1–8 | 152 sts each round |
Straps
| Section | Count |
|---|---|
| Straps made | 2 |
| Foundation chain per strap | 8 ch |
| Strap width | 7 sts |
| Strap rows | 113 rows |
| Strap border | 252 sc |
Raised Seam Ridges
| Ridge Area | Count |
|---|---|
| Front vertical ridges | 78 surface sl sts |
| Front horizontal ridge | 59 surface sl sts |
| Back vertical ridges | 78 surface sl sts |
| Back horizontal ridge | 59 surface sl sts |
| Side center ridges | 38 surface sl sts |
| Corner vertical ridges | 156 surface sl sts |
| Bottom front/back ridges | 118 surface sl sts |
| Bottom panel center ridges | 40 surface sl sts |
Planning to make this tote as a gift or to sell? Track your progress in the project planner and work out a fair price with our pricing calculator.
9. Placement Order
Bottom layer pieces:
- Bottom granny square strip
- Front granny square panel
- Back granny square panel
- Left side granny square panel
- Right side granny square panel
Middle layer pieces:
- Cream joining seams
- Raised cream seam ridges
- Solid cream top band
Top layer pieces:
- Front shoulder strap
- Back shoulder strap
No leaves are used.
No stems are used.
No appliqué is used.
No doily base is used.
No diagonal layout is used.
Front Square Placement
Front panel:
- Top row: 3 brown squares.
- Bottom row: 3 brown squares.
- Cream raised seams divide the panel into 6 visible squares.
- Center vertical seam aligns with the center of the bag front.
- Horizontal seam sits halfway up the square section.
Strap Placement
Front strap:
- Attach to front top band.
- Left end covers front top band sts 9–15.
- Right end covers front top band sts 43–49.
- Each strap end extends 2.25 in / 5.75 cm down inside the bag.
Back strap:
- Attach to back top band.
- Left end covers back top band sts 9–15.
- Right end covers back top band sts 43–49.
- Each strap end extends 2.25 in / 5.75 cm down inside the bag.
Strap spacing:
- 8 sts remain outside each strap end.
- 27 sts remain between strap ends.
- Both straps stand vertically and do not cross.
10. Assembly
- Block all 19 squares:
- Pin each square to 4 in x 4 in.
- Keep all corners square.
- Let dry fully before joining.
- Assemble front panel:
- Join 6 squares into a 3 x 2 rectangle.
- Keep cream borders facing outward.
- Add raised seam ridges after joining.
- Assemble back panel:
- Join 6 squares into a 3 x 2 rectangle.
- Match front panel measurements.
- Assemble side panels:
- Join 2 squares vertically for each side panel.
- Each side panel must measure 4 in x 8 in.
- Assemble bottom panel:
- Join 3 squares horizontally.
- Bottom panel must measure 12 in x 4 in.
- Join bag body:
- Attach front panel to one long side of bottom panel.
- Attach back panel to opposite long side.
- Attach left side panel to left short side of bottom.
- Attach right side panel to right short side of bottom.
- Join all vertical corners.
- Work raised cream seam ridges:
- Work ridges over all visible seams.
- Keep ridges loose.
- Do not pull seams inward.
- Work top band:
- Pick up 152 sts around upper opening.
- Work 8 rounds.
- Keep upper edge level.
- Attach front strap:
- Place front strap ends over front top band sts 9–15 and 43–49.
- Sew a rectangle around each strap end: 7 sts wide x 9 rounds deep.
- Sew an X inside each rectangle.
- Reinforce top edge with 6 extra stitches.
- Attach back strap:
- Repeat the same placement on back top band.
- Match strap drop to front strap.
- Optional lining:
- Cut fabric rectangle 13 in x 24 in / 33 cm x 61 cm.
- Sew side seam.
- Box bottom corners to 4 in / 10 cm depth.
- Fold top edge down 0.5 in / 1.25 cm.
- Hand sew lining to inside of top band.
- Final blocking:
- Stuff bag with cloth.
- Shape front and back flat.
- Square bottom panel.
- Shape sides upright.
- Steam lightly from inside only.
- Allow to dry fully.
11. Final Checklist
- 19 granny squares are made.
- Each square measures 4 in x 4 in.
- Each square has 6 rounds.
- Each square ends with cream border.
- Front panel uses 6 squares.
- Back panel uses 6 squares.
- Each side panel uses 2 squares.
- Bottom panel uses 3 squares.
- Front panel is 3 squares wide and 2 squares high.
- Back panel matches front panel.
- Side panels are 1 square wide and 2 squares high.
- Bottom panel is 3 squares wide and 1 square deep.
- All visible seams are cream.
- Raised seam ridges are worked over visible joins.
- Top opening has 152 sts before band.
- Top band has 8 rounds.
- Two cream straps are made.
- Each strap is 7 sts wide.
- Each strap has 113 rows.
- Each strap border has 252 sc.
- Front strap attaches to front sts 9–15 and 43–49.
- Back strap attaches to back sts 9–15 and 43–49.
- Finished bag width is 12 in / 30.5 cm.
- Finished bag depth is 4 in / 10 cm.
- Finished bag height without straps is 11.25 in / 28.5 cm.
- Finished strap drop is 12 in / 30.5 cm.
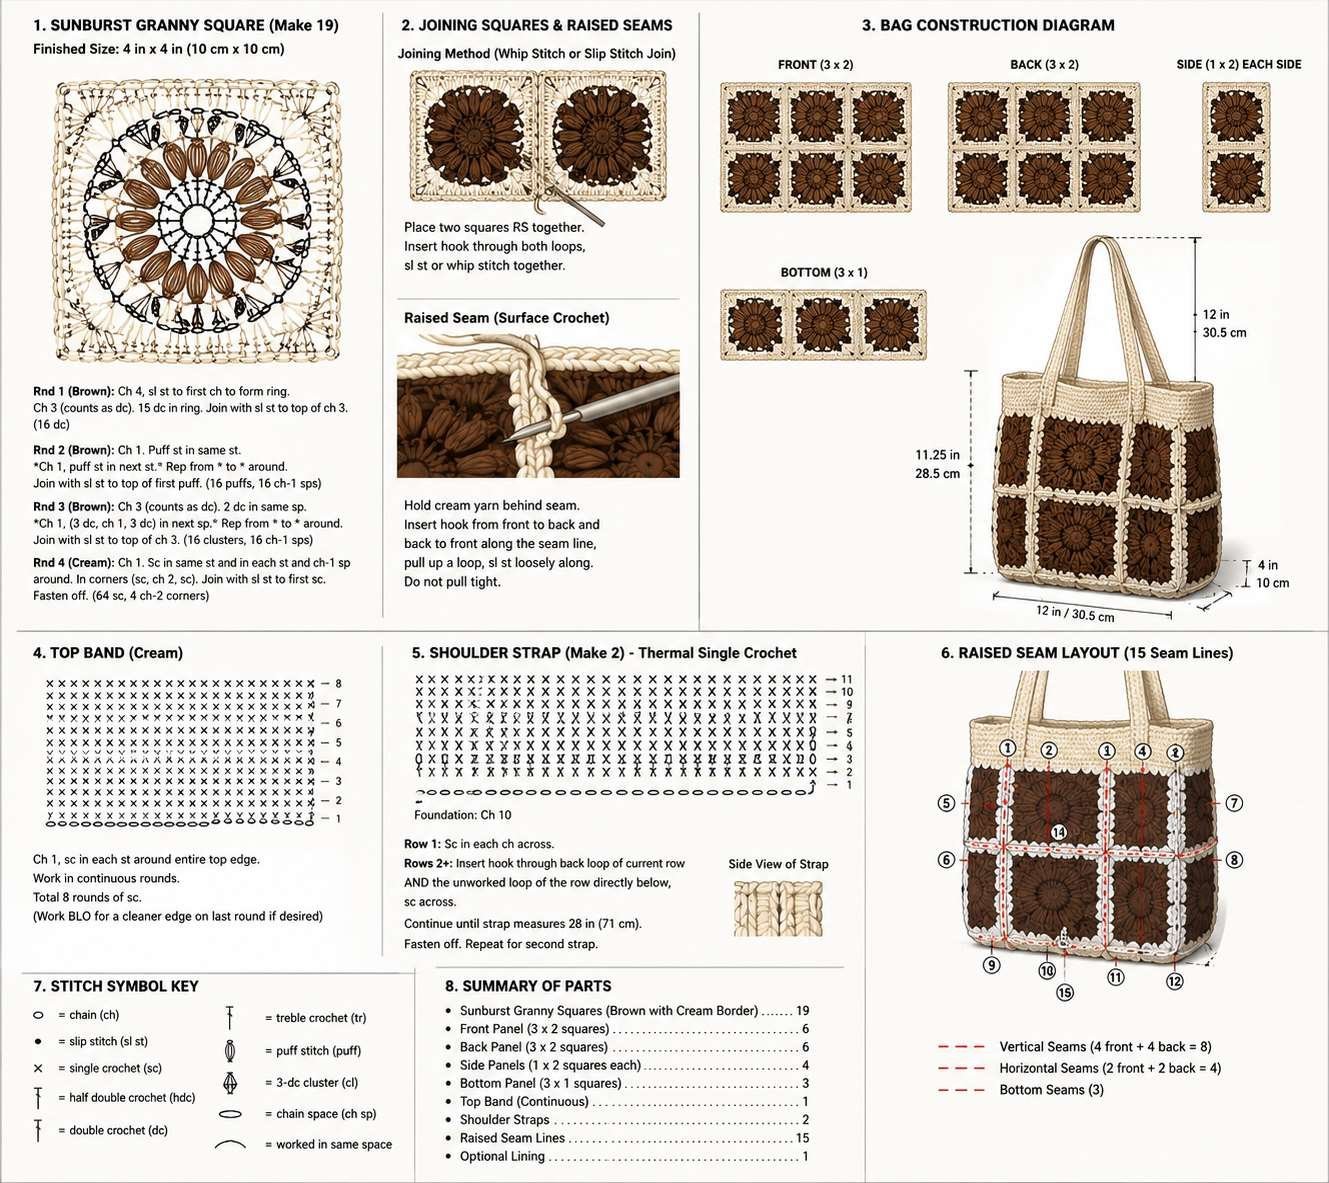
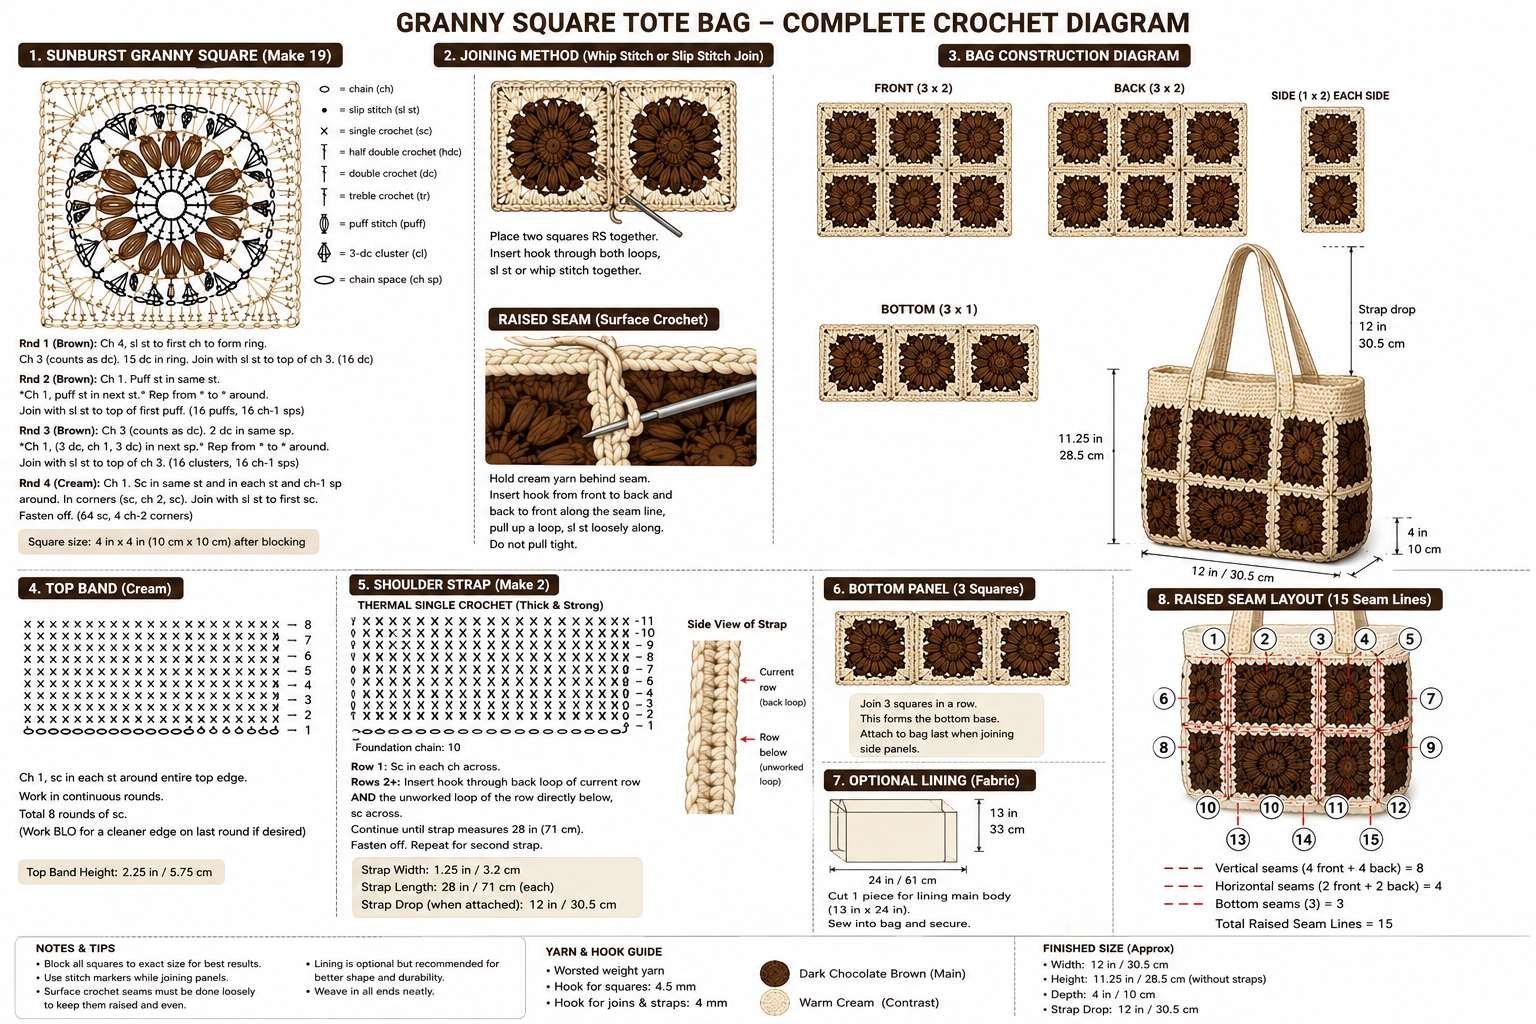
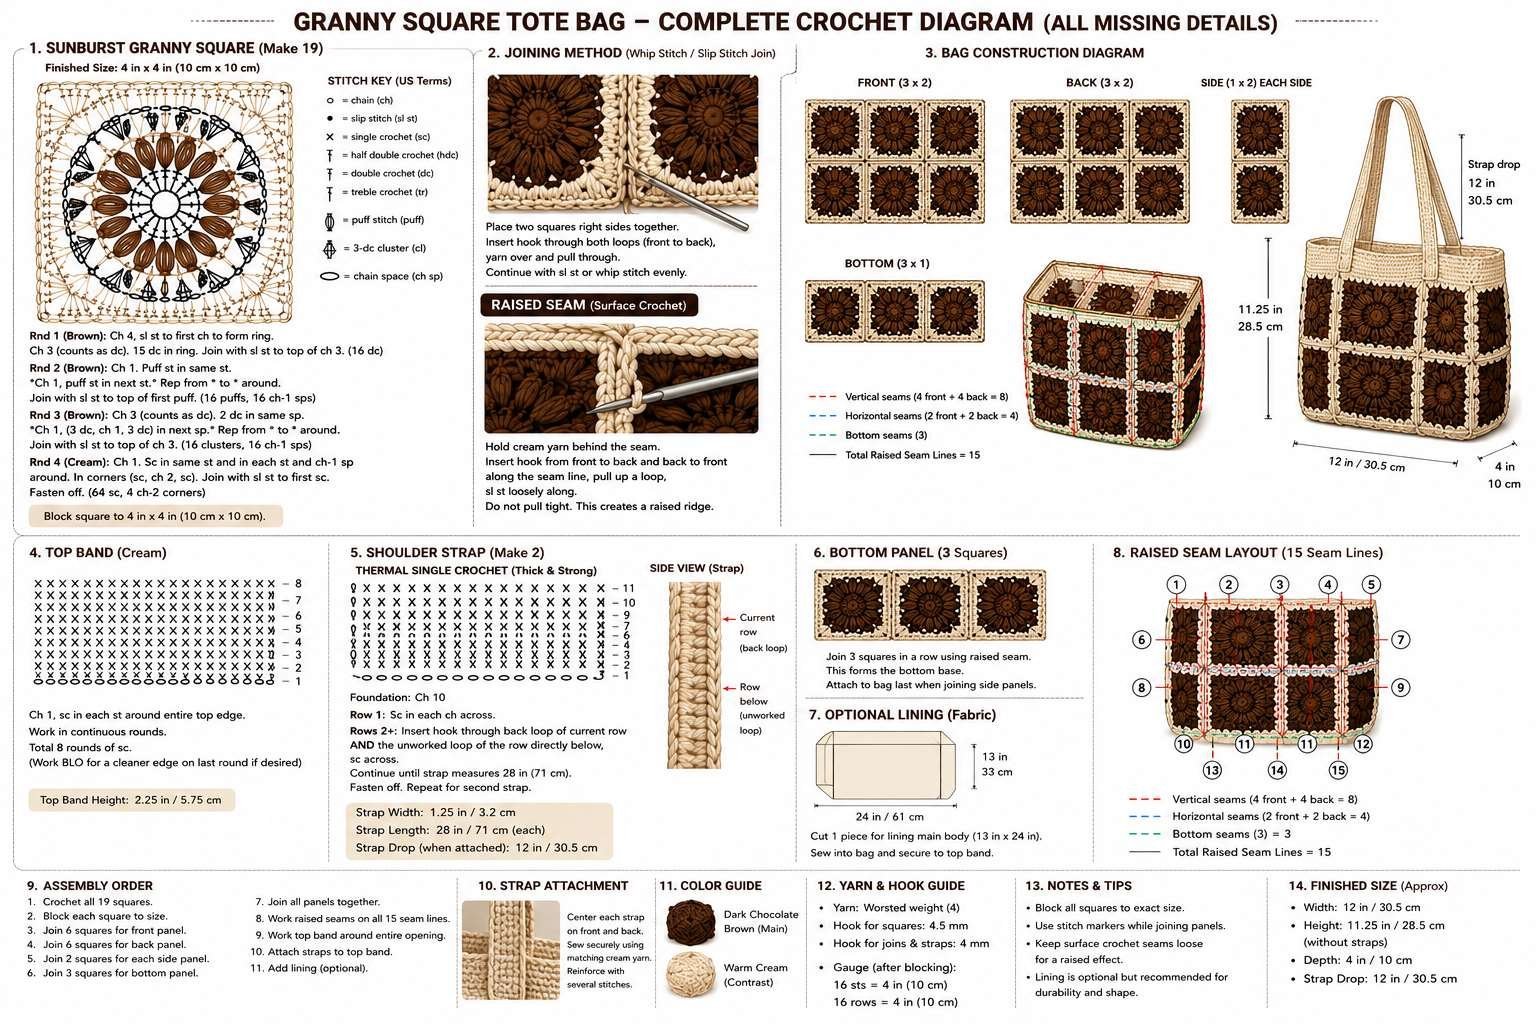
Granny Square Tote Bag Crochet Diagram
More Free Crochet Bag Patterns
Finished your granny square tote? Try another bag from our free pattern library:
- Two Tone Market Tote Crochet Pattern – a chunky puff-stitch market bag worked in rounds.
- Boho Sling Bag Crochet Pattern – a relaxed crossbody bag for everyday use.
- Holiday Spirits Bottle Bag – a quick gift bag for wine and bottles.
- Crochet Water Bottle Cozy Pattern – a handy carry-along holder with a strap.
- Granny Square Blanket Pattern – use up leftover squares in a cozy throw.
Helpful Crochet Tutorials
- How to Attach Granny Squares: 5 Easy Ways
- How to Read Crochet Patterns
- 6 Basic Crochet Stitches Every Beginner Should Know
- Best Yarn for Crochet Projects
- How to Crochet for Absolute Beginners
Make This Tote Bag Easier with Our Free Crochet Tools
Check gauge before joining your squares, estimate how much brown and cream yarn you need, convert the 4.5 mm and 4 mm hooks to US or UK sizes, and look up any abbreviation — all on our free Crochet Calculator & Tools page.