
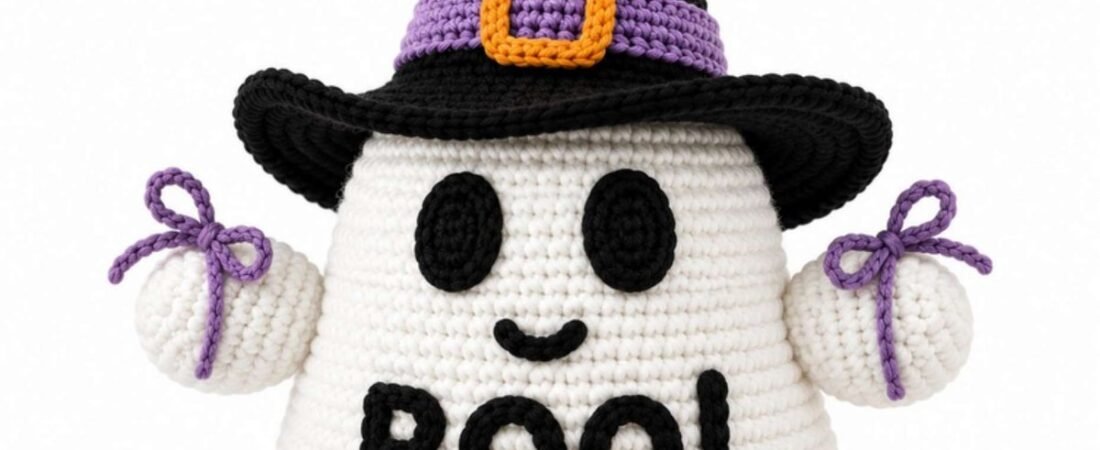
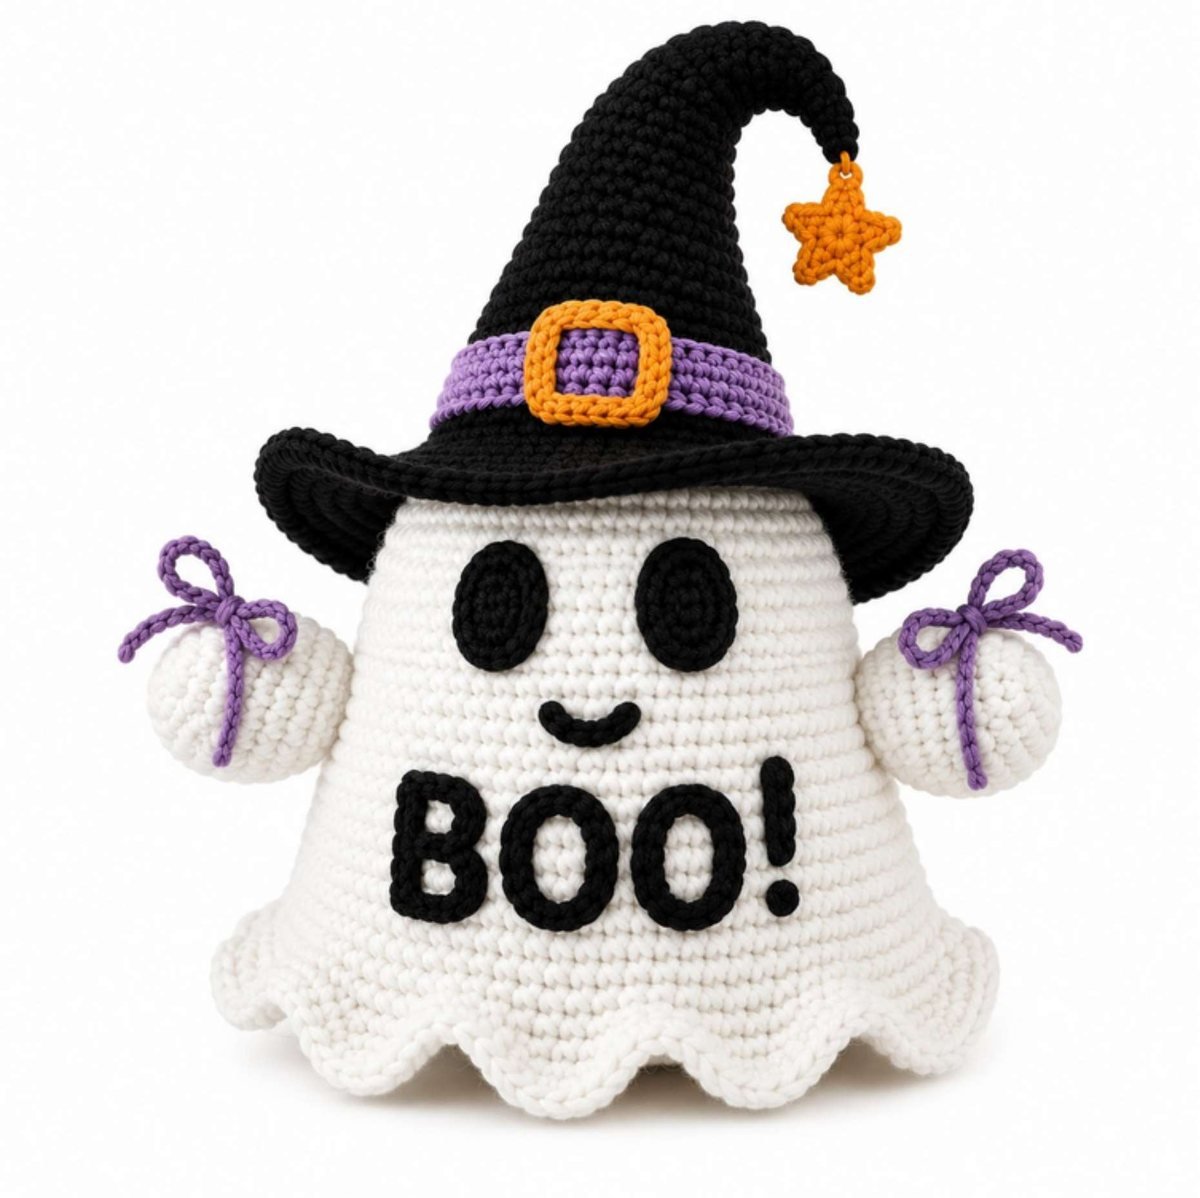
This crochet ghost witch is a showstopping Halloween amigurumi: a bell-shaped white ghost with a 12-lobe scalloped hem, two little stuffed hands tied with purple bows, a tall black witch hat with a curved tip, a purple band with an orange buckle, a dangling orange star and raised black BOO! lettering made from firm Romanian-style crochet cord.
The pattern is written in US crochet terms with round-by-round stitch counts, a full count audit, exact placement measurements and a 20-step assembly order. If you love stuffed seasonal makes, browse our free amigurumi patterns and the full holiday crochet patterns collection after this one.
Free Crochet Tools for This Pattern
Use our free calculators to check your gauge, estimate how much bulky yarn you need, convert the 5.5 mm and 4.5 mm hooks to your local sizes and decode any abbreviation in this ghost witch pattern.
1. About This Pattern
The ghost is worked top-down in one continuous spiral, then closed with a separate flat base so it stands on a shelf, mantel or table. The decorative hem, hands, hat and every face detail are added in a planned order so the finished figure stays symmetrical.
| Project | Detail |
|---|---|
| Skill level | Intermediate (new to amigurumi? Start with how to crochet for absolute beginners) |
| Terms | US crochet terms (see how to read crochet patterns) |
| Overall height | 40–42 cm / 15.75–16.5 in, base to highest hat curve |
| Ghost body width | 23–24 cm / 9–9.5 in |
| Yarn weight | Bulky #5 |
| Hooks | 5.5 mm main hook, 4.5 mm detail hook |
| Best for | Halloween décor, mantel displays, fall gifts and craft fairs |
Skills you will use
- Magic ring and continuous spiral crochet
- Single crochet increases and invisible decreases
- Working in front loops only and back loops only
- Half double crochet and double crochet
- Flat oval appliqué construction
- Romanian-style crochet cord for raised facial details and letters
- Controlled stuffing and shape sculpting
- Appliqué sewing and symmetric placement
- Hat-tip shaping with internal tacking stitches
Need a refresher? Every core stitch here is covered in our guide to the 6 basic crochet stitches for beginners, and our crochet hook grip guide helps keep tension even across long spiral rounds.
2. Finished Size
| Component | Target finished measurement |
|---|---|
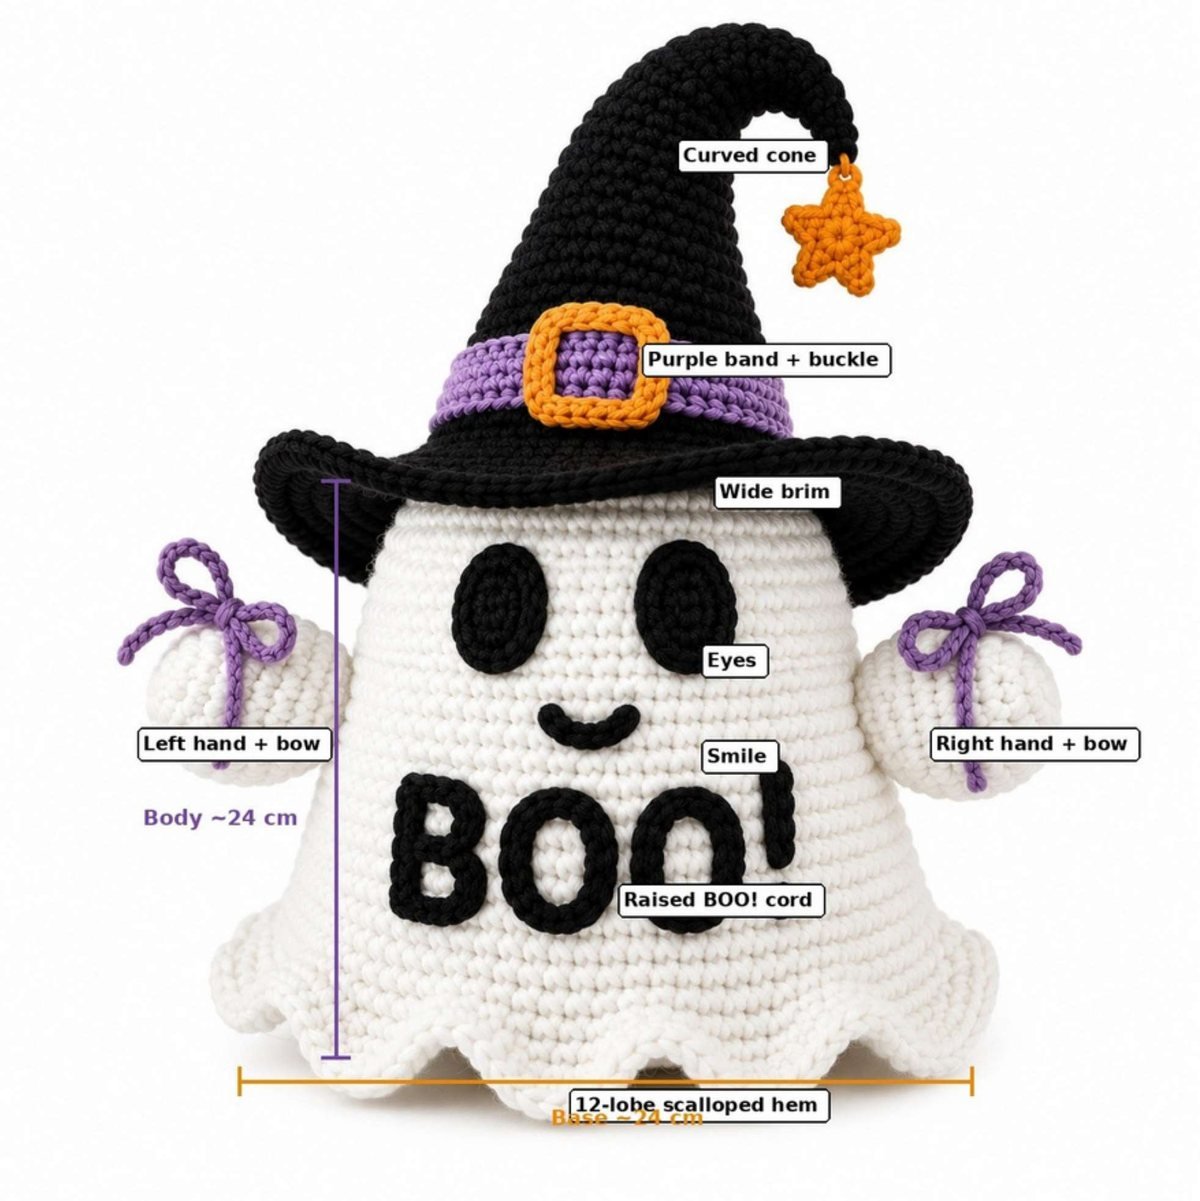
| Overall height, base to highest hat curve | 40–42 cm / 15.75–16.5 in (includes 2–3 cm hat/body overlap) |
| Ghost body including hem | 24–25 cm / 9.5–9.8 in |
| Body maximum width | 23–24 cm / 9–9.5 in |
| Flat base diameter | 23–24 cm / 9–9.5 in |
| Hat cone length before bending | 24–26 cm / 9.5–10.25 in |
| Hat height after bending | 18–20 cm / 7–7.9 in |
| Hat brim diameter | 29–31 cm / 11.4–12.2 in |
| Each hand | 7.5 x 6 cm / 3 x 2.4 in |
| Each eye | 4.2 x 3 cm / 1.65 x 1.2 in |
| BOO! letter height | 5.5–6 cm / 2.2–2.35 in |
| Star diameter, tip to tip | 5–5.5 cm / 2–2.2 in |
3. Materials
| Material | Specification / quantity |
|---|---|
| White yarn | Bulky #5, smooth cotton/acrylic or tube-style yarn; 250–300 g |
| Black yarn | Bulky #5; 170–200 g |
| Purple yarn | Bulky #5; 45–60 g |
| Orange yarn | Bulky #5; 20–30 g |
| Main hook | 5.5 mm |
| Detail hook | 4.5 mm |
| Stuffing | Polyester fiberfill, approximately 180–250 g |
| Needles | Large-eye tapestry needle plus a smaller finishing needle |
| Other | Stitch markers, scissors, straight pins, row counter |
| Optional base support | 20–21 cm / 8–8.25 in plastic-canvas circle |
A smooth, low-fuzz bulky yarn shows the raised cord lettering best. Not sure which fiber to pick? Our guide to the best yarn for crochet projects compares cotton, acrylic and blends for stuffed toys.
Free tool: Swapping to a different bulky yarn? Use the Yarn Estimator to calculate how many skeins you need, and the Hook Size Converter to match 5.5 mm and 4.5 mm to US letter or UK sizes.
4. Abbreviations (US Terms)
| Abbreviation | Meaning |
|---|---|
| MR | magic ring |
| ch | chain |
| sl st | slip stitch |
| sc | single crochet |
| hdc | half double crochet |
| dc | double crochet |
| inc | 2 sc in the same stitch |
| dec | invisible single crochet decrease |
| FLO | front loop only |
| BLO | back loop only |
| st / sts | stitch / stitches |
| rnd | round |
| BOR | beginning of round |
| CF | center front |
| CB | center back |
| RS / WS | right side / wrong side |
| RC | Romanian-style crochet cord |
Free tool: Paste any line of this pattern into the Pattern Decoder to see it in plain English, or use the US / UK Detector if you usually crochet in UK terms.
5. Stitch Guide
Invisible decrease
Insert the hook through the front loop of each of the next 2 stitches, yarn over and pull through both front loops, yarn over and pull through both loops on the hook. One decrease is completed.
Romanian-style crochet cord (RC)
- Ch 2.
- Sc in the second ch from hook.
- Rotate the work clockwise so the side edge faces upward.
- Insert the hook under the horizontal side loop at the left edge and work 1 sc.
- Rotate clockwise again. A new side loop will appear.
- Repeat the previous two actions. Each new sc after the initial sc counts as 1 RC step.
Cord consistency: Use the 4.5 mm hook and pull each cord stitch snugly. The cord should be firm and rounded, not loose or flat.
6. Gauge & Notes Before Starting
| Fabric | Gauge |
|---|---|
| Main fabric | 11 sc x 12 rounds = 10 x 10 cm / 4 x 4 in with 5.5 mm hook |
| Detail cord | 4 Romanian-cord steps = approximately 2.5 cm / 1 in with 4.5 mm hook |
Gauge control: The body, base and hat brim measurements depend directly on stitch width. If 11 sc are wider than 10 cm, use a smaller hook. If narrower, use a larger hook. Keep the fabric dense enough that stuffing cannot be seen.
Free tool: Measured your swatch? Enter your stitches and rounds into the Gauge Calculator to see exactly how your finished ghost will compare to the 23–24 cm target width.
Parts list
| Part | Quantity |
|---|---|
| Ghost body | 1 |
| Flat base disc | 1 |
| Integrated scalloped hem | 12 lobes |
| Stuffed hands | 2 |
| Purple hand ties | 2 |
| Black witch-hat cone with integrated brim | 1 |
| Purple hat band | 1 |
| Orange buckle | 1 |
| Orange hanging star + loop | 1 |
| Black eye appliqués | 2 |
| Black smile cord | 1 |
| B letter (stem, upper loop, lower loop) | 1 set |
| O cords | 2 |
| Exclamation stem + dot | 1 set |
Construction overview
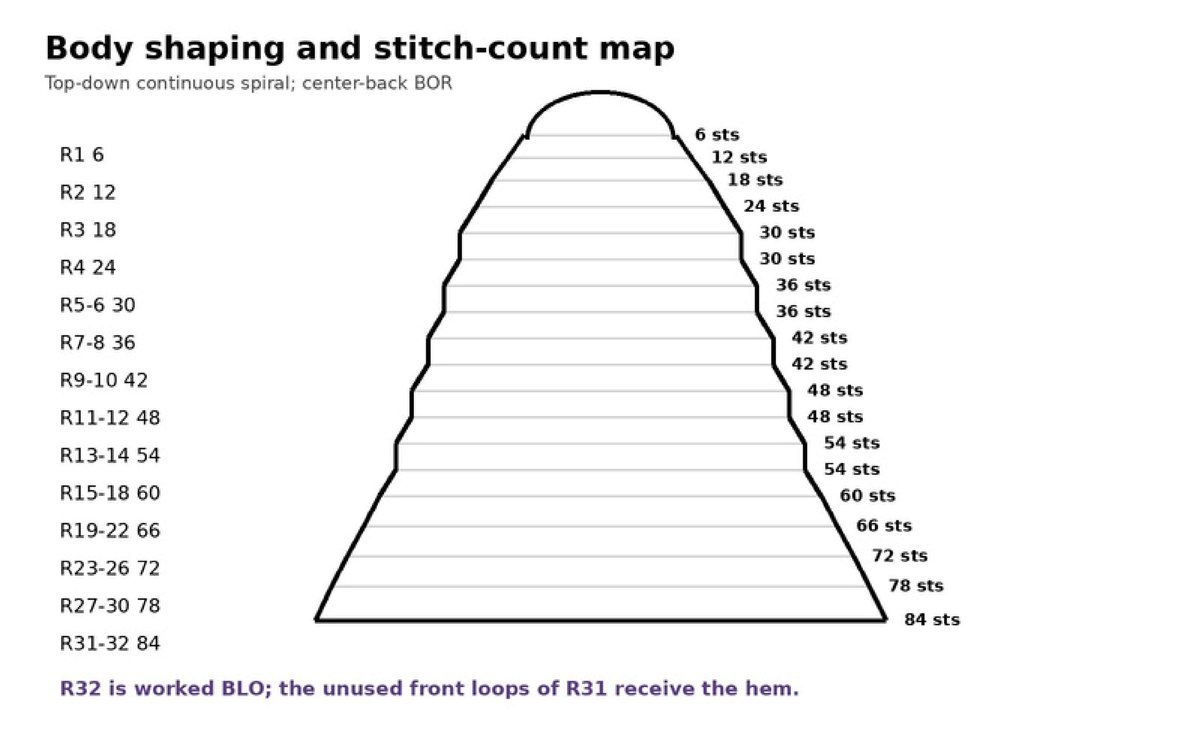
- The white body is worked from the crown downward in one continuous spiral. Increases are deliberately slowed through the upper rounds to create a rounded head instead of a flat disc.
- The lower body widens in four controlled stages to produce the bell-shaped ghost silhouette. The final body opening contains exactly 84 stitches.
- A separate 84-stitch flat base is stuffed and sewn one-for-one to the body opening. Optional plastic canvas can be inserted above the base for a flatter display surface.
- The decorative hem is worked into the 84 front loops reserved immediately above the base seam. Twelve equal 7-stitch repeats create 12 rounded ghost lobes.
- The two hands are stuffed ovals. Their 12-stitch open ends are sewn directly to the body and concealed with purple crochet cords tied into bows.
- The hat cone is worked from tip to brim, lightly stuffed in the upper section and tacked internally on one side to bend toward the viewer’s right.
- The brim is worked directly from the cone and expands from 60 to 108 stitches. The purple band, orange buckle and orange star are separate pieces.
- The eyes are flat ovals. The smile and BOO! letters are made from firm crochet cord and sewn on as raised surface details.
7. Ghost Body Instructions
With white bulky yarn and the 5.5 mm hook, work in a continuous spiral. Place the BOR marker at center back. Do not join rounds unless stated.
| Rnd | Instruction | Stitch count |
|---|---|---|
| 1 | 6 sc in MR | 6 |
| 2 | inc in each st around | 12 |
| 3 | (sc, inc) x 6 | 18 |
| 4 | (2 sc, inc) x 6 | 24 |
| 5 | (3 sc, inc) x 6 | 30 |
| 6 | sc around | 30 |
| 7 | (4 sc, inc) x 6 | 36 |
| 8 | sc around | 36 |
| 9 | (5 sc, inc) x 6 | 42 |
| 10 | sc around | 42 |
| 11 | (6 sc, inc) x 6 | 48 |
| 12 | sc around | 48 |
| 13 | (7 sc, inc) x 6 | 54 |
| 14 | sc around | 54 |
| 15 | (8 sc, inc) x 6 | 60 |
| 16–18 | sc around | 60 each |
| 19 | (9 sc, inc) x 6 | 66 |
| 20–22 | sc around | 66 each |
| 23 | (10 sc, inc) x 6 | 72 |
| 24–26 | sc around | 72 each |
| 27 | (11 sc, inc) x 6 | 78 |
| 28–30 | sc around | 78 each |
| 31 | (12 sc, inc) x 6 | 84 |
| 32 | BLO sc around | 84 |
Fasten off after Rnd 32. The unworked front loops of Rnd 31 are reserved for the scalloped hem.
8. Flat Base & Stuffing
With white bulky yarn and the 5.5 mm hook, work in a continuous spiral.
| Rnd | Instruction | Count |
|---|---|---|
| 1 | 6 sc in MR | 6 |
| 2 | inc x 6 | 12 |
| 3 | (sc, inc) x 6 | 18 |
| 4 | (2 sc, inc) x 6 | 24 |
| 5 | (3 sc, inc) x 6 | 30 |
| 6 | (4 sc, inc) x 6 | 36 |
| 7 | (5 sc, inc) x 6 | 42 |
| 8 | (6 sc, inc) x 6 | 48 |
| 9 | (7 sc, inc) x 6 | 54 |
| 10 | (8 sc, inc) x 6 | 60 |
| 11 | (9 sc, inc) x 6 | 66 |
| 12 | (10 sc, inc) x 6 | 72 |
| 13 | (11 sc, inc) x 6 | 78 |
| 14 | (12 sc, inc) x 6 | 84 |
Fasten off, leaving at least 70 cm / 28 in for sewing.
Stuffing and base attachment
- If using plastic canvas, place the 20–21 cm circle inside the lower body before final stuffing. It must remain centered and flat.
- Stuff the crown firmly enough to retain a smooth rounded surface. Continue stuffing downward, keeping the side walls smooth and the lower body evenly flared.
- Align the 84 stitches of Base Rnd 14 with the 84 stitches of Body Rnd 32. The BOR positions should meet at center back.
- Whipstitch one base stitch to one body stitch all around. Do not skip stitches and do not gather the seam.
- Before closing the final 8–10 cm, adjust stuffing so the body stands upright without a hard bulge at the base. Complete the seam.
9. Twelve-Lobe Scalloped Hem
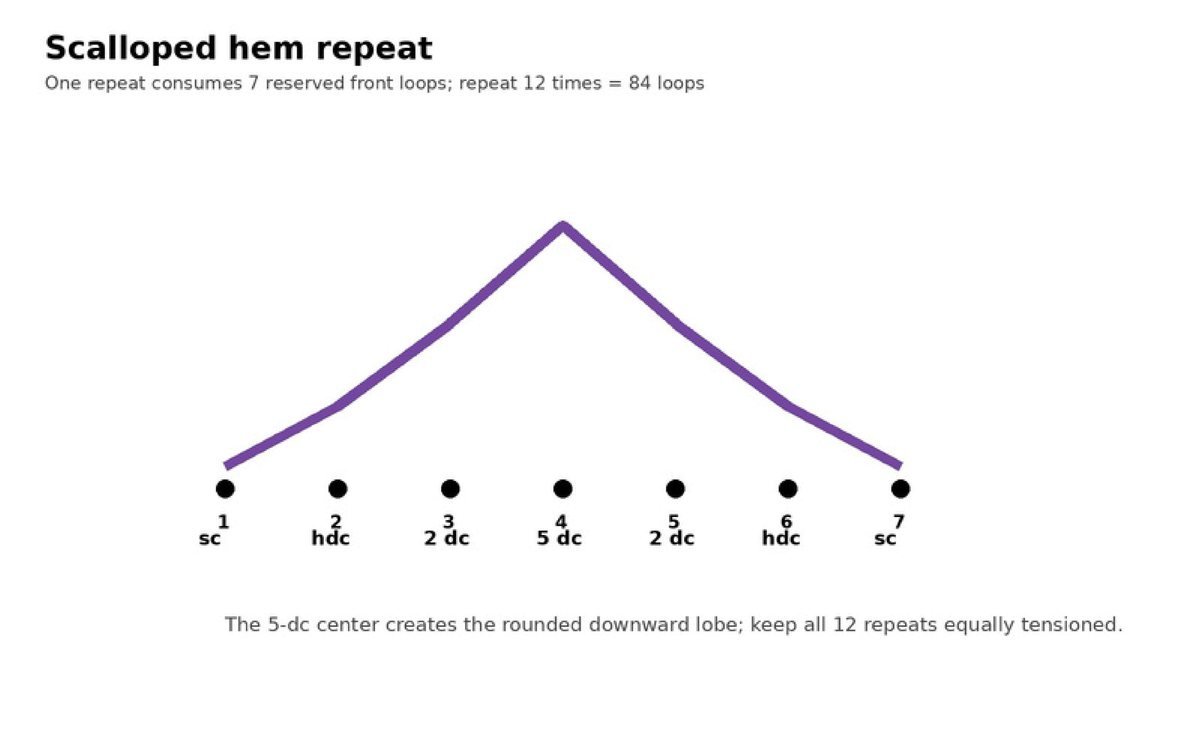
Join white yarn with a sl st into any unused front loop of Body Rnd 31. Each repeat consumes exactly 7 reserved loops.
Hem repeat: *sc in next FLO, hdc in next FLO, 2 dc in next FLO, 5 dc in next FLO, 2 dc in next FLO, hdc in next FLO, sc in next FLO*; repeat from * to * 12 times.
Math check: 12 repeats x 7 body loops = 84 loops exactly. Join with a sl st to the first sc and fasten off invisibly. Gently pull each 5-dc center downward to emphasize the rounded ghost lobe.
10. Hands & Purple Bows
Hands – make 2
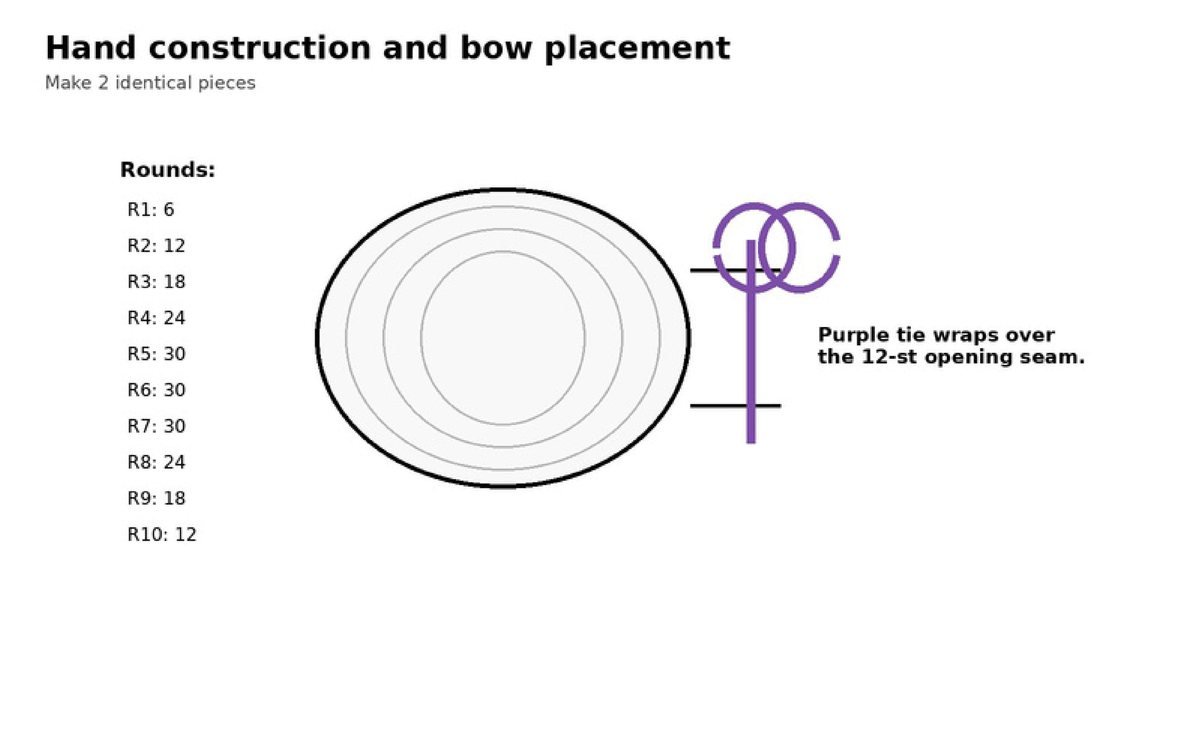
With white bulky yarn and the 5.5 mm hook, work continuously in a spiral.
| Rnd | Instruction | Count |
|---|---|---|
| 1 | 6 sc in MR | 6 |
| 2 | inc around | 12 |
| 3 | (sc, inc) x 6 | 18 |
| 4 | (2 sc, inc) x 6 | 24 |
| 5 | (3 sc, inc) x 6 | 30 |
| 6–8 | sc around | 30 each |
| 9 | (3 sc, dec) x 6 | 24 |
| 10 | (2 sc, dec) x 6 | 18 |
| 11 | (sc, dec) x 6 | 12 |
Fasten off with a 35 cm / 14 in sewing tail. Stuff firmly, concentrating stuffing toward the rounded outer end. Leave the 12-stitch opening unclosed.
Purple hand ties – make 2
With purple bulky yarn and the 5.5 mm hook, ch 44. Beginning in the second ch from hook, sl st through the back bump of each chain to the end: 43 sl sts. Fasten off. Each finished cord should measure approximately 23–25 cm / 9–10 in.
11. Witch Hat Instructions
Black witch-hat cone
With black bulky yarn and the 5.5 mm hook, work in a continuous spiral. Keep the BOR at center back. The cone uses three increases on each increase round; distribute tension evenly so the fabric does not twist.
| Rnd | Instruction | Count |
|---|---|---|
| 1 | 6 sc in MR | 6 |
| 2 | sc around | 6 |
| 3 | (sc, inc) x 3 | 9 |
| 4 | (2 sc, inc) x 3 | 12 |
| 5 | sc around | 12 |
| 6 | (3 sc, inc) x 3 | 15 |
| 7 | (4 sc, inc) x 3 | 18 |
| 8 | sc around | 18 |
| 9 | (5 sc, inc) x 3 | 21 |
| 10 | (6 sc, inc) x 3 | 24 |
| 11 | sc around | 24 |
| 12 | (7 sc, inc) x 3 | 27 |
| 13 | (8 sc, inc) x 3 | 30 |
| 14 | sc around | 30 |
| 15 | (9 sc, inc) x 3 | 33 |
| 16 | (10 sc, inc) x 3 | 36 |
| 17 | sc around | 36 |
| 18 | (11 sc, inc) x 3 | 39 |
| 19 | (12 sc, inc) x 3 | 42 |
| 20 | sc around | 42 |
| 21 | (13 sc, inc) x 3 | 45 |
| 22 | (14 sc, inc) x 3 | 48 |
| 23 | sc around | 48 |
| 24 | (15 sc, inc) x 3 | 51 |
| 25 | (16 sc, inc) x 3 | 54 |
| 26 | sc around | 54 |
| 27 | (17 sc, inc) x 3 | 57 |
| 28 | (18 sc, inc) x 3 | 60 |
| 29–30 | sc around | 60 each |
Do not fasten off. Continue directly to the brim.
Hat brim
| Brim rnd | Instruction | Count |
|---|---|---|
| 1 | FLO sc around | 60 |
| 2 | (4 sc, inc) x 12 | 72 |
| 3 | sc around | 72 |
| 4 | (5 sc, inc) x 12 | 84 |
| 5 | sc around | 84 |
| 6 | (6 sc, inc) x 12 | 96 |
| 7 | sc around | 96 |
| 8 | (7 sc, inc) x 12 | 108 |
| 9 | BLO sc around | 108 |
| 10 | reverse sc around | 108 |
Fasten off. The final brim circumference at gauge is approximately 98 cm / 38.5 in, giving a relaxed diameter of approximately 30–31 cm after blocking. Love making hats? Try our free Santa hat crochet pattern next.
Shape the crooked hat tip
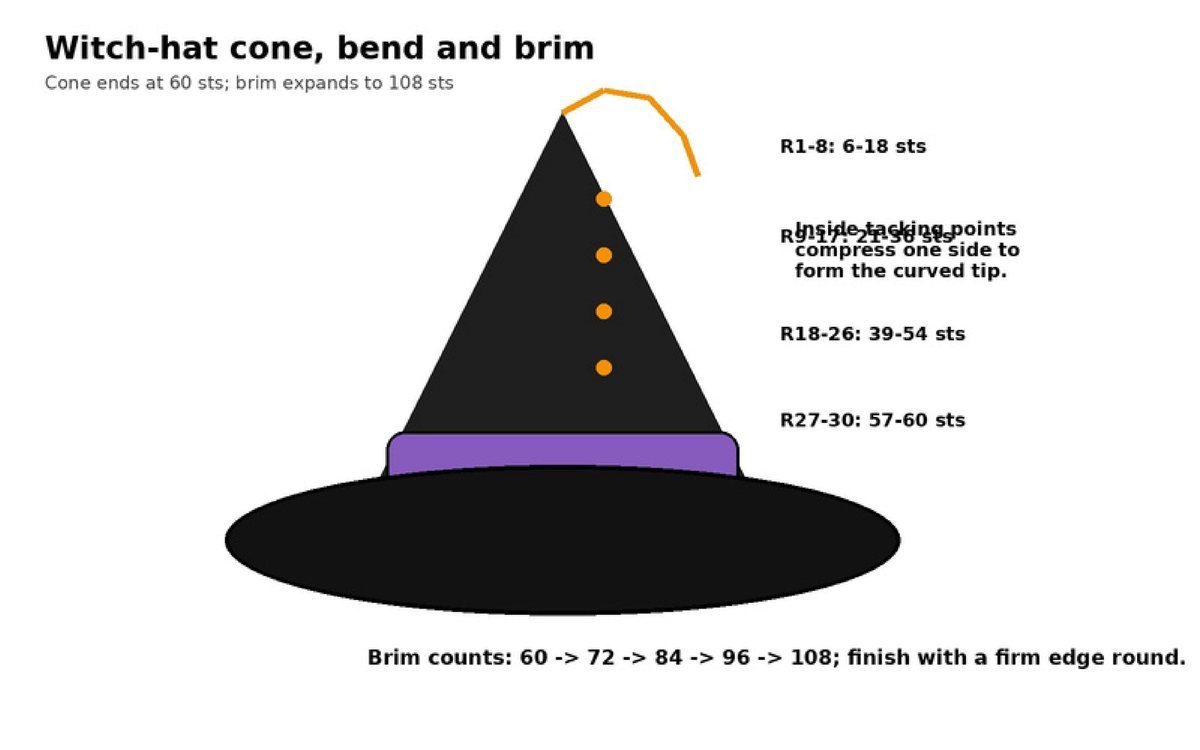
- Lightly stuff Hat Rnds 1–18 only. Do not pack the stuffing hard; the tip must remain flexible.
- Place the hat with CF facing you. The point must bend toward the viewer’s right.
- Thread 50 cm / 20 in of black yarn through the inside of the cone. On the viewer-right side, take a hidden tack between approximately Rnd 6 and Rnd 10. Pull until that four-round interval is shortened by about one half.
- Take a second tack between approximately Rnd 10 and Rnd 14, and a third between Rnd 14 and Rnd 18. Secure each tack separately.
- Curve the final 3–4 cm of the tip slightly downward. The viewer-left side remains untacked and therefore forms the longer outside curve.
- Do not sew the cone flat. It must retain a soft three-dimensional bend.
12. Hat Band, Buckle & Hanging Star
Purple hat band
With purple bulky yarn and the 5.5 mm hook, ch 61.
| Row | Instruction | Count |
|---|---|---|
| 1 | Hdc in second ch from hook and across | 60 hdc |
| 2 | Ch 1, turn, hdc across | 60 hdc |
| 3 | Ch 1, turn, hdc across | 60 hdc |
| 4 | Ch 1, turn, hdc across | 60 hdc |
Fasten off with a long tail. Join the short ends to form a ring. Position around Hat Rnds 27–30 directly above the brim and sew the top and bottom edges to the black cone with small hidden stitches.
Orange buckle
With orange bulky yarn and the 4.5 mm hook, make 32 RC steps. At detail gauge the cord is approximately 20 cm / 8 in long.
- Form the cord into a rounded rectangle measuring approximately 6.0 cm wide x 4.5 cm high.
- Overlap the cord ends by 5 mm and sew them together invisibly.
- Pin the buckle to the exact center front of the purple band.
- Sew around both edges of the cord so the buckle cannot twist. The purple band must remain visible inside the buckle opening.
Orange hanging star
With orange bulky yarn and the 4.5 mm hook.
| Rnd | Instruction | Count |
|---|---|---|
| 1 | MR, ch 1, work 10 sc into ring; join with sl st | 10 sc |
| 2 | Repeat 5x: sl st in next center sc; ch 5; sl st in 2nd ch from hook, sc in next ch, hdc in next ch, dc in last ch; sl st in next center sc. Each point consumes 2 adjacent center stitches. | 5 points |
Fasten off. Pin and steam-block the five points outward. For the hanging loop, ch 12, join to the first ch with sl st, and fasten off. Attach one side of the loop to the top point of the star and the opposite side to the hat tip.
Star lover? Use the same technique to make a full amigurumi star or the easy crochet star ornament for matching seasonal décor.
13. Eyes, Smile & Raised BOO! Lettering
Black eye appliqués – make 2
With black bulky yarn and the 4.5 mm hook.
| Rnd | Instruction | Count |
|---|---|---|
| Foundation | Ch 5 | – |
| 1 | Sc in 2nd ch from hook and next 2 ch; 3 sc in last ch; working along underside, sc in next 2 ch; 2 sc in first worked ch | 10 |
| 2 | Inc in first st, sc in next 2, inc in next 3, sc in next 2, inc in final 2 | 16 |
| 3 | Sc around | 16 |
Fasten off with a sewing tail. Do not stuff. Stretch gently into a vertical oval approximately 4.2 cm high x 3 cm wide.
Smile cord
With black bulky yarn and the 4.5 mm hook, make 6 RC steps, approximately 3.8 cm / 1.5 in long. Fasten off with tails at both ends. Curve into a shallow U with the center approximately 8–9 mm lower than the ends.
Raised BOO! lettering
Use black bulky yarn and the 4.5 mm hook. Make all components as Romanian-style crochet cord. Pin the entire word before sewing any component.
| Component | RC steps | Target cord length / formed size |
|---|---|---|
| B vertical stem | 9 | 5.5–5.8 cm high |
| B upper loop | 12 | about 7.5 cm cord |
| B lower loop | 13 | about 8 cm cord |
| O #1 | 24 | closed loop; 5.5–5.8 cm high x 3.8 cm wide |
| O #2 | 24 | same as O #1 |
| Exclamation stem | 7 | 4.4 cm long |
- Letter B: Pin the 9-step stem vertically. Shape the 12-step cord into an upper loop approximately 2.5 cm high and sew its ends to the right edge of the stem. Shape the 13-step cord into a lower loop approximately 2.8 cm high and sew it to the lower right edge of the stem. The lower loop should project slightly farther right than the upper loop.
- O letters: Join the ends of each 24-step cord to form a closed loop. Shape vertically. Keep both O letters identical before sewing.
- Exclamation dot: With black bulky yarn and the 4.5 mm hook, work 6 sc in MR. Join with sl st to the first sc and fasten off. The dot should measure approximately 1.2 cm / 0.5 in across.
14. Placement Guide
Set the ghost upright on a flat surface. Center back is the BOR seam line; center front is exactly opposite. All measurements are taken on the finished stuffed body.
| Layer | Pieces |
|---|---|
| Bottom / structural | Body, base, hem, hands, hat cone and brim |
| Middle | Purple band, eyes, smile, BOO! lettering, hand ties |
| Top / trim | Orange buckle, star, bow loops and tails, exclamation dot |
Hands
- Place hand centers approximately 6.5–7 cm below the uppermost visible white head surface.
- The hands project horizontally from the left and right sides. Keep both center lines level.
- Flatten each 12-st opening slightly and sew approximately 6 paired stitches against the body.
- Place the purple bow knot over the upper outer quadrant of the hand/body join.
Eyes and smile
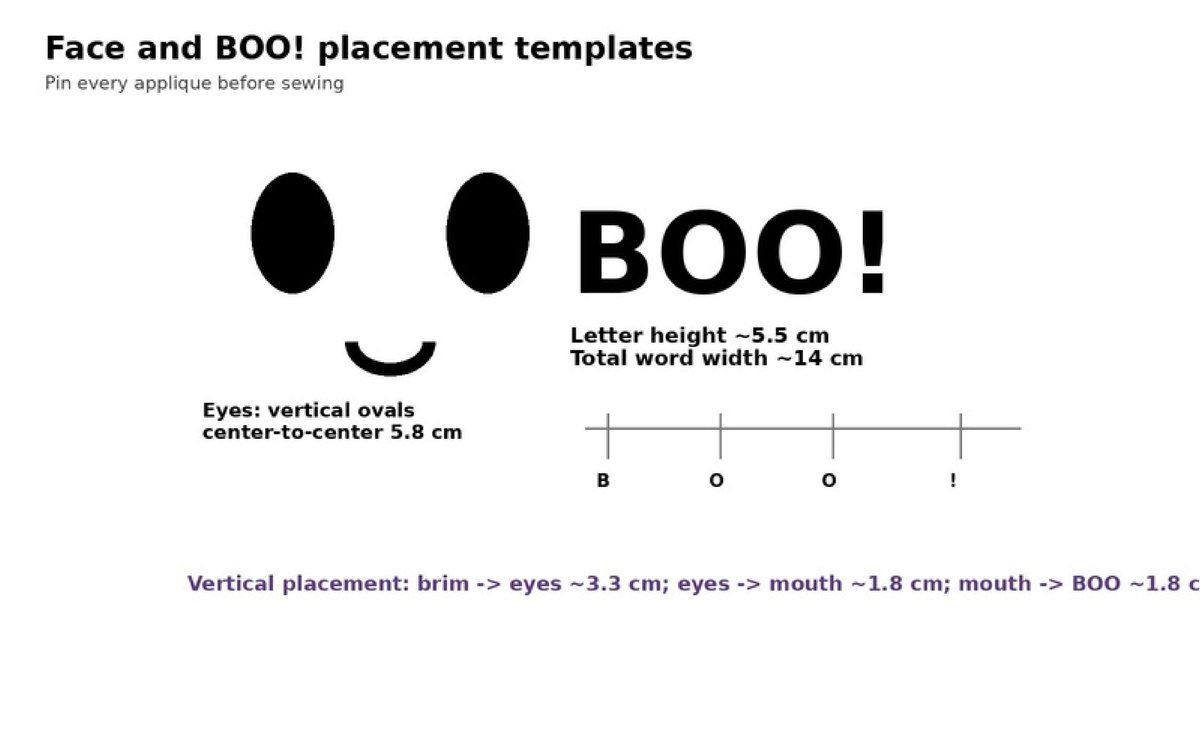
- Left eye center: 2.9 cm left of CF. Right eye center: 2.9 cm right of CF (center-to-center about 5.8 cm).
- Top of each eye: approximately 3.3 cm below the lower visible edge of the hat brim. Keep the long axes vertical.
- Center the smile on CF approximately 1.7–1.9 cm below the lower edge of the eyes. Finished smile width: 3.4–3.8 cm.
BOO! lettering
- Place the top of the word approximately 1.7–1.9 cm below the lowest part of the smile.
- Keep a common baseline for B, O, O and the exclamation stem.
- Approximate gaps: B to O 6 mm; O to O 6 mm; second O to ! 7–8 mm. Total word width: approximately 14–14.5 cm.
- Place the exclamation dot 5–6 mm below the stem.
Hat, band, buckle and star
- Center the hat over the body so the buckle aligns with CF.
- The brim extends evenly left and right, but the tip bends toward the viewer’s right.
- The purple band sits directly above the brim and should not cover the brim edge.
- The buckle is centered on CF and remains fully on the purple band.
- Hang the star from the lower side of the bent tip so it drops approximately 1–1.5 cm below the tip.
15. Assembly Order
- Complete the white body through Rnd 32 and leave the 84-st opening accessible.
- Complete the 84-st base disc.
- Insert optional plastic canvas if used and stuff the body evenly.
- Sew the base to the body one stitch to one stitch. Confirm that the body stands vertically.
- Work the 12-lobe hem into the reserved front loops of Body Rnd 31.
- Crochet and stuff both hands. Do not close the 12-st openings. Pin both hands in their final positions.
- Sew each 12-st hand opening securely to the body. Confirm symmetry before knotting the yarn.
- Wrap and tie one purple cord over each hand seam. Secure the bow knot with one hidden sewing stitch so it cannot loosen.
- Complete the black cone and integrated brim.
- Lightly stuff the upper cone and form the three internal tacking points to create the right-bending tip.
- Fit the purple band around the lower cone and sew it in place.
- Form and sew the orange buckle to the exact center front of the purple band.
- Crochet the orange star and hanging loop. Attach to the hat tip.
- Pin the two eye appliqués. Check equal height, equal angle and equal distance from CF. Sew around the entire outer edge of each eye.
- Pin the smile cord and sew through the center of the cord every 5–7 mm so the curve remains smooth.
- Pin the complete BOO! arrangement and compare spacing and baseline to the placement template before sewing.
- Sew the B stem first, then its two loops. Sew both O loops, then the exclamation stem and dot.
- Position the completed hat on the ghost. Tack it at CF, CB, left, right, front-left and front-right, keeping tacks approximately 2.5 cm inward from the outer brim edge so the brim remains free.
- From the front, adjust the brim into a shallow wave: slightly lower above the face and slightly raised at the outer left/right edges.
- Weave in all remaining ends inside the body or beneath appliqués. Remove all pins and make the final proportion check.
Free tool: This is a multi-part make. Use the Project Planner to track each piece, your yarn, hook and deadline, then print your plan to keep beside you while you crochet.
16. Stitch Count Audit
| Area | Counts |
|---|---|
| Body | 6, 12, 18, 24, 30, 30, 36, 36, 42, 42, 48, 48, 54, 54, 60 (Rnds 15–18), 66 (Rnds 19–22), 72 (Rnds 23–26), 78 (Rnds 27–30), 84 (Rnds 31–32) |
| Hem | 84 reserved FLO ÷ 7 loops per repeat = 12 complete lobes, no loops remain |
| Base | 6, 12, 18, 24, 30, 36, 42, 48, 54, 60, 66, 72, 78, 84 – matches the 84-st body opening |
| Each hand | 6 → 12 → 18 → 24 → 30; Rnds 6–8 = 30; 24 → 18 → 12 attachment opening |
| Hat cone | 6 → 9 → 12 → 15 → 18 → 21 → 24 → 27 → 30 → 33 → 36 → 39 → 42 → 45 → 48 → 51 → 54 → 57 → 60 |
| Brim | 60 → 72 → 72 → 84 → 84 → 96 → 96 → 108 → 108 → 108 |
| Band | 60 hdc per row x 4 rows |
| Star center | 10 sc; 2 adjacent center sc per point x 5 points = 10 |
17. Customization & Styling Ideas
- Change the greeting: Swap BOO! for a name, “HI!” or “EEK!” using the same Romanian-cord technique; keep letter height at 5.5–6 cm.
- Colorway swaps: Try a lime band with a black buckle, or a pastel ghost with a lilac hat for a softer look.
- Mini version: Use worsted weight yarn and a 3.5 mm hook for a smaller shelf ghost of roughly 60% size.
- Seasonal pairing: Display it with our crochet skull lace mask for a coordinated Halloween setup.
- Gift it: Pop a small treat bag under the hat brim for a Halloween party favor.
18. Troubleshooting
| Problem | Fix |
|---|---|
| Head looks flat on top | Keep the plain rounds between increases (Rnds 6, 8, 10, 12, 14). Skipping them flattens the crown. |
| Stuffing shows through | Go down a hook size or tighten tension; bulky fabric must be dense for amigurumi. |
| Ghost leans or wobbles | Re-check the base seam is one-for-one, add the plastic canvas circle and redistribute stuffing away from the base. |
| Hem lobes look uneven | Count 7 loops per repeat and keep all 5-dc centers the same tension; tug each lobe down gently after finishing. |
| Hat tip will not bend | Use less stuffing in Rnds 1–18 and tighten the three inner tacks on the viewer-right side. |
| Cord letters look flat | Pull each RC step snug with the 4.5 mm hook; sew through the cord center rather than its edges. |
Frequently Asked Questions
Is this ghost witch pattern beginner friendly?
It is rated intermediate because of the size, front/back loop work and appliqué placement. If you are new, practice with a smaller project first, such as our amigurumi winged heart or frog crochet bookmark.
Can I use a different yarn weight?
Yes. Any yarn works if you keep the fabric dense. Lighter yarn makes a smaller ghost; heavier yarn makes it larger. Run your swatch through the free gauge calculator to predict the final size.
How much yarn does the ghost witch take?
About 250–300 g white, 170–200 g black, 45–60 g purple and 20–30 g orange bulky #5 yarn.
Do I need safety eyes?
No. The eyes are crocheted oval appliqués, which makes this design suitable for decorations around children. Always supervise young children with small sewn-on parts.
Why do I need the plastic canvas circle?
It is optional but keeps the base flat so the large ghost stands perfectly upright on a shelf or mantel.
Can I sell the finished ghost witch?
You are welcome to sell handmade finished items made from this pattern; please credit Crochet Patterns Hub. Use our crochet pricing calculator to price materials and time fairly.
More Free Patterns You’ll Love
Plan Your Next Make with Free Crochet Tools
Decode stitches, convert hook sizes, check gauge, estimate yarn and price your finished ghost witch figures — all free.