
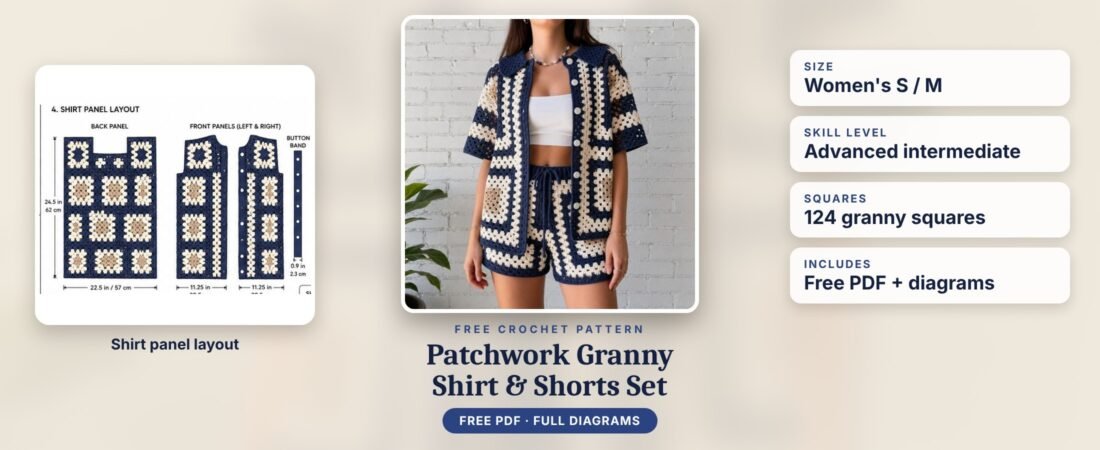
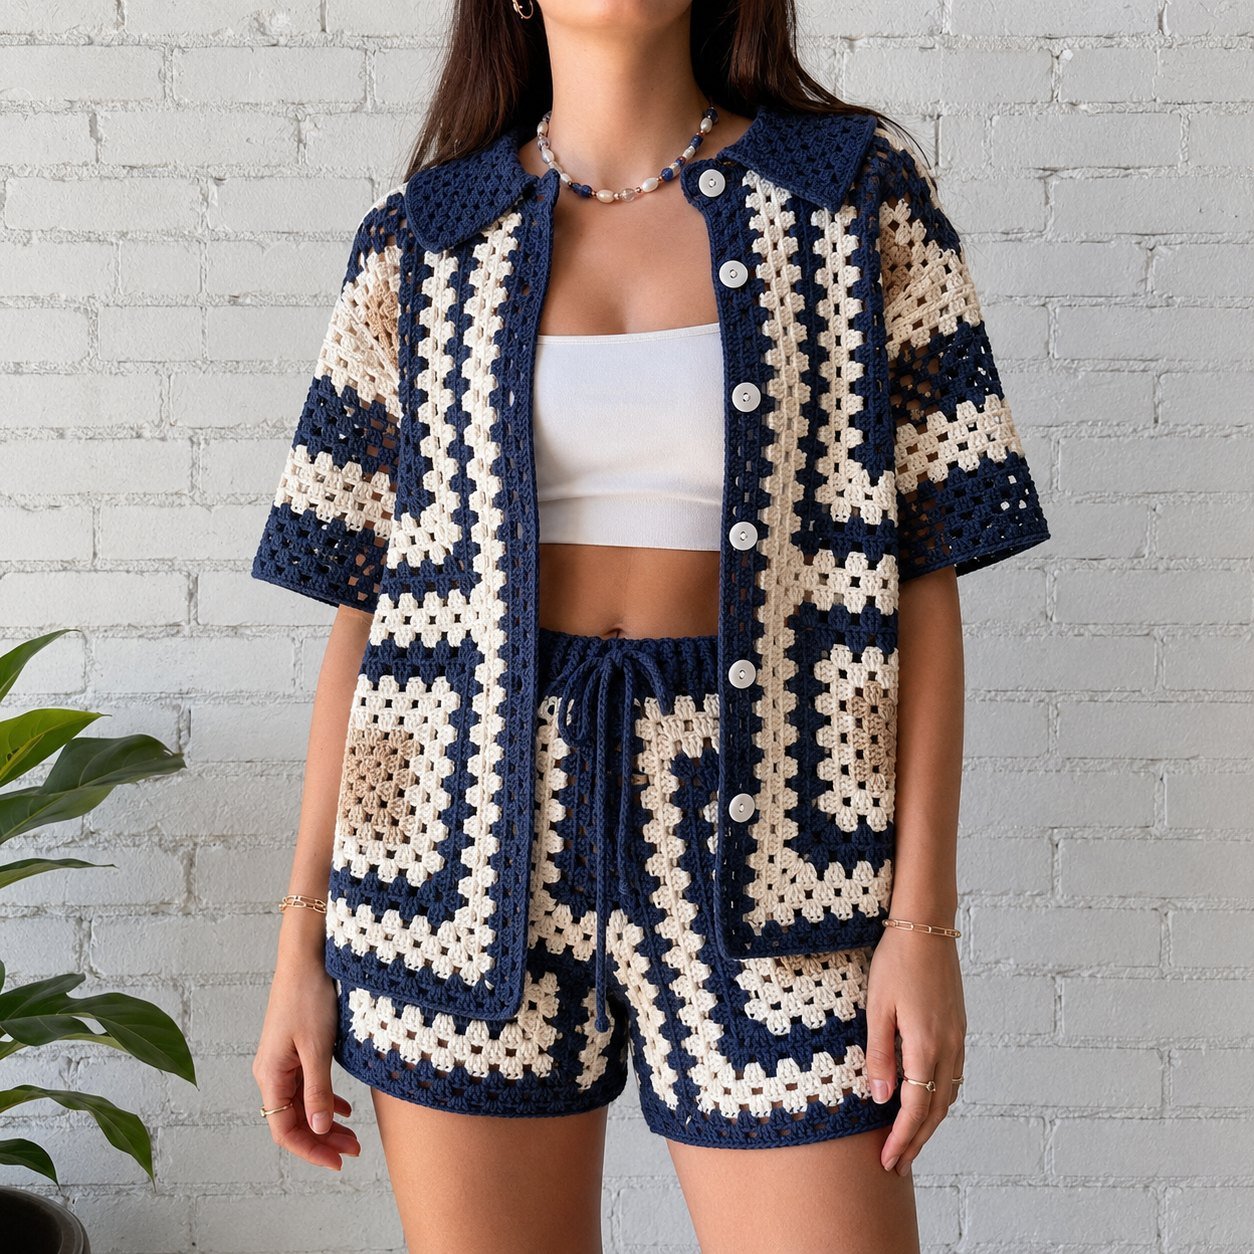
This free women’s crochet granny square shirt and shorts set pattern is a navy, cream and taupe patchwork co-ord built entirely from 124 blocked 5-round granny squares. The set includes a relaxed-fit short-sleeve button-up shirt with a fold-over collar, button band and buttonhole band, plus matching drawstring shorts with a crotch bridge, leg extensions and a waistband eyelet round. It is worked in DK cotton with a 4 mm hook for the squares and a 3.5 mm hook for the edging, in a single adult size (Small / Medium relaxed fit), and rated advanced intermediate.
Before you start, check your motif size with the crochet gauge calculator (one blocked square = 3.75 in / 9.5 cm), plan your navy, cream and taupe cotton with the crochet yarn calculator and convert your 4 mm and 3.5 mm hooks with the crochet hook size converter. New to granny squares? Start with how to make a magic ring, how to double crochet and the 6 basic crochet stitches for beginners, and keep the crochet abbreviations glossary open while you read.
Free Crochet Tools for This Pattern
Check your gauge, convert your hooks and plan your granny shirt and shorts set before you make square one.
Free PDF Pattern Download
Download the Women’s Patchwork Granny Crochet Shirt and Shorts Set pattern as a PDF – the complete 35-page written pattern plus all diagram pages, ready to print or save. No email required.
Patchwork Granny Shirt and Shorts Set at a Glance
| Detail | Pattern facts |
|---|---|
| Pattern type | Free women’s crochet co-ord pattern, written instructions with diagram pages (US terms) |
| Skill level | Advanced intermediate |
| Size | Single adult size: Small / Medium relaxed fit |
| Shirt chest | 45 in / 114 cm |
| Shirt length from shoulder | 24.5 in / 62 cm |
| Shorts | Waist 45 in / 114 cm before drawstring, adjustable 28–34 in / 71–86 cm; length 14 in / 35.5 cm; inseam 3.75 in / 9.5 cm |
| Construction | 124 joined granny squares, sewn shoulder, side and sleeve seams, button bands, fold-over collar, crotch bridge, leg extensions, eyelet waistband and drawstring |
| Yarn | DK cotton: navy 420–500 g, ivory cream 300–380 g, warm taupe / beige 160–220 g |
| Hooks | 4 mm for granny squares, 3.5 mm for bands, edging and drawstring |
| Buttons | 7 white buttons, 14–16 mm |
| Gauge | One granny square after blocking = 3.75 in x 3.75 in / 9.5 cm x 9.5 cm; single crochet edging 18 sc = 4 in / 10 cm |
In This Pattern
- Skill Level
- Finished Size
- Materials
- Stitch Abbreviations
- 5-Round Granny Square Motif
- Parts List
- Construction Overview
- Crochet Diagram Pages
- Part-by-Part Instructions
- Stitch Counts
- Placement Order
- Assembly
- Final Checklist
- Frequently Asked Questions
- More Free Patterns and Tools
Women’s Patchwork Granny Crochet Shirt and Shorts Set Pattern
1. Skill Level
Advanced intermediate.
This pattern uses modular granny-square construction, contrast patchwork layout, joined shirt panels, short sleeves, button band, buttonholes, fold-over collar, matching granny shorts, crotch bridge construction, waistband eyelets, drawstring, contrast edging, and full assembly.
If you are building up to this make, try the Crochet Granny Square Top and Skirt Set Pattern or the Granny Square Tote Bag Crochet Pattern first.
2. Finished Size
Single adult size: Small / Medium relaxed fit.
Shirt Finished Measurements
| Area | Measurement |
|---|---|
| Chest circumference | 45 in / 114 cm |
| Back width | 22.5 in / 57 cm |
| Each front width before button band | 11.25 in / 28.5 cm |
| Shirt length from shoulder | 24.5 in / 62 cm |
| Square section length | 22.5 in / 57 cm |
| Armhole depth | 7.5 in / 19 cm |
| Sleeve circumference | 15 in / 38 cm |
| Sleeve length | 7.5 in / 19 cm |
| Button band width | 0.9 in / 2.3 cm |
| Collar depth | 2.5 in / 6.5 cm |
Shorts Finished Measurements
| Area | Measurement |
|---|---|
| Waist circumference before drawstring | 45 in / 114 cm |
| Adjustable waist fit | 28–34 in / 71–86 cm |
| Hip circumference | 45 in / 114 cm |
| Shorts length from waist | 14 in / 35.5 cm |
| Inseam | 3.75 in / 9.5 cm |
| Each leg opening circumference | 22.5 in / 57 cm |
| Drawstring length | 58 in / 147 cm |
Motif Gauge
| Gauge Area | Measurement |
|---|---|
| One granny square after blocking | 3.75 in x 3.75 in / 9.5 cm x 9.5 cm |
| Final granny square side count | 19 side positions |
| Final granny square corner | ch-2 corner space |
| Single crochet edging | 18 sc = 4 in / 10 cm |
Check your swatch and blocked square with the crochet gauge calculator before you commit to all 124 squares.
3. Materials
| Material | Amount |
|---|---|
| DK cotton yarn, dark navy | 420–500 g |
| DK cotton yarn, ivory cream | 300–380 g |
| DK cotton yarn, warm taupe / beige | 160–220 g |
| Crochet hook for granny squares | 4 mm |
| Crochet hook for bands, edging, drawstrings | 3.5 mm |
| White buttons, 14–16 mm | 7 |
| Stitch markers | 24 |
| Yarn needle | 1 |
| Sewing needle and matching thread | Required |
| Blocking pins | Required |
| Measuring tape | Required |
Color labels:
- Color A: dark navy
- Color B: ivory cream
- Color C: warm taupe / beige
Not sure how much yarn to buy? Use the crochet yarn calculator, and convert your hooks with the hook size converter.
4. Stitch Abbreviations
US crochet terms.
| Abbreviation | Meaning |
|---|---|
| ch | chain |
| sl st | slip stitch |
| sc | single crochet |
| hdc | half double crochet |
| dc | double crochet |
| BLO | back loop only |
| st / sts | stitch / stitches |
| sp | space |
| rnd | round |
| RS | right side |
| WS | wrong side |
| rep | repeat |
| sk | skip |
| FO | fasten off |
Need more terms? See the crochet abbreviations glossary or switch names with the US/UK crochet terms converter. Stitch tutorials: how to half double crochet, how to slip stitch and how to start a crochet chain.
Stitch Definitions
Single Crochet: Insert hook into indicated stitch, yarn over, pull up loop, yarn over, pull through both loops.
Half Double Crochet: Yarn over, insert hook into indicated stitch, yarn over, pull up loop, yarn over, pull through all 3 loops.
Double Crochet: Yarn over, insert hook into indicated stitch, yarn over, pull up loop, yarn over and pull through 2 loops, yarn over and pull through final 2 loops.
Back Loop Only Single Crochet: Work sc into the back loop only of the indicated stitch.
Reverse Single Crochet: Working from left to right, insert hook into previous stitch, yarn over, pull up loop, yarn over, pull through both loops.
Padded Drawstring Cord: Chain the stated number, then sl st in the back bump of 2nd ch from hook and in each back bump across. This creates a firm rounded cord.
5-Round Granny Square Motif
Each square finishes with 19 side positions per side and 4 ch-2 corner spaces.
Work every square with the color sequence listed in the motif color chart.
| Round | Instruction | Count |
|---|---|---|
| Rnd 1 | Ch 4, sl st to first ch to form ring. Ch 3, 2 dc in ring, ch 2, *3 dc in ring, ch 2; rep from * 3 times. Sl st to top of beginning ch-3. | 4 clusters of 3 dc, 4 corner ch-2 spaces |
| Rnd 2 | Sl st into next corner ch-2 sp. Ch 3, 2 dc in same corner, ch 2, 3 dc in same corner, ch 1, *(3 dc, ch 2, 3 dc) in next corner ch-2 sp, ch 1; rep from * 3 times. Sl st to top of beginning ch-3. | Side count: 7 positions per side |
| Rnd 3 | Sl st into next corner ch-2 sp. Ch 3, 2 dc in same corner, ch 2, 3 dc in same corner, ch 1, 3 dc in next ch-1 sp, ch 1, *(3 dc, ch 2, 3 dc) in next corner ch-2 sp, ch 1, 3 dc in next ch-1 sp, ch 1; rep from * 3 times. Sl st to top of beginning ch-3. | Side count: 11 positions per side |
| Rnd 4 | Sl st into next corner ch-2 sp. Ch 3, 2 dc in same corner, ch 2, 3 dc in same corner, ch 1, *3 dc in next ch-1 sp, ch 1; rep from * to next corner, **(3 dc, ch 2, 3 dc) in next corner ch-2 sp, ch 1, *3 dc in next ch-1 sp, ch 1; rep from * to next corner; rep from ** 3 times. Sl st to top of beginning ch-3. | Side count: 15 positions per side |
| Rnd 5 | Sl st into next corner ch-2 sp. Ch 3, 2 dc in same corner, ch 2, 3 dc in same corner, ch 1, *3 dc in next ch-1 sp, ch 1; rep from * to next corner, **(3 dc, ch 2, 3 dc) in next corner ch-2 sp, ch 1, *3 dc in next ch-1 sp, ch 1; rep from * to next corner; rep from ** 3 times. Sl st to top of beginning ch-3. | Side count: 19 positions per side |
FO and weave in ends.
Block each square to exactly 3.75 in x 3.75 in / 9.5 cm x 9.5 cm.
Want to decode the rounds line by line? Paste them into the crochet pattern decoder. Circle-start refresher: how to make a magic ring and how to increase in a crochet circle.
Square Color Types
| Type | Rnd 1 | Rnd 2 | Rnd 3 | Rnd 4 | Rnd 5 |
|---|---|---|---|---|---|
| N | Navy | Navy | Navy | Navy | Cream |
| C | Cream | Cream | Cream | Cream | Navy |
| T | Taupe | Taupe | Taupe | Cream | Navy |
| S | Navy | Cream | Navy | Cream | Navy |
| L | Cream | Navy | Cream | Navy | Cream |
| M | Taupe | Cream | Taupe | Navy | Cream |
Changing colors every round? See how to change colors in crochet.
Total squares required
| Garment Section | Quantity |
|---|---|
| Shirt back | 36 |
| Shirt left front | 18 |
| Shirt right front | 18 |
| Shirt sleeves | 16 |
| Shorts upper body | 24 |
| Shorts leg extensions | 12 |
| Total squares | 124 |
5. Parts List
| Part | Quantity | Color / Style |
|---|---|---|
| Granny squares | 124 | Navy / cream / taupe mix |
| Shirt back panel | 1 | 6 squares wide x 6 squares high |
| Shirt left front panel | 1 | 3 squares wide x 6 squares high |
| Shirt right front panel | 1 | 3 squares wide x 6 squares high |
| Shirt left sleeve tube | 1 | 4 squares around x 2 squares high |
| Shirt right sleeve tube | 1 | 4 squares around x 2 squares high |
| Right button band | 1 | Navy |
| Left buttonhole band | 1 | Navy |
| Fold-over collar | 1 | Navy |
| Shirt hem edging | 1 | Navy |
| Sleeve edgings | 2 | Navy |
| Shorts upper tube | 1 | 12 squares around x 2 squares high |
| Shorts left leg extension | 1 | 6 squares around x 1 square high |
| Shorts right leg extension | 1 | 6 squares around x 1 square high |
| Crotch bridge | 1 | Cream |
| Shorts waistband edging | 1 | Navy |
| Shorts leg edgings | 2 | Navy |
| Shorts drawstring | 1 | Navy |
| Buttons | 7 | White |
6. Construction Overview
- Crochet 124 granny squares using the written 5-round square pattern.
- Block every square to 3.75 in x 3.75 in.
- Join 36 squares into the shirt back panel.
- Join 18 squares into each shirt front panel.
- Join shoulder seams, leaving a center back neck opening and front neckline openings.
- Join side seams, leaving the upper 2 square rows open for armholes.
- Join sleeve squares into two sleeve tubes.
- Attach sleeve tubes to armholes.
- Work button band, buttonhole band, hem edging, sleeve edging, and collar.
- Sew buttons.
- Join 24 squares into the shorts upper body tube.
- Crochet and attach the crotch bridge.
- Join 6 squares into each shorts leg extension tube.
- Attach leg extensions to the lower body.
- Work waistband edging, leg edgings, and drawstring.
- Block both garments to final measurements.
Track all 16 steps in the crochet project planner so you always know which squares and seams are done.
Crochet Diagram Pages
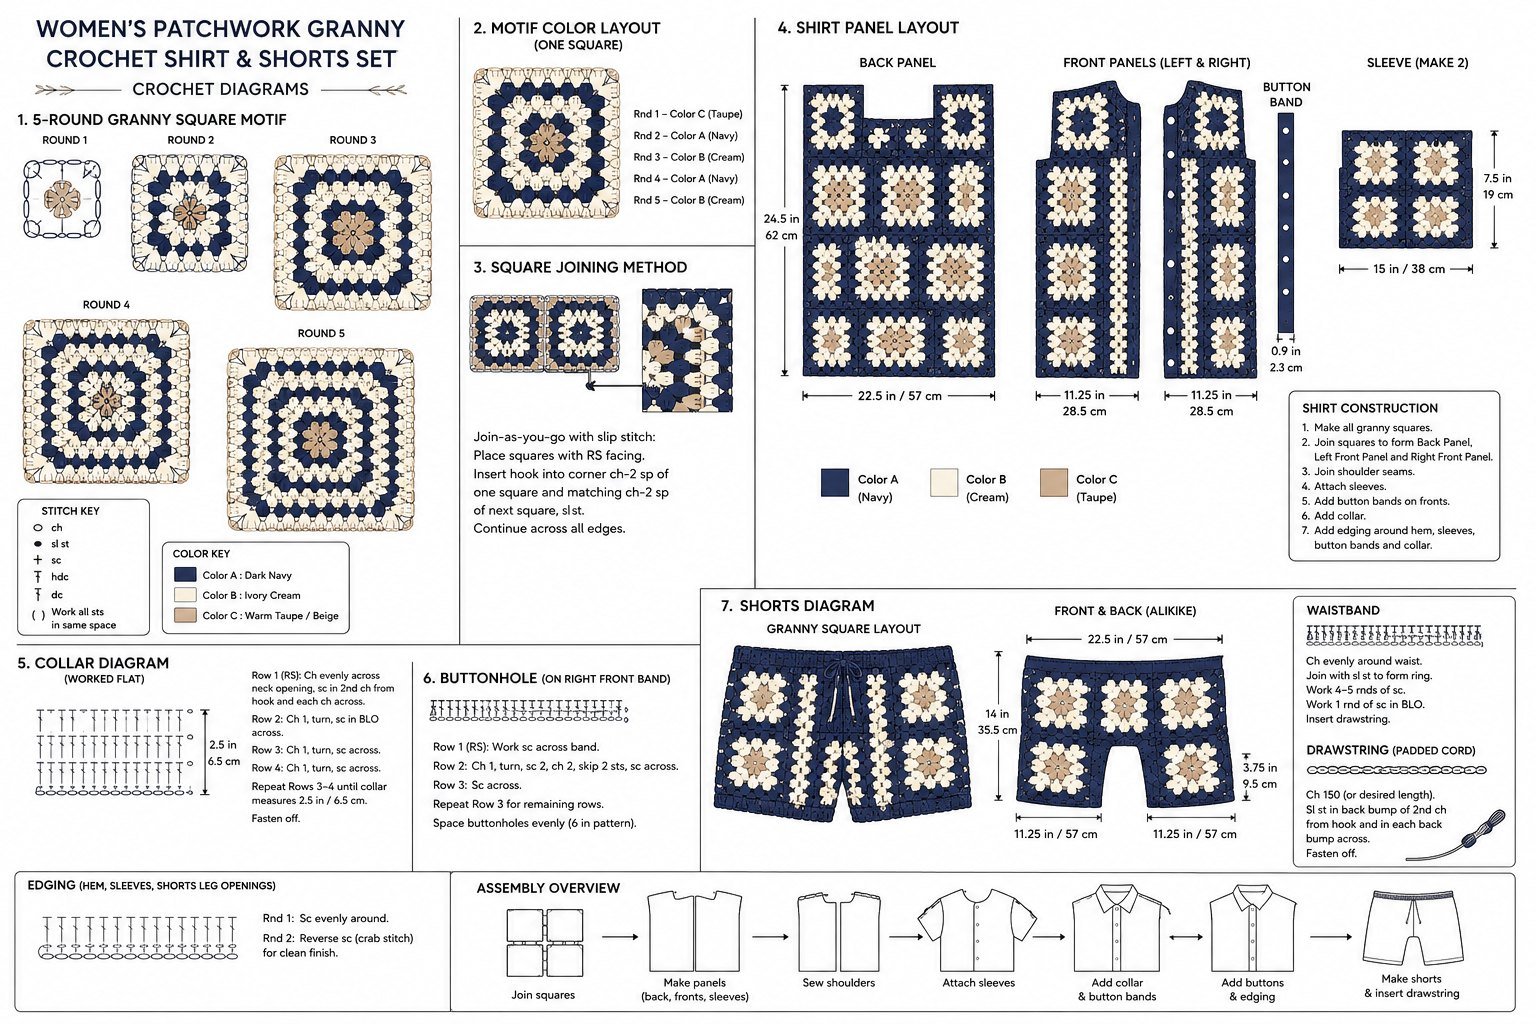
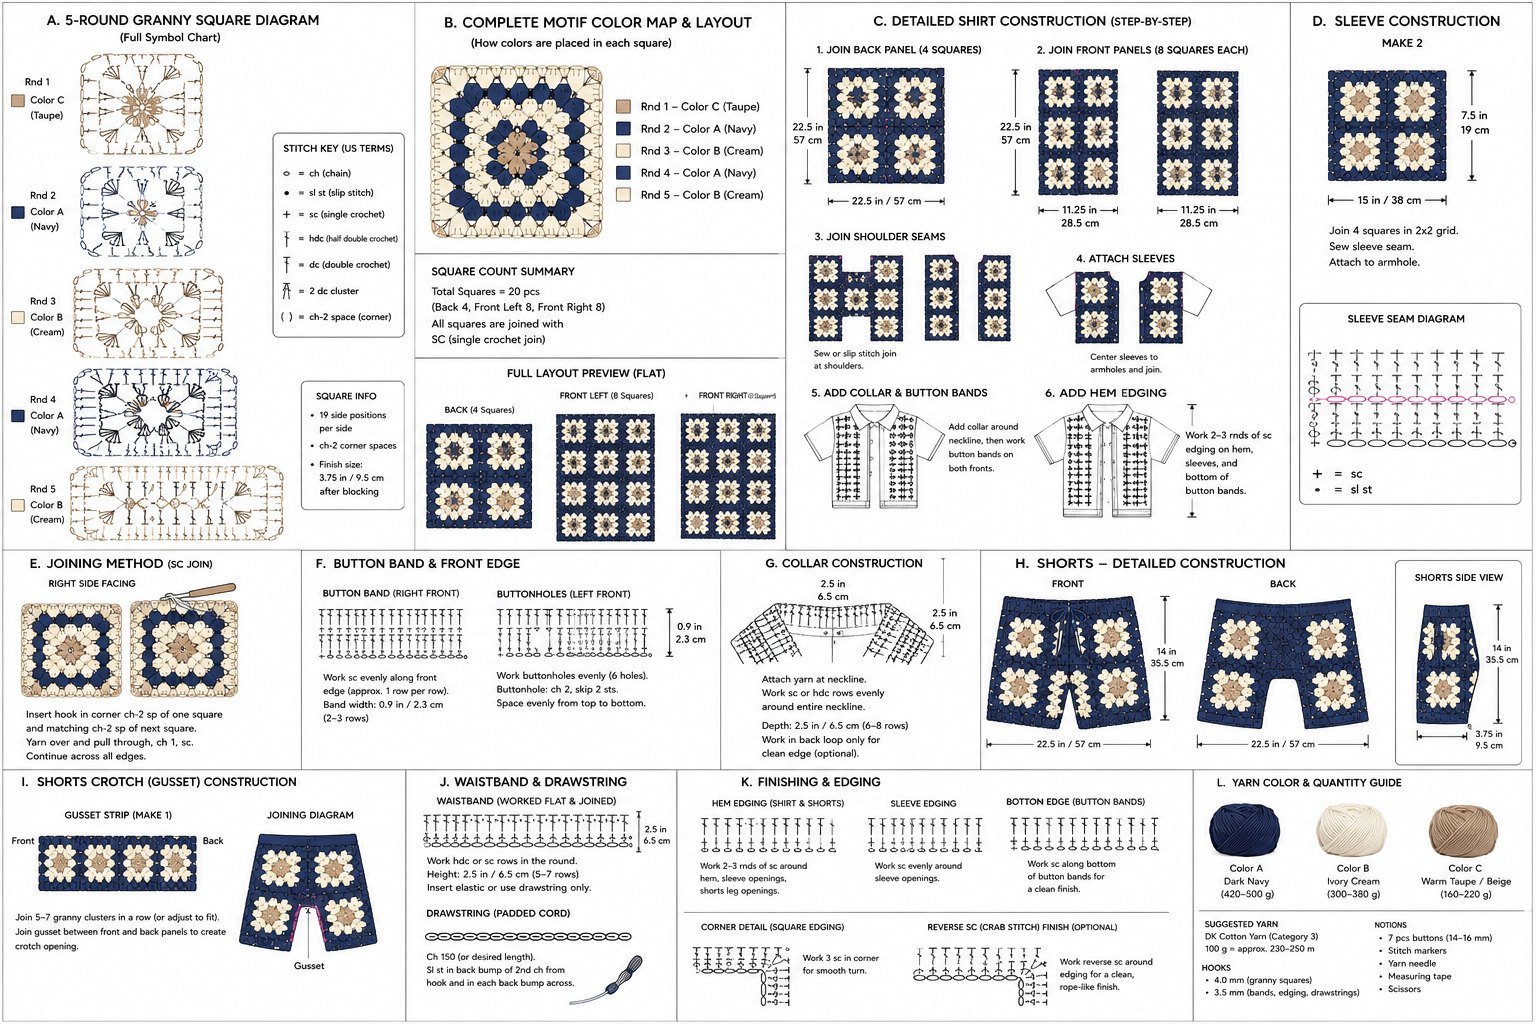
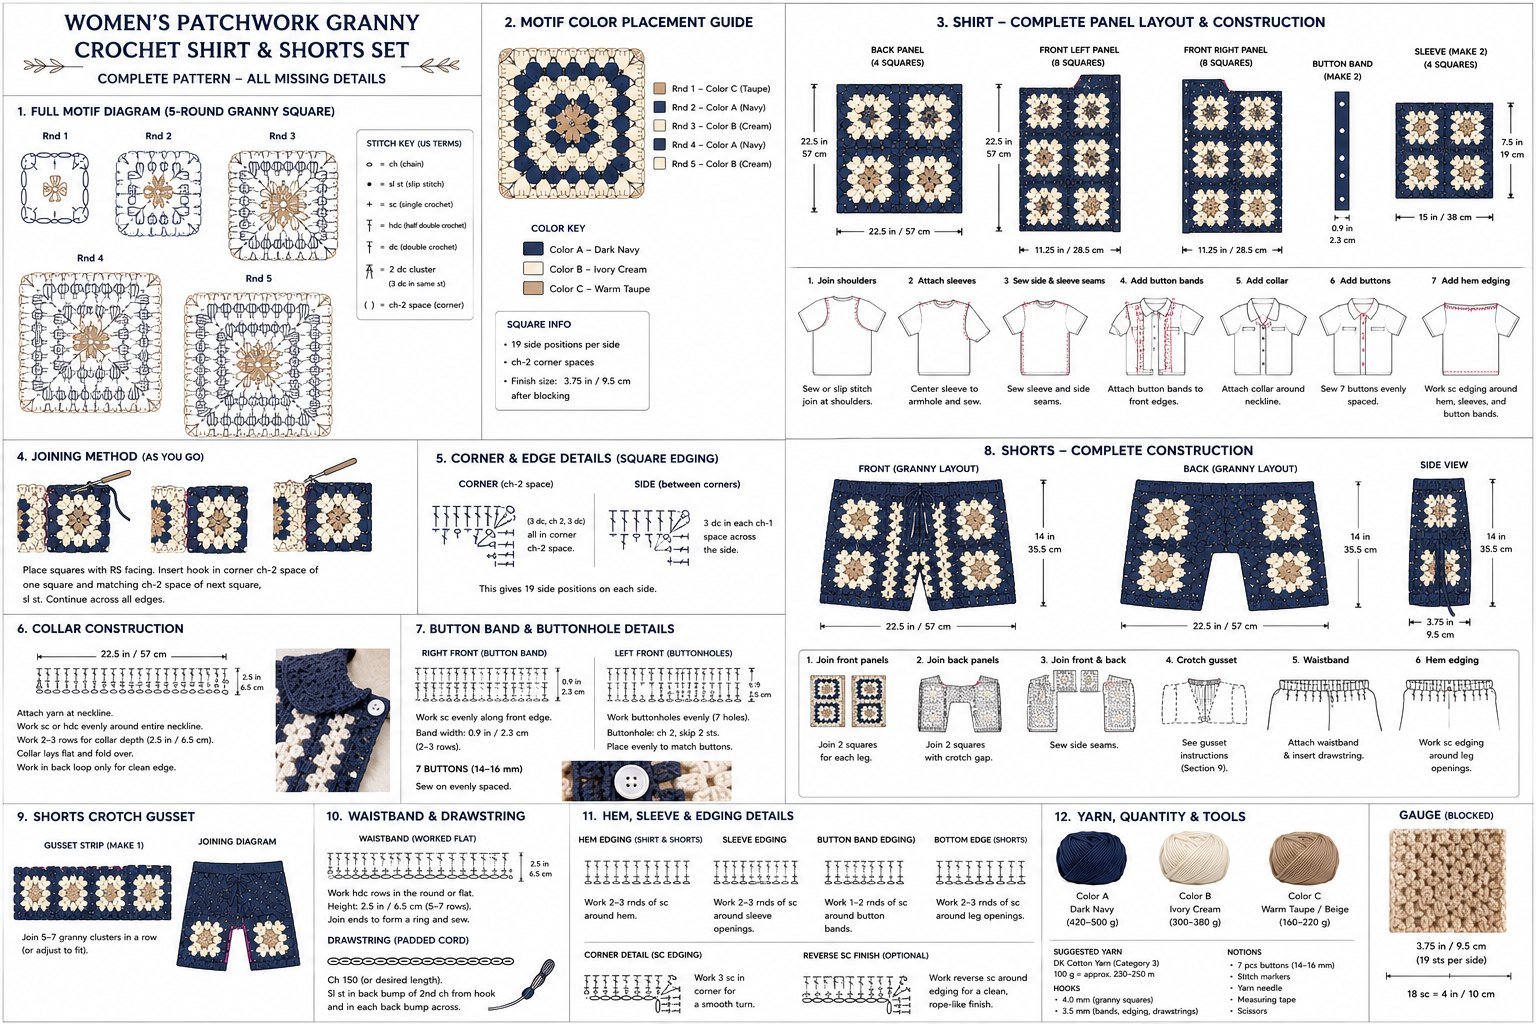
The diagram pages below are the visual guides included in the PDF. Follow the written stitch counts, rounds and square layouts in this pattern whenever a visual image and the written instruction differ.
7. Part-by-Part Instructions
Shirt Back Panel
Make 36 granny squares. Arrange 6 squares wide x 6 squares high. Rows are listed from top to bottom.
| Back Row | Square Types, Left to Right |
|---|---|
| Row 1 | N, C, S, N, T, C |
| Row 2 | L, N, C, T, N, S |
| Row 3 | C, S, N, L, C, N |
| Row 4 | N, T, C, N, S, T |
| Row 5 | S, C, N, T, C, N |
| Row 6 | N, L, T, C, N, S |
Join Back Squares
Use navy yarn and 4 mm hook. Join each square with WS together and RS facing outward. For every side join:
- Sl st through the back loop of one square side position and the back loop of the matching square side position.
- Work across all 19 side positions.
- Work 1 sl st through both matching corner ch-2 spaces.
Count per square-to-square side join: 20 sl sts.
Horizontal joins:
- Join Row 1 squares into one strip.
- Join Row 2 squares into one strip.
- Join Row 3 squares into one strip.
- Join Row 4 squares into one strip.
- Join Row 5 squares into one strip.
- Join Row 6 squares into one strip.
Each 6-square strip has 5 joins. Count per strip: 5 joins x 20 sl sts = 100 sl sts.
Vertical joins: Join Row 1 to Row 2, Row 2 to Row 3, Row 3 to Row 4, Row 4 to Row 5, and Row 5 to Row 6. Each horizontal seam across panel:
- 6 square edges x 19 side positions = 114 side positions.
- 5 internal corner joins = 5 sl sts.
- Total per row-to-row seam: 119 sl sts.
Back panel completed size: 22.5 in wide x 22.5 in high.
Left Front Shirt Panel as Worn
Make 18 granny squares. Arrange 3 squares wide x 6 squares high. Rows are listed from top to bottom.
| Left Front Row | Square Types, Center Front to Side Seam |
|---|---|
| Row 1 | C, N, T |
| Row 2 | N, L, C |
| Row 3 | S, C, N |
| Row 4 | T, N, C |
| Row 5 | C, S, N |
| Row 6 | N, T, L |
Join using the same 20-sl-st side join method.
Horizontal row joins: Each 3-square strip has 2 joins. Count per strip: 2 joins x 20 sl sts = 40 sl sts.
Vertical row-to-row joins: Each seam across 3 squares has 57 side positions plus 2 internal corner joins. Count per row-to-row seam: 59 sl sts.
Left front panel completed size: 11.25 in wide x 22.5 in high.
Right Front Shirt Panel as Worn
Make 18 granny squares. Arrange 3 squares wide x 6 squares high. Rows are listed from top to bottom.
| Right Front Row | Square Types, Side Seam to Center Front |
|---|---|
| Row 1 | T, N, C |
| Row 2 | C, L, N |
| Row 3 | N, C, S |
| Row 4 | C, N, T |
| Row 5 | N, S, C |
| Row 6 | L, T, N |
Join using the same 20-sl-st side join method.
Horizontal row joins: Each 3-square strip has 2 joins. Count per strip: 40 sl sts.
Vertical row-to-row joins: Count per row-to-row seam: 59 sl sts.
Right front panel completed size: 11.25 in wide x 22.5 in high.
Shirt Shoulder Seams
Use navy yarn and yarn needle. Place panels RS together. Back panel has 6 squares across the top.
| Area | Back Top Edge |
|---|---|
| Right shoulder | Outer 2 squares |
| Back neck opening | Center 2 squares |
| Left shoulder | Outer 2 squares |
Left shoulder seam: Sew left front top outer 2 square edges to left back top outer 2 square edges. 2 square edges x 19 positions = 38 stitches.
Right shoulder seam: Sew right front top outer 2 square edges to right back top outer 2 square edges. 2 square edges x 19 positions = 38 stitches.
Back neck left open: Center 2 square edges = 38 positions.
Front neck openings left open: Inner top edge of each front panel = 19 positions.
Shirt Side Seams
Use navy yarn and yarn needle. Each side seam is sewn from hem upward.
Left side seam: Sew the lower 4 square rows together. Each square row edge has 19 positions. 4 square rows x 19 positions = 76 sewing points. Leave the upper 2 square rows open for armhole.
Right side seam: Sew the lower 4 square rows together. Count: 76 sewing points. Leave the upper 2 square rows open for armhole.
Each armhole opening:
| Area | Count |
|---|---|
| Front armhole edge | 2 square sides x 19 = 38 |
| Back armhole edge | 2 square sides x 19 = 38 |
| Total armhole edge | 76 positions |
Left Shirt Sleeve
Make 8 granny squares.
| Sleeve Row | 4 Squares Around |
|---|---|
| Upper row | N, C, S, T |
| Lower row | C, N, L, S |
Join each row into a 4-square ring. For each 4-square ring:
- Join Square 1 to Square 2: 20 sl sts.
- Join Square 2 to Square 3: 20 sl sts.
- Join Square 3 to Square 4: 20 sl sts.
- Join Square 4 to Square 1: 20 sl sts.
- Total ring joins: 80 sl sts.
Join upper ring to lower ring:
- 4 square edges x 19 positions = 76 side positions.
- 4 corner joins = 4 sl sts.
- Total row-to-row sleeve seam: 80 sl sts.
Sleeve top edge count: 76 positions. Sleeve lower edge count: 76 positions.
Right Shirt Sleeve
Make same as left sleeve with this layout:
| Sleeve Row | 4 Squares Around |
|---|---|
| Upper row | T, S, C, N |
| Lower row | S, L, N, C |
Counts:
- Sleeve squares: 8
- Upper edge: 76 positions
- Lower edge: 76 positions
- Row-to-row seam: 80 sl sts
Attach Sleeves to Armholes
Use navy yarn and yarn needle. For each sleeve:
- Turn shirt WS out.
- Keep sleeve RS facing outward.
- Insert sleeve into armhole with RS together.
- Match sleeve seam to underarm seam.
- Match opposite sleeve seam to shoulder seam.
- Sew sleeve top edge to armhole edge.
| Area | Count |
|---|---|
| Sleeve top edge | 76 positions |
| Armhole edge | 76 positions |
| Sewing ratio | 1 sleeve position to 1 armhole position |
Repeat for second sleeve.
Right Button Band as Worn
Use navy yarn and 3.5 mm hook. With RS facing, join yarn at lower right front opening. The right front opening is 6 square edges high.
Pickup count: 6 square edges x 19 positions = 114 sc.
| Row | Instruction | Count |
|---|---|---|
| Row 1 Pickup | Ch 1. Work 114 sc evenly up the right front opening. | 114 sc |
| Row 2 | Ch 1, turn. Sc in each st across. | 114 sc |
| Row 3 | Ch 1, turn. Sc in each st across. | 114 sc |
| Row 4 | Ch 1, turn. Sc BLO in each st across. | 114 sc |
| Row 5 | Ch 1, turn. Sc in each st across. | 114 sc |
FO.
Button placement:
| Button | Position |
|---|---|
| Button 1 | Between band sts 12 and 13 |
| Button 2 | Between band sts 27 and 28 |
| Button 3 | Between band sts 42 and 43 |
| Button 4 | Between band sts 57 and 58 |
| Button 5 | Between band sts 72 and 73 |
| Button 6 | Between band sts 87 and 88 |
| Button 7 | Between band sts 102 and 103 |
Left Buttonhole Band as Worn
Use navy yarn and 3.5 mm hook. With RS facing, join yarn at upper left front opening and work downward.
| Row | Instruction | Count |
|---|---|---|
| Row 1 Pickup | Ch 1. Work 114 sc down the left front opening. | 114 sc |
| Row 2 | Ch 1, turn. Sc in each st across. | 114 sc |
| Row 3 Buttonhole Row | Ch 1, turn. Sc in first 11 sts, *ch 2, sk next 2 sts, sc in next 13 sts; rep from * 6 times, ch 2, sk next 2 sts, sc in final 11 sts. | 114 sts |
| Row 4 | Ch 1, turn. Sc in each sc and work 2 sc into each ch-2 buttonhole sp across. | 114 sc |
| Row 5 | Ch 1, turn. Sc in each st across. | 114 sc |
FO.
Buttonholes:
| Buttonhole | Position |
|---|---|
| Buttonhole 1 | Over skipped sts 12–13 |
| Buttonhole 2 | Over skipped sts 27–28 |
| Buttonhole 3 | Over skipped sts 42–43 |
| Buttonhole 4 | Over skipped sts 57–58 |
| Buttonhole 5 | Over skipped sts 72–73 |
| Buttonhole 6 | Over skipped sts 87–88 |
| Buttonhole 7 | Over skipped sts 102–103 |
Ready for the finishing rows? The collar, hem and sleeve edging come next, and the same fold-over collar idea appears in our Men’s Striped Open-Mesh Crochet Sweater Pattern.
Shirt Collar
Use navy yarn and 3.5 mm hook. Work after button bands are complete.
Neckline pickup count:
| Area | Count |
|---|---|
| Right button band top edge | 5 |
| Right front neckline top edge | 19 |
| Back neck opening | 38 |
| Left front neckline top edge | 19 |
| Left buttonhole band top edge | 5 |
| Total | 86 |
| Row | Instruction | Count |
|---|---|---|
| Row 1 RS | Join yarn at upper right front edge. Ch 2. Hdc in each neckline pickup point across. | 86 hdc |
| Row 2 WS | Ch 2, turn. 2 hdc in first st, hdc in each st across, 2 hdc in final st. | 88 hdc |
| Row 3 RS | Ch 2, turn. Hdc in each st across. | 88 hdc |
| Row 4 WS | Ch 2, turn. 2 hdc in first st, hdc in each st across, 2 hdc in final st. | 90 hdc |
| Row 5 RS | Ch 2, turn. Hdc in each st across. | 90 hdc |
| Row 6 WS | Ch 2, turn. 2 hdc in first st, hdc in each st across, 2 hdc in final st. | 92 hdc |
| Row 7 RS | Ch 2, turn. Hdc in each st across. | 92 hdc |
| Row 8 Collar Edge | Ch 1, turn. Sc in each st across. | 92 sc |
Without fastening off, work 8 sc down the left short collar edge. Sl st into neckline edge. FO. Rejoin yarn at right short collar edge. Work 8 sc up the right short collar edge. Sl st into first sc of Row 8. FO.
Shirt Hem Edging
Use navy yarn and 3.5 mm hook. Work after button bands are complete. With RS facing, join yarn at lower right front corner.
Row 1: Ch 1. Work across lower edge as follows:
- 5 sc across lower edge of right button band.
- 57 sc across right front bottom edge.
- 114 sc across back bottom edge.
- 57 sc across left front bottom edge.
- 5 sc across lower edge of left buttonhole band.
| Row | Instruction | Count |
|---|---|---|
| Row 1 | Ch 1. Work across lower edge as listed above (5 + 57 + 114 + 57 + 5 sc). | 238 sc |
| Row 2 | Ch 1, turn. Sc in each st across. | 238 sc |
| Row 3 Final Edge | Ch 1, turn. Reverse sc in each st across. | 238 reverse sc |
FO.
Shirt Sleeve Edging
Use navy yarn and 3.5 mm hook. Work around each sleeve opening.
| Round | Instruction | Count |
|---|---|---|
| Round 1 | Join yarn at sleeve underarm seam. Ch 1. Work 76 sc around sleeve opening. Sl st to first sc. | 76 sc |
| Round 2 | Ch 1. Sc in each st around. Sl st to first sc. | 76 sc |
| Round 3 Final Edge | Ch 1. Reverse sc in each st around. Sl st to first reverse sc. | 76 reverse sc |
FO. Repeat for second sleeve.
Shorts Upper Body Tube
Make 24 granny squares. Construct as 12 squares around x 2 squares high. Top row and lower row are listed from center front moving clockwise around the body.
| Position | Top Row | Lower Row |
|---|---|---|
| 1 center front left | N | C |
| 2 front left | C | S |
| 3 front side left | T | N |
| 4 left side | N | L |
| 5 back left | S | T |
| 6 center back left | C | N |
| 7 center back right | N | C |
| 8 back right | T | S |
| 9 right side | L | N |
| 10 front side right | N | T |
| 11 front right | C | L |
| 12 center front right | S | N |
Join top row into a 12-square ring: 12 joins x 20 sl sts = 240 sl sts.
Join lower row into a 12-square ring: 12 joins x 20 sl sts = 240 sl sts.
Join top row to lower row: 12 square edges x 19 positions = 228 positions; 12 corner joins = 12 sl sts. Total row-to-row join: 240 sl sts.
Shorts upper tube measurements:
| Area | Count / Measurement |
|---|---|
| Top opening | 12 square edges x 19 = 228 positions |
| Lower opening | 228 positions |
| Tube height | 7.5 in / 19 cm |
| Tube circumference | 45 in / 114 cm |
Crotch Bridge
Use cream yarn and 4 mm hook. Foundation: Ch 20.
| Row | Instruction | Count |
|---|---|---|
| Row 1 RS | Sc in 2nd ch from hook and in each ch across. | 19 sc |
| Rows 2–12 | Ch 1, turn. Sc in each st across. | 19 sc each row |
FO, leaving a 20 in / 50 cm sewing tail.
Finished crotch bridge:
| Area | Count / Measurement |
|---|---|
| Width | 19 sc / one square edge |
| Length | 12 rows / 3 in / 7.5 cm |
Attach crotch bridge:
- Mark the center front lower edge between lower-row positions 12 and 1.
- Mark the center back lower edge between lower-row positions 6 and 7.
- Sew one 19-st short end of the crotch bridge to the lower center front edge.
- Sew the opposite 19-st short end to the lower center back edge.
- Keep the bridge flat and centered.
Left Shorts Leg Extension
Make 6 granny squares. Join into a 6-square ring. Layout around left leg:
| Position | Square Type |
|---|---|
| Front inner | N |
| Front center | C |
| Front outer | T |
| Back outer | S |
| Back center | N |
| Back inner | L |
Join ring: 6 joins x 20 sl sts = 120 sl sts.
Attach to left lower leg opening: Leg extension top edge: 6 square edges x 19 = 114 positions. Left body leg opening: 114 positions. Sew or sl st join 1 extension position to 1 body position. FO.
Right Shorts Leg Extension
Make 6 granny squares. Join into a 6-square ring. Layout around right leg:
| Position | Square Type |
|---|---|
| Front inner | C |
| Front center | N |
| Front outer | L |
| Back outer | T |
| Back center | C |
| Back inner | S |
Join ring: 6 joins x 20 sl sts = 120 sl sts.
Attach to right lower leg opening: Leg extension top edge: 114 positions. Right body leg opening: 114 positions. Sew or sl st join 1 extension position to 1 body position. FO.
Shorts Waistband Edge and Eyelets
Use navy yarn and 3.5 mm hook. Join yarn at center back top edge.
| Round | Instruction | Count |
|---|---|---|
| Round 1 | Ch 1. Work 228 sc around top opening. Sl st to first sc. | 228 sc |
| Round 2 Eyelet Round | Ch 1. *Sc in next 3 sts, ch 1, sk next st; rep from * 57 times. Sl st to first sc. | 228 pattern positions |
| Round 3 | Ch 1. Sc in each sc and ch-1 sp around. Sl st to first sc. | 228 sc |
| Round 4 Final Edge | Ch 1. Reverse sc in each st around. Sl st to first reverse sc. | 228 reverse sc |
FO.
Shorts Leg Edging
Use navy yarn and 3.5 mm hook. Work around each leg opening.
| Round | Instruction | Count |
|---|---|---|
| Round 1 | Join yarn at inner leg seam. Ch 1. Work 114 sc around leg opening. Sl st to first sc. | 114 sc |
| Round 2 | Ch 1. Sc in each st around. Sl st to first sc. | 114 sc |
| Round 3 Final Edge | Ch 1. Reverse sc in each st around. Sl st to first reverse sc. | 114 reverse sc |
FO. Repeat for second leg.
Shorts Drawstring
Use navy yarn and 3.5 mm hook. Foundation: Ch 465.
Cord Row: Sl st in back bump of 2nd ch from hook and in each back bump across. Count: 464 sl sts.
FO. Knot both ends. Finished drawstring length: 58 in / 147 cm.
Thread through the waistband eyelet round. Bring both ends out at center front and tie into a bow.
Buttons
Use 7 white buttons. Sew buttons to the right button band as worn.
| Button | Position |
|---|---|
| Button 1 | Between band sts 12 and 13 |
| Button 2 | Between band sts 27 and 28 |
| Button 3 | Between band sts 42 and 43 |
| Button 4 | Between band sts 57 and 58 |
| Button 5 | Between band sts 72 and 73 |
| Button 6 | Between band sts 87 and 88 |
| Button 7 | Between band sts 102 and 103 |
Sew each button with at least 8 passes of thread.
8. Stitch Counts
Granny Squares
| Section | Count |
|---|---|
| Total squares | 124 |
| Rnd 1 | 4 clusters + 4 corners |
| Rnd 2 | 7 side positions per side |
| Rnd 3 | 11 side positions per side |
| Rnd 4 | 15 side positions per side |
| Rnd 5 | 19 side positions per side |
| Finished square size | 3.75 in x 3.75 in |
Shirt Panels
| Panel | Layout | Squares |
|---|---|---|
| Back | 6 wide x 6 high | 36 |
| Left front | 3 wide x 6 high | 18 |
| Right front | 3 wide x 6 high | 18 |
| Each sleeve | 4 around x 2 high | 8 |
| Both sleeves | 16 | |
| Shirt total | 88 |
Shirt Joining Counts
| Join Area | Count |
|---|---|
| One square side join | 20 sl sts |
| Back row-to-row seam | 119 sl sts |
| Front row-to-row seam | 59 sl sts |
| Shoulder seam per side | 38 sewing points |
| Side seam per side | 76 sewing points |
| Each armhole edge | 76 positions |
| Each sleeve top edge | 76 positions |
Shirt Edging Counts
| Edging | Count |
|---|---|
| Right button band | 114 sc per row |
| Left buttonhole band | 114 sc per row |
| Buttonholes | 7 |
| Buttons | 7 |
| Collar pickup | 86 sts |
| Collar final row | 92 sc |
| Hem Row 1 | 238 sc |
| Hem Row 3 | 238 reverse sc |
| Each sleeve edging | 76 reverse sc |
Shorts Counts
| Section | Count |
|---|---|
| Upper body squares | 24 |
| Upper body layout | 12 around x 2 high |
| Upper top opening | 228 positions |
| Upper lower opening | 228 positions |
| Crotch bridge width | 19 sc |
| Crotch bridge length | 12 rows |
| Left leg extension squares | 6 |
| Right leg extension squares | 6 |
| Each leg extension top edge | 114 positions |
| Waistband Round 1 | 228 sc |
| Waistband eyelets | 57 eyelets |
| Waistband final edge | 228 reverse sc |
| Each leg final edge | 114 reverse sc |
| Drawstring | 464 sl sts |
9. Placement Order
Shirt Bottom Layer Pieces
- Back granny-square panel
- Left front granny-square panel
- Right front granny-square panel
- Left sleeve granny-square tube
- Right sleeve granny-square tube
Shirt Middle Layer Pieces
- Shoulder seams
- Side seams
- Sleeve attachment seams
- Button band
- Buttonhole band
- Hem edging
- Sleeve edgings
- Collar
Shirt Top Layer Pieces
- White buttons
- Navy reverse single crochet edging
Shorts Bottom Layer Pieces
- Shorts upper granny-square tube
- Crotch bridge
- Left leg extension ring
- Right leg extension ring
Shorts Middle Layer Pieces
- Waistband edging
- Leg edgings
Shorts Top Layer Pieces
- Navy drawstring bow
No leaves are used. No stems are used. No appliqué flowers are used. No doily base is used. No diagonal layout is used.
Shirt Placement Layout
- Back panel is 6 squares wide and 6 squares high.
- Each front panel is 3 squares wide and 6 squares high.
- Shoulder seams use the outer 2 squares on each front panel.
- Back neck opening uses the center 2 squares of the back panel.
- Side seams close the lower 4 square rows only.
- Upper 2 square rows remain open for armholes.
- Sleeves attach to the 76-position armhole edge.
- Button band sits on the right front as worn.
- Buttonhole band sits on the left front as worn.
- Collar sits above the button bands and folds outward.
- Navy edging frames the shirt hem, sleeves, front opening, and collar.
Shorts Placement Layout
- Shorts upper body is 12 squares around and 2 squares high.
- Center front is between positions 12 and 1.
- Center back is between positions 6 and 7.
- Crotch bridge connects lower center front to lower center back.
- Left leg extension uses 6 squares around.
- Right leg extension uses 6 squares around.
- Waistband eyelets sit above the upper row of squares.
- Drawstring exits at center front.
- Navy edging frames the waistband and both leg openings.
10. Assembly
- Block all squares: Pin each square to 3.75 in x 3.75 in. Keep corners square. Allow all motifs to dry fully before joining.
- Assemble shirt back: Join 36 squares into a 6 x 6 panel. Keep the row chart orientation correct.
- Assemble shirt fronts: Join left front into a 3 x 6 panel. Join right front into a 3 x 6 panel. Keep center front edges straight.
- Sew shirt shoulders: Sew 38 positions on each shoulder. Leave center back neck and inner front top edges open.
- Sew shirt side seams: Sew lower 4 square rows on each side. Leave upper 2 square rows open for armholes.
- Assemble sleeves: Join each sleeve into a 4-square-around, 2-square-high tube. Attach each sleeve to a 76-position armhole.
- Work shirt bands: Work 5 rows on right button band. Work 5 rows on left buttonhole band with 7 buttonholes.
- Work shirt collar: Pick up 86 neckline stitches. Work 8 collar rows. Fold collar outward.
- Work shirt edging: Work 238-st hem edging. Work 76-st sleeve edging on each sleeve.
- Sew buttons: Attach 7 white buttons opposite buttonholes. Confirm shirt closes evenly.
- Assemble shorts upper tube: Join 24 squares into a 12-around x 2-high tube. Keep center front and center back markers in place.
- Attach crotch bridge: Sew one short end to center front lower edge. Sew opposite short end to center back lower edge. Keep bridge flat.
- Assemble leg extensions: Join 6 squares into the left leg ring. Join 6 squares into the right leg ring. Attach each ring to its matching leg opening.
- Work shorts waistband: Work 228 sc around top. Work 57 eyelets. Finish with reverse sc.
- Work shorts leg edgings: Work 114 sc around each leg. Finish each leg with reverse sc.
- Make and thread drawstring: Crochet 464-sl-st drawstring. Thread through eyelet round. Bring ends out at center front.
- Final blocking: Block shirt flat with collar folded. Block sleeves evenly. Block shorts with waist gathered slightly. Shape leg openings evenly. Steam lightly or wet block according to yarn label. Allow to dry fully before wearing.
Pattern complete? Browse more wearable makes in clothing and wearables crochet patterns or compare construction with the Ivory Lace V-Neck Crochet Midi Dress Pattern.
11. Final Checklist
- 124 granny squares are made.
- Every square has 5 rounds.
- Every square has 19 side positions per side.
- Every square is blocked to 3.75 in x 3.75 in.
- Shirt back uses 36 squares.
- Each shirt front uses 18 squares.
- Each sleeve uses 8 squares.
- Shirt shoulder seams are 38 positions each.
- Shirt side seams are 76 positions each.
- Each armhole has 76 positions.
- Each sleeve top edge has 76 positions.
- Right button band has 114 sc per row.
- Left buttonhole band has 114 sc per row.
- Seven buttonholes are made.
- Seven buttons are sewn.
- Collar pickup has 86 sts.
- Collar final row has 92 sc.
- Shirt hem final edge has 238 reverse sc.
- Each sleeve final edge has 76 reverse sc.
- Shorts upper tube uses 24 squares.
- Shorts upper tube has 228 positions at top.
- Crotch bridge has 19 sc across and 12 rows.
- Each leg extension uses 6 squares.
- Each leg opening has 114 positions.
- Waistband has 57 eyelets.
- Waistband final edge has 228 reverse sc.
- Each leg final edge has 114 reverse sc.
- Drawstring has 464 sl sts.
- Navy edging appears on shirt opening, collar, hem, sleeves, waistband, and leg openings.
- Finished shirt chest is 45 in / 114 cm.
- Finished shorts waist adjusts to 28–34 in / 71–86 cm.
- Finished set matches the navy, cream, and taupe patchwork look.
Frequently Asked Questions
What size is the Women’s Patchwork Granny Crochet Shirt and Shorts Set?
It is a single adult size, Small / Medium relaxed fit. The shirt has a 45 in / 114 cm chest and is 24.5 in / 62 cm long from the shoulder. The shorts have a 45 in / 114 cm waist before the drawstring (adjustable to 28–34 in / 71–86 cm), a 14 in / 35.5 cm length and a 3.75 in / 9.5 cm inseam.
How many granny squares do I need to crochet?
You need 124 five-round granny squares in total: 88 for the shirt (36 back, 18 per front, 8 per sleeve) and 36 for the shorts (24 for the upper body tube and 12 for the two leg extensions). Each is blocked to 3.75 in x 3.75 in / 9.5 cm.
What yarn and hooks does this pattern use?
DK cotton yarn in dark navy (420–500 g), ivory cream (300–380 g) and warm taupe / beige (160–220 g), a 4 mm hook for the granny squares and a 3.5 mm hook for the bands, edging and drawstring, plus 7 white 14–16 mm buttons. Convert hook sizes with the crochet hook size converter and estimate yarn with the crochet yarn calculator.
What skill level is the granny square shirt and shorts set?
It is rated advanced intermediate because it combines modular granny-square construction, joined panels, sleeves, a button band with buttonholes, a fold-over collar, a crotch bridge and an eyelet waistband. If you are new to granny squares, start with the how to make a magic ring tutorial and the how to read crochet patterns guide.
How are the squares joined?
Each square is joined with WS together and RS facing outward, using a slip stitch through the back loops of matching side positions, working across all 19 side positions plus 1 sl st through both matching corner ch-2 spaces, for 20 sl sts per square-to-square join.
How is the shirt assembled?
Join 36 squares into a 6 x 6 back panel and 18 squares into each 3 x 6 front panel, sew 38-position shoulder seams, sew the lower 4 square rows of each side seam (76 sewing points) leaving the upper 2 rows open for armholes, then attach the 4-around x 2-high sleeve tubes to the 76-position armholes. Finish with the button band, buttonhole band, 86-stitch collar pickup, hem and sleeve edging, and 7 buttons.
How are the shorts constructed?
Join 24 squares into a 12-around x 2-high tube, sew the 19-stitch by 12-row cream crotch bridge from the lower center front to the lower center back, add a 6-square leg extension ring to each leg opening, then work the waistband with 57 eyelets, reverse single crochet edging on the waist and legs, and a 464-slip-stitch padded drawstring.
Is this crochet shirt and shorts pattern free?
Yes. The full written pattern with diagram pages is free to read here and to download as a PDF, with no email required.
More Free Patterns and Tools
Keep crocheting with these related patterns, guides and tools:
- Crochet Granny Square Top and Skirt Set Pattern – another granny-square co-ord.
- Men’s Striped Open-Mesh Crochet Sweater Pattern – more wearable construction with a ribbed collar.
- Ivory Lace V-Neck Crochet Midi Dress Pattern and Open-Lace Crochet Cardigan Pattern – elegant wearables.
- Off-Shoulder Crochet Dress Pattern and Crochet Striped Maxi Dress Pattern – summer dresses.
- Granny Square Tote Bag Crochet Pattern – use up leftover navy, cream and taupe.
- Mesh Bucket Hat Crochet Pattern – a matching summer accessory.
- How to Read Crochet Patterns – decode rounds and stitch counts.
- How to Crochet for Absolute Beginners – start here if granny squares are new.
- All clothing and wearables patterns and all free patterns.
- Crochet tutorials, free crochet calculators and tools, the crochet pattern decoder and the crochet project planner.