
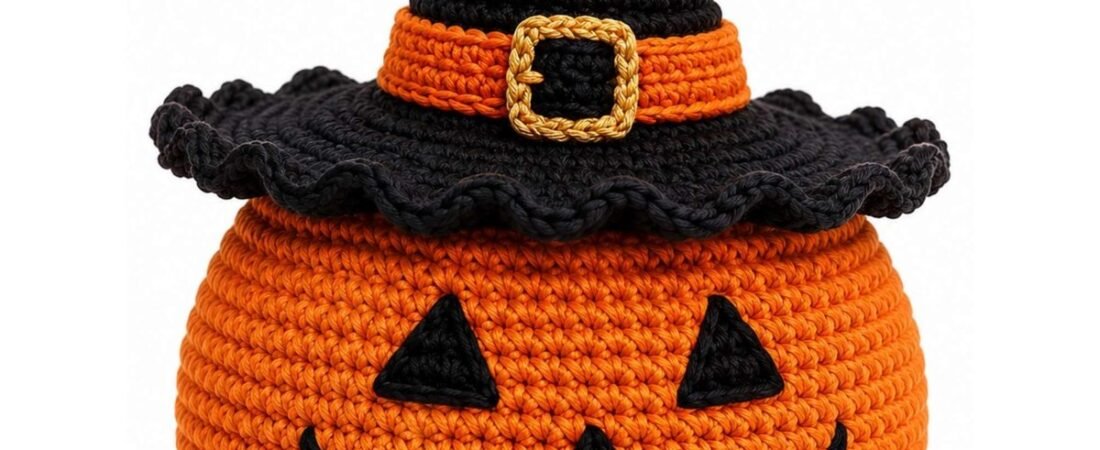
This pumpkin basket crochet pattern turns a chunky orange jack-o-lantern into a real storage basket with a removable black witch-hat lid. The pumpkin is worked in one continuous spiral of double crochet, the face is appliquéd in black, and the ruffled-brim lid carries a curled hat cone, an orange band and a gold buckle. Fill it with wrapped treats, yarn or small Halloween décor, then lift the lid off to reach everything inside.
The pattern is written in US crochet terms with a stitch count for every round, exact face-placement measurements, an assembly order and a final checklist. If you enjoy seasonal makes, browse all of our free holiday crochet patterns or the full free crochet patterns library. Love the witch hat? Our crochet ghost witch amigurumi also has a curved hat with a buckle, so the two make a great Halloween set.
Free Crochet Tools for This Pattern
Check your gauge before starting the basket body, estimate how much orange and black yarn you need if you change yarn weight, convert the 4.5 mm and 4.0 mm hooks to your local sizes, and plan your project with our free tools.
1. Skill Level
Intermediate. The pattern uses continuous spiral shaping, controlled increases and decreases, a flat circle, appliqué work, light stuffing and precise assembly. A confident beginner can complete it by checking the stitch count after every round.
Skills you will use
- Working in continuous rounds with a stitch marker, see how to double crochet and 6 basic crochet stitches
- Making a flat disk that does not cup or ruffle, see how to increase in a crochet circle
- Working the foundation chain for the face pieces, see how to start a crochet chain
- Reading abbreviations and repeats, see how to read crochet patterns
2. Finished Size
| Component | Finished measurement |
|---|---|
| Pumpkin basket | Approx. 11 in / 28 cm diameter x 7.5 in / 19 cm high |
| Opening | Approx. 7.5 in / 19 cm diameter |
| Hat brim lid | Approx. 15 in / 38 cm diameter |
| Hat cone | Approx. 9.5 in / 24 cm high before curling |
| Overall height | Approx. 15.5 in / 39.5 cm |
| Gauge | 14 sc x 15 rounds = 4 in / 10 cm |
Finished size changes with yarn, hook, tension and stuffing. Match gauge before beginning the basket body, and use the free gauge calculator to see how a different gauge changes the final size.
3. Materials
- Worsted-weight cotton or cotton-blend yarn: orange 420 yd / 385 m, black 360 yd / 330 m, metallic gold or mustard 25 yd / 23 m. Not sure how much to buy if you swap yarn? Try the yarn estimator, or read our guide to the best yarn for crochet projects.
- 4.5 mm crochet hook for the basket body and lid; 4.0 mm hook for appliqués, band and buckle. Use the hook size converter for your local sizing.
- Yarn needle, locking stitch markers, scissors, measuring tape, pins and a row counter
- Polyester fiberfill: approximately 2 oz / 55 g for the hat cone only
- Optional: 14-gauge plastic-coated craft wire, 16 in / 40 cm, for a display-only curled tip. Omit the wire when the item may be handled by children.
- Optional structural insert: a 10.5 in / 26.5 cm circle of plastic canvas for the basket base and a 13 in / 33 cm circle for the lid
4. Stitch Abbreviations (US Terms)
| Abbreviation | Meaning | Method |
|---|---|---|
| ch | chain | Yarn over and pull through loop. |
| sl st | slip stitch | Insert hook, yarn over, pull through stitch and loop. |
| sc | single crochet | Insert hook, yarn over, pull up loop, yarn over, pull through 2 loops. |
| hdc | half double crochet | Yarn over, insert hook, pull up loop, yarn over, pull through 3 loops. |
| dc | double crochet | Yarn over, insert hook, pull up loop, yarn over and pull through 2 loops twice. |
| inc | increase | Work 2 sc in the same stitch unless another stitch is stated. |
| dec | invisible decrease | Insert hook through front loop of next 2 sts, yarn over, pull through both front loops, yarn over, pull through 2 loops. |
| dc2tog | double crochet 2 together | Work 2 unfinished dc, one in each of the next 2 sts, then yarn over and pull through all 3 loops on the hook. |
| BLO | back loop only | Work through the back loop of the indicated stitch. |
| FLO | front loop only | Work through the front loop of the indicated stitch. |
| MR | magic ring | Adjustable starting ring. |
| RS / WS | right side / wrong side | Visible side / reverse side. |
| st(s) | stitch(es) | Individual crochet stitch(es). |
5. Parts List and Construction Overview
Parts list
- Pumpkin basket body – 1
- Black top-edge reinforcement round – 1
- Left eye appliqué – 1
- Right eye appliqué – 1
- Nose appliqué – 1
- Curved mouth appliqué – 1
- Lower tooth tabs – 4
- Witch-hat brim lid – 1
- Witch-hat cone – 1
- Orange hat band – 1
- Gold buckle frame – 1
- Gold buckle prong – 1
Construction overview
- Work the pumpkin body from the center of the base upward in a continuous spiral.
- Create the flat base, expand the lower sides, work the widest section even, then decrease to the top opening.
- Crochet and sew the facial appliqués to the front of the finished body.
- Work the lid as a flat black circle. Add a firm edging and an outer ruffled shell border.
- Work the hat cone from the curled tip downward. Shape the lower cone, stuff lightly, and sew it to the center of the lid.
- Add the orange band, gold buckle and buckle prong.
- Block, shape, and verify all measurements and stitch counts.
6. Part-by-Part Instructions
A. Pumpkin Basket Body
Use orange yarn and a 4.5 mm hook. Work in continuous rounds. Place a marker in the first stitch and move it after every round. Do not join unless instructed.
- Round 1: Make MR; work 12 dc in ring. [12 sts]
- Round 2: 2 dc in each st around. [24 sts]
- Round 3: (dc in next st, 2 dc in next st) 12 times. [36 sts]
- Round 4: (dc in next 2 sts, 2 dc in next st) 12 times. [48 sts]
- Round 5: (dc in next 3 sts, 2 dc in next st) 12 times. [60 sts]
- Round 6: (dc in next 4 sts, 2 dc in next st) 12 times. [72 sts]
- Round 7: (dc in next 5 sts, 2 dc in next st) 12 times. [84 sts]
- Round 8: (dc in next 6 sts, 2 dc in next st) 12 times. [96 sts]
- Round 9: (dc in next 7 sts, 2 dc in next st) 12 times. [108 sts]
- Round 10: (dc in next 8 sts, 2 dc in next st) 12 times. [120 sts]
- Round 11: (dc in next 9 sts, 2 dc in next st) 12 times. [132 sts]
- Round 12: BLO dc in each st around. [132 sts]
- Rounds 13-16: Dc in each st around. [132 sts]
- Round 17: (dc in next 10 sts, 2 dc in next st) 12 times. [144 sts]
- Rounds 18-22: Dc in each st around. [144 sts]
- Round 23: (dc in next 11 sts, 2 dc in next st) 12 times. [156 sts]
- Rounds 24-35: Dc in each st around. [156 sts]
- Round 36: (dc in next 11 sts, dc2tog) 12 times. [144 sts]
- Rounds 37-38: Dc in each st around. [144 sts]
- Round 39: (dc in next 10 sts, dc2tog) 12 times. [132 sts]
- Rounds 40-41: Dc in each st around. [132 sts]
- Round 42: (dc in next 9 sts, dc2tog) 12 times. [120 sts]
- Round 43: Dc in each st around. [120 sts]
- Round 44: (dc in next 8 sts, dc2tog) 12 times. [108 sts]
- Round 45: Dc in each st around. [108 sts]
- Round 46: (dc in next 7 sts, dc2tog) 12 times. [96 sts]
- Round 47: BLO sc in each st around. [96 sts]
- Round 48: Sc in each st around; join with sl st to first sc. [96 sts]
Fasten off, leaving a 12 in / 30 cm tail. Steam lightly from 2 in / 5 cm above the fabric. Do not flatten the rounded sides.
B. Optional Base Insert and Top Reinforcement
Cut plastic canvas to a 10.5 in / 26.5 cm circle. Insert it inside the basket and tack it to Round 12 at 12 evenly spaced points. For the top reinforcement, join black yarn in any stitch of Round 48 and work 1 sl st in each stitch around. Fasten off invisibly. This black line is hidden by the lid when closed.
C. Eye Appliqués – Make 2
Use black yarn and a 4.0 mm hook. Work in rows. Ch 2 does not count as a stitch.
- Row 1: Ch 2; work 2 sc in second ch from hook. Turn. [2 sts]
- Row 2: Ch 1, 2 sc in each st. Turn. [4 sts]
- Row 3: Ch 1, sc in first st, 2 sc in next 2 sts, sc in last st. Turn. [6 sts]
- Row 4: Ch 1, sc in first 2 sts, 2 sc in next 2 sts, sc in last 2 sts. Turn. [8 sts]
- Row 5: Ch 1, sc in first 3 sts, 2 sc in next 2 sts, sc in last 3 sts. Turn. [10 sts]
- Row 6: Ch 1, sc in first 4 sts, 2 sc in next 2 sts, sc in last 4 sts. Turn. [12 sts]
Do not turn. Ch 1; work sc evenly around all 3 sides, placing 2 sc in each corner. Join with sl st. Fasten off with an 18 in / 45 cm sewing tail. Each finished eye measures approximately 2.25 in / 5.7 cm wide x 2.5 in / 6.4 cm high.
D. Nose Appliqué
Work as for an eye through Row 4 only, then edge with sc as stated. Finished size: approximately 1.4 in / 3.6 cm wide x 1.5 in / 3.8 cm high.
E. Curved Mouth Appliqué
Use black yarn and a 4.0 mm hook. The mouth is a curved strip with pointed ends and four lower tooth tabs.
- Row 1: Ch 43. Beginning in second ch from hook: sl st in next 3 ch, sc in next 5 ch, hdc in next 6 ch, dc in next 14 ch, hdc in next 6 ch, sc in next 5 ch, sl st in final 3 ch. [42 sts]
- Row 2: Ch 1, turn. Working FLO: sl st in next 3 sts, sc in next 5 sts, hdc in next 6 sts, dc in next 14 sts, hdc in next 6 sts, sc in next 5 sts, sl st in next 3 sts. [42 sts]
Fasten off with a 30 in / 76 cm sewing tail. Curve the strip upward at both ends while pinning. The center of the strip should sit approximately 1 in / 2.5 cm lower than both ends.
Lower Tooth Tabs – Make 4
- Row 1: Ch 7; sc in second ch from hook and in each remaining ch. Turn. [6 sts]
- Row 2: Ch 1, sc in each st. Turn. [6 sts]
- Row 3: Ch 1, dec, sc in next 2 sts, dec. [4 sts]
- Row 4: Ch 1, dec twice. [2 sts]
Fasten off with a 10 in / 25 cm tail. Tabs measure approximately 1.1 in / 2.8 cm wide x 1.2 in / 3 cm deep.
F. Witch-Hat Brim Lid
Use black yarn and a 4.5 mm hook. Work joined rounds. Ch 2 does not count as a stitch. Join each round with sl st to the first dc. If your disk starts to cup or ruffle, revisit how to increase in a crochet circle.
- Round 1: MR; ch 2, 12 dc in ring. [12 sts]
- Round 2: Ch 2, 2 dc in each st. [24 sts]
- Round 3: Ch 2, (dc in next st, 2 dc in next st) 12 times. [36 sts]
- Round 4: Ch 2, (dc in next 2 sts, 2 dc in next st) 12 times. [48 sts]
- Round 5: Ch 2, (dc in next 3 sts, 2 dc in next st) 12 times. [60 sts]
- Round 6: Ch 2, (dc in next 4 sts, 2 dc in next st) 12 times. [72 sts]
- Round 7: Ch 2, (dc in next 5 sts, 2 dc in next st) 12 times. [84 sts]
- Round 8: Ch 2, (dc in next 6 sts, 2 dc in next st) 12 times. [96 sts]
- Round 9: Ch 2, (dc in next 7 sts, 2 dc in next st) 12 times. [108 sts]
- Round 10: Ch 2, (dc in next 8 sts, 2 dc in next st) 12 times. [120 sts]
- Round 11: Ch 2, (dc in next 9 sts, 2 dc in next st) 12 times. [132 sts]
- Round 12: Ch 2, (dc in next 10 sts, 2 dc in next st) 12 times. [144 sts]
- Round 13: Ch 2, (dc in next 11 sts, 2 dc in next st) 12 times. [156 sts]
- Round 14: Ch 2, (dc in next 12 sts, 2 dc in next st) 12 times. [168 sts]
- Round 15: Ch 1, BLO sc in each st. [168 sts]
- Round 16: Ch 1, (sc in next 13 sts, 2 sc in next st) 12 times. [180 sts]
- Round 17: Ch 1, (skip next 2 sts, 7 dc in next st, skip next 2 sts, sl st in next st) 30 times. [30 shells]
Fasten off invisibly. The lid should measure approximately 15 in / 38 cm across after blocking. Insert a 13 in / 33 cm plastic-canvas circle between Rounds 1-15 and a separately crocheted backing disk when extra stiffness is desired.
G. Witch-Hat Cone
Use black yarn and a 4.5 mm hook. Work in continuous spiral rounds from the tip downward. Lightly stuff as you work. For a stable display curl, position the optional coated wire inside the cone after Round 18, keeping both ends fully buried in stuffing.
- Round 1: MR; 6 sc in ring. [6 sts]
- Rounds 2-4: Sc in each st. [6 sts]
- Round 5: (sc in next st, inc) 3 times. [9 sts]
- Rounds 6-8: Sc in each st. [9 sts]
- Round 9: (sc in next 2 sts, inc) 3 times. [12 sts]
- Rounds 10-12: Sc in each st. [12 sts]
- Round 13: (sc in next 3 sts, inc) 3 times. [15 sts]
- Rounds 14-16: Sc in each st. [15 sts]
- Round 17: (sc in next 4 sts, inc) 3 times. [18 sts]
- Rounds 18-19: Sc in each st. [18 sts]
- Round 20: (sc in next 5 sts, inc) 3 times. [21 sts]
- Round 21: Sc in each st. [21 sts]
- Round 22: (sc in next 6 sts, inc) 3 times. [24 sts]
- Round 23: Sc in each st. [24 sts]
- Round 24: (sc in next 3 sts, inc) 6 times. [30 sts]
- Round 25: Sc in each st. [30 sts]
- Round 26: (sc in next 4 sts, inc) 6 times. [36 sts]
- Round 27: Sc in each st. [36 sts]
- Round 28: (sc in next 5 sts, inc) 6 times. [42 sts]
- Round 29: Sc in each st. [42 sts]
- Round 30: (sc in next 6 sts, inc) 6 times. [48 sts]
- Round 31: Sc in each st. [48 sts]
- Round 32: (sc in next 7 sts, inc) 6 times. [54 sts]
- Round 33: Sc in each st. [54 sts]
- Round 34: (sc in next 8 sts, inc) 6 times. [60 sts]
- Round 35: Sc in each st. [60 sts]
- Round 36: (sc in next 9 sts, inc) 6 times. [66 sts]
- Round 37: Sc in each st. [66 sts]
- Round 38: (sc in next 10 sts, inc) 6 times. [72 sts]
- Round 39: Sc in each st. [72 sts]
- Round 40: (sc in next 11 sts, inc) 6 times. [78 sts]
- Round 41: (sc in next 12 sts, inc) 6 times. [84 sts]
- Round 42: (sc in next 13 sts, inc) 6 times. [90 sts]
- Round 43: (sc in next 14 sts, inc) 6 times. [96 sts]
- Rounds 44-46: Sc in each st. [96 sts]
- Round 47: BLO sc in each st; join with sl st. [96 sts]
Fasten off with a 30 in / 76 cm tail. The cone base circumference must equal the 96-stitch attachment circle on the brim. Shape the top 5 in / 12.5 cm into an S-curve. Bend the last 2 in / 5 cm upward to form the hook.
H. Orange Hat Band
Use orange yarn and a 4.0 mm hook. The band is worked as a closed strip directly around the lower cone.
- Round 1: Join yarn in any unused front loop of Hat Round 47. Ch 1, sc in each front loop; join. [96 sts]
- Round 2: Ch 1, hdc in each st; join. [96 sts]
- Round 3: Ch 1, hdc in each st; join. [96 sts]
- Round 4: Ch 1, sc in each st; join. [96 sts]
Fasten off invisibly. Finished band depth: approximately 1.6 in / 4 cm.
I. Gold Buckle Frame
Use metallic gold or mustard yarn and a 4.0 mm hook.
- Row 1: Ch 25. Beginning in second ch from hook, sc in each ch. Join with sl st to first sc, taking care not to twist. [24 sts]
- Round 2: Ch 1, sc in next 5 sts, 3 sc in next st, sc in next 5 sts, 3 sc in next st, sc in next 5 sts, 3 sc in next st, sc in next 5 sts, 3 sc in final st; join. [32 sts]
- Round 3: Ch 1, sc in each st, placing 2 sc in the center stitch of each 3-sc corner group; join. [36 sts]
Fasten off with an 18 in / 45 cm tail. Pin into a 2.4 x 2.4 in / 6 x 6 cm rounded square with an opening approximately 1.4 x 1.4 in / 3.5 x 3.5 cm.
Buckle Prong
Ch 7. Sl st in second ch from hook and in each remaining ch. Fasten off with a sewing tail. Sew one end to the left inner edge of the buckle and point the free end toward the center.
7. Stitch Count Check
Check these counts before you move on. They keep the lid, cone and basket opening the same size so everything fits together.
| Part | Critical round/row | Required count | Check |
|---|---|---|---|
| Basket body | R11 / R23 / R46 / R48 | 132 / 156 / 96 / 96 | Top opening equals hat base attachment count. |
| Eye | Row 6 | 12 | Both eyes must match. |
| Nose | Row 4 | 8 | Edge count may vary by 1 only if tension differs. |
| Mouth | Rows 1-2 | 42 | Do not add stitches at ends. |
| Lid disk | R14 / R16 | 168 / 180 | Disk must remain flat before shell border. |
| Brim border | R17 | 30 shells | Each shell consumes 6 base stitches. |
| Hat cone | R43 / R47 | 96 / 96 | Must match attachment circle. |
| Band | All rounds | 96 | No increases. |
| Buckle | R2 / R3 | 32 / 36 | Four shaped corners. |
8. Face Placement Guide
Facial placement
- Identify the center-front stitch of Basket Round 48 and mark a vertical centerline to the center of the base.
- Place the eye tips 2.5 in / 6.4 cm below the top edge. Space the inner eye corners 2.1 in / 5.3 cm apart. Tilt the outer eye edges downward by approximately 8 degrees.
- Place the nose centered on the vertical line, with its top point 4.1 in / 10.4 cm below the top edge.
- Pin the mouth so its center lies 5.8 in / 14.7 cm below the top edge. Position both ends approximately 0.6 in / 1.5 cm higher than the center.
- Place four tooth tabs behind the lower edge of the mouth. From left to right, align their centers approximately 1.3, 2.7, 4.1 and 5.5 in / 3.3, 6.9, 10.4 and 14 cm from the left inside corner of the mouth.
- Confirm symmetry from a distance of 6 ft / 1.8 m before sewing.
Layer and overlap order
- Bottom layer: pumpkin body and lid disk.
- Middle layer: eyes, nose, mouth strip, tooth tabs, hat cone and orange band.
- Top layer: buckle frame and buckle prong.
- The tooth tabs sit behind the mouth strip by 0.25 in / 6 mm.
- The orange band overlaps the hat cone base by approximately 1.5 in / 3.8 cm.
- The buckle is centered on the front of the band, aligned with the pumpkin face centerline.
9. Assembly
- Block all appliqués to the stated measurements. Allow them to dry fully.
- Using matching black yarn, sew the eyes and nose through the outer edge stitches and the basket surface. Do not pull tightly enough to distort the body.
- Pin the mouth in its curve. Sew the upper edge first, then secure the lower edge while maintaining the curved smile.
- Insert the tooth tabs 0.25 in / 6 mm under the mouth and sew each tab around its outer edge.
- Center the hat cone over Lid Rounds 1-8. The cone base has 96 stitches; align one cone stitch with each stitch around Lid Round 8. Whipstitch through both loops of the cone and the top loops of the lid.
- Sew the buckle to the band at the center front. Secure the prong after the frame is completely attached.
- Set the lid on the basket. The black shell border must extend evenly around the entire opening. Adjust curl and brim waves by hand.
Optional concealed lid stop
With black yarn, work a chain long enough to measure 8 in / 20 cm. Sew one end inside the basket, 1 in / 2.5 cm below the top edge at center back. Sew the other end to the underside of the lid at center back. This prevents the lid from being misplaced while allowing it to open fully.
10. Final Checklist
- Basket base lies flat and measures approximately 10.5-11 in / 26.5-28 cm.
- Basket body is symmetrical with no abrupt increase or decrease ridges.
- Round 48 contains exactly 96 stitches.
- Lid lies flat through Round 16 and has exactly 30 shell repeats in Round 17.
- Hat cone contains 96 stitches at the base and is sewn evenly to the lid.
- Hat tip is fully stuffed and any optional wire is completely enclosed.
- Eyes, nose, mouth and buckle align to the same vertical centerline.
- All yarn tails are woven through at least 1.5 in / 4 cm of fabric in two directions.
- No pins, wire ends, plastic-canvas corners or loose stitches remain exposed.
- Finished item matches the stated dimensions within 5 percent.
Care and safety
Spot clean with cool water and mild detergent. Reshape and air dry. Do not machine dry. When craft wire or plastic canvas is used, this item is decorative and is not a toy. Do not use it as a container for unwrapped food or near open flame.
Frequently Asked Questions
Is this pumpkin basket pattern beginner friendly?
It is rated intermediate because of the continuous spiral shaping, appliqué placement and assembly. If you are newer to crochet, practice with a smaller project first, such as our amigurumi star or Santa hat, and keep how to read crochet patterns open while you work.
Can I use a different yarn weight?
Yes, but keep the fabric dense so the basket holds its shape. Lighter yarn makes a smaller basket; heavier yarn makes a larger one. Work a swatch and run it through the free gauge calculator to predict the final size, then check your yardage with the yarn estimator.
How much yarn does the pumpkin basket take?
About 420 yd / 385 m of orange, 360 yd / 330 m of black and 25 yd / 23 m of metallic gold or mustard in worsted-weight yarn. Use the yarn estimator if you change yarn weight or size.
Do I need the plastic canvas?
No. The plastic-canvas circles for the base and lid are optional and only add stiffness. Choose a firm cotton and a tight gauge for the sturdiest basket without them.
Is it safe for children?
The basket is a decorative item, not a toy. Omit the craft wire in the hat tip and the plastic canvas when the item may be handled by children, and do not use it to hold unwrapped food.
What hook size should I use?
Use a 4.5 mm hook for the basket body and lid, and a 4.0 mm hook for the face, band and buckle. Convert hook sizes with the hook size converter, and see how to hold a crochet hook for a more comfortable grip on a long project.
More Free Patterns You’ll Love
Plan Your Next Make with Free Crochet Tools
Before you start your next pattern, use our free crochet calculators and tools to check gauge, estimate yarn, convert hook sizes and price finished items. New to patterns? Start with how to crochet for absolute beginners or browse all crochet tutorials.