
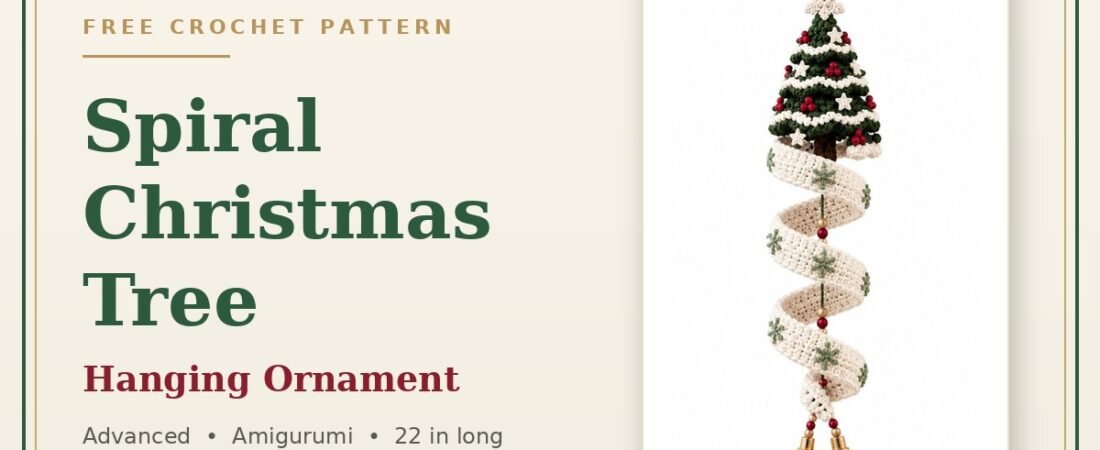
This spiral Christmas tree crochet pattern makes a keepsake hanging ornament: a plump amigurumi cone tree trimmed with white garlands, tiny stars and red berries, sitting above a long wired spiral tail that ends in a pair of jingle bells. Hang it on a door, window or mantel. It finishes about 55 cm / 22 in long, with a tree about 12 cm / 4.7 in across the base.
It is an advanced, dimensional make: worked-in-the-round amigurumi, a flat crocheted band shaped over wire into a coil, surface embroidery and simple wire assembly. Each part on its own is simple, and the written pattern below comes with a photo tutorial for every stage. If you are newer to shaping, start with how to crochet for absolute beginners and the 6 basic crochet stitches, or warm up with an easier festive make such as the Christmas Tree Crochet Coaster or the Silmë Star ornament.
Love holiday makes? Browse our full collection of free Christmas and holiday crochet patterns, our free amigurumi patterns or the complete free crochet patterns library.
Free Crochet Tools for This Pattern
Use our free calculators before you start: check your gauge against the 24 sc x 26 rounds = 10 cm swatch, estimate how much sport-weight cotton you need for the tree and spiral, convert the 2.25 mm hook to your local size and decode any abbreviation used in this ornament. Find them all on our Crochet Calculator & Tools page.
Pattern Overview
Read the whole pattern once before you begin. The ornament combines six crocheted components with a wired central cord, so planning ahead makes assembly much easier. Terms are US, and if any are unfamiliar our guide to how to read crochet patterns explains the notation used here.
| Project | Detail |
|---|---|
| Skill level | Advanced (amigurumi and dimensional crochet) |
| Terms | US crochet terms |
| Finished length | Approx. 55 cm / 22 in, from ring to bells |
| Tree | Approx. 12 cm / 4.7 in base diameter, 11 cm / 4.3 in tall |
| Spiral tail | Approx. 5 cm / 2 in wide band, 90–100 cm / 35–40 in before coiling |
| Yarn weight | Sport (5-ply) mercerised cotton |
| Hook | 2.25 mm (US B / UK 13) |
| Best for | A hanging ornament for a door, window or mantel |
Safety: this is a decorative hanging ornament, not a toy. Wire ends, beads and bells are small or sharp, so tuck every wire end inside the fabric and keep the finished piece away from babies and young children.
Materials & Tools
| Material | Amount / details |
|---|---|
| Dark green sport-weight cotton (5-ply, mercerised) | Approx. 55 g |
| White / cream sport-weight cotton | Approx. 40 g |
| Brown sport-weight cotton (trunk) | Approx. 8 g |
| Sage-green yarn or embroidery floss | Small amount, for the snowflake embroidery |
| Red yarn (berry bobbles) | Small amount, or use small red beads instead |
| Crochet hook | 2.25 mm (US B / UK 13) |
| Polyester toy stuffing | Small handful |
| Flexible floral / armature wire, 26–22 gauge | One long length for the central axis, plus a finer length for the spiral edge |
| Beads | A few gold spacer beads and red round beads for the tail cord |
| Jingle bells, 25–35 mm | 2 (one gold, one red) |
| Hanging ring | 1 metal or wooden O-ring, approx. 30 mm |
| Cord | Strong cotton cord or doubled yarn for the central axis and hanging loop |
| Notions | Tapestry needle, stitch markers, small sharp scissors, optional fabric stiffener or spray starch |
Quantities are a guide. Actual yarn use varies with your tension and how firmly you stuff. Not sure which cotton to buy? Read our guide to the best yarn for crochet projects, then run your numbers through the free yarn estimator. Working with fine cotton for the first time? See how to hold a crochet hook for grips that stay comfortable over a long project.
Gauge & Finished Size
| Measurement | Detail |
|---|---|
| Gauge | 24 sc and 26 rounds = 10 cm (4 in) in single crochet, worked firmly for a dense amigurumi fabric |
| Total hanging length | Approx. 55 cm / 22 in |
| Tree | Approx. 12 cm / 4.7 in base diameter, 11 cm / 4.3 in tall |
| Spiral tail | Approx. 5 cm / 2 in wide band |
Tip: gauge matters more than hook size. If your fabric is loose enough to see the stuffing through it, drop a hook size. Check your swatch with the gauge calculator, or match your hook to local sizing with the hook size converter.
Abbreviations (US Terms)
| Abbreviation | Meaning |
|---|---|
| ch | chain |
| sl st | slip stitch |
| sc | single crochet |
| hdc | half double crochet |
| dc | double crochet |
| MR | magic ring |
| yo | yarn over |
| inc | increase (2 sc in one st) |
| dec | invisible decrease (sc 2 sts together) |
| BLO | back loop only |
| st(s) | stitch(es) |
| rep | repeat |
| rnd | round |
| ( ) | work instructions in brackets as a group |
| [ ] | stitch count at end of round |
| * * | repeat sequence between markers |
Need a refresher on any term? Look it up with the abbreviation lookup tool, or browse our crochet stitch tutorials and the full crochet tutorials library.
Pattern Notes
- The tree body is worked in a continuous spiral (do not join rounds unless told to). Use a stitch marker in the first stitch of each round and move it up as you go.
- US crochet terms are used throughout.
- The tree is worked from the top (apex) down to the base, then stuffed and closed around the trunk.
- The spiral tail is worked flat, then shaped over a wire edge and set with steam or stiffener so it holds its coil. Cotton will not corkscrew on its own.
- Where the pattern says even round, work 1 sc in each st around with no shaping.
Construction Overview
You will make six components: the cone tree body, the trunk and base, the snowflake topper, the mini stars, the berry clusters and the spiral tail. Small trims (garland, stars and berries) are added to the tree before final assembly. Everything is then threaded onto a central wired cord that carries the weight from the top ring down to the bells.
| Part | Quantity | Colour |
|---|---|---|
| Cone tree body | 1 | Dark green |
| Trunk | 1 | Brown |
| Base disc | 1 | Green |
| Snowflake topper | 1 | White |
| Mini stars | 8–10 | White |
| Berry bobbles | 12–15 | Red |
| Garland | 4 wavy garlands | White |
| Spiral tail with snowflake embroidery | 1 | White, with sage-green embroidery |
Part 1: Cone Tree Body
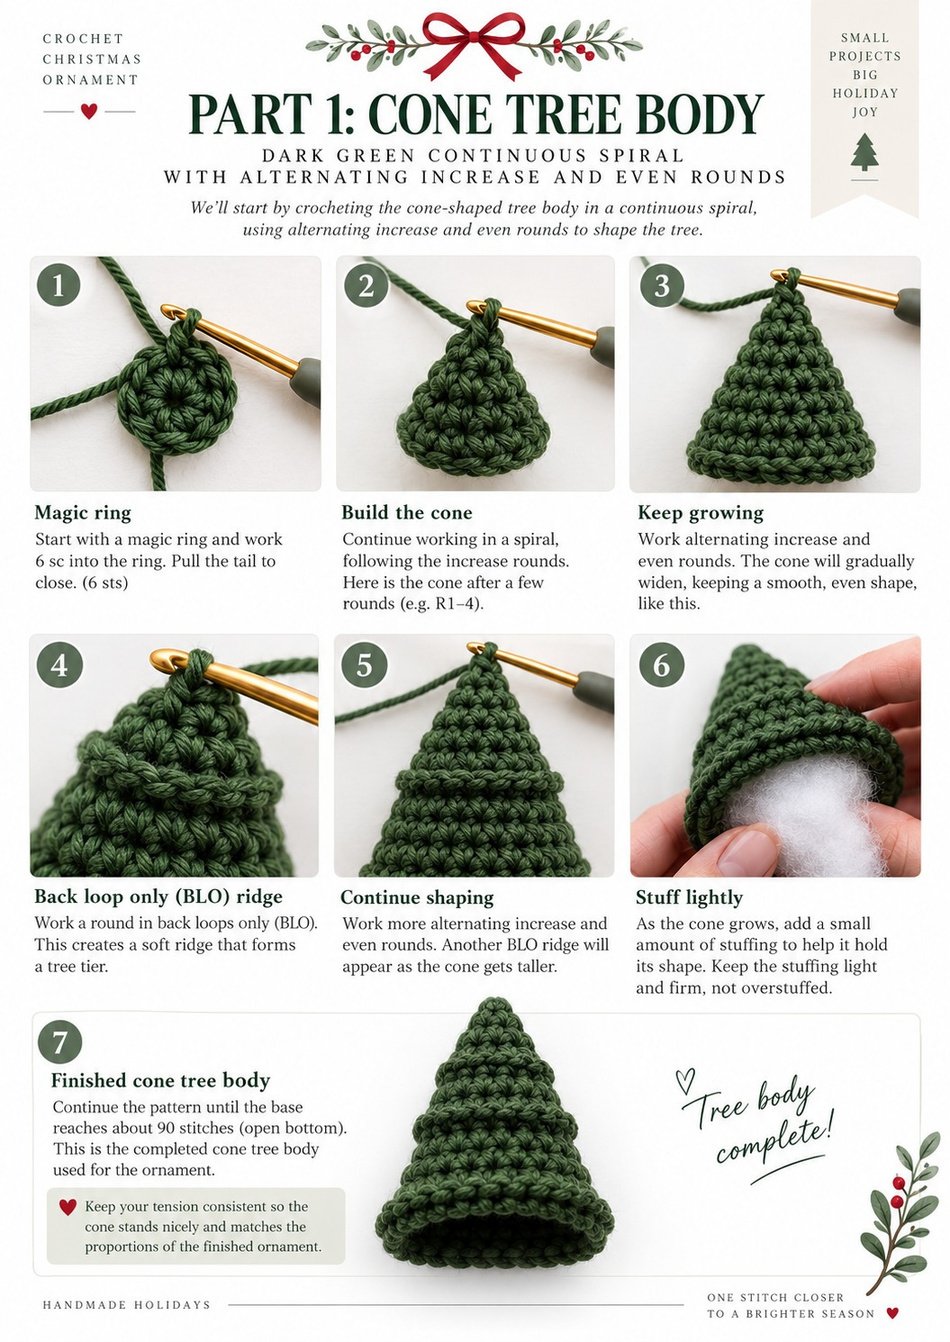
Worked in dark green, in a continuous spiral from the apex down. The cone is shaped by alternating an increase round (adds 6 sts) with an even round (no shaping). This gives the gentle tapered tree; working increases every round would make a flat disc.
| Rnd | Instruction | Sts |
|---|---|---|
| 1 | With green, MR, 6 sc in ring. | [6] |
| 2 | Inc in each st around. | [12] |
| 3 | *Sc in next 1 st, inc; rep from * around. | [18] |
| 4 | Even round. | [18] |
| 5 | *Sc in next 2 sts, inc; rep from * around. | [24] |
| 6 | Even round. | [24] |
| 7 | *Sc in next 3 sts, inc; rep from * around. | [30] |
| 8 | Even round. | [30] |
| 9 | *Sc in next 4 sts, inc; rep from * around. | [36] |
| 10 | Even round, worked in BLO to form a soft tier ridge. | [36] |
| 11 | *Sc in next 5 sts, inc; rep from * around. | [42] |
| 12 | Even round. | [42] |
| 13 | *Sc in next 6 sts, inc; rep from * around. | [48] |
| 14 | Even round, worked in BLO (tier ridge). | [48] |
| 15 | *Sc in next 7 sts, inc; rep from * around. | [54] |
| 16 | Even round. | [54] |
| 17 | *Sc in next 8 sts, inc; rep from * around. | [60] |
| 18 | Even round, worked in BLO (tier ridge). | [60] |
| 19 | *Sc in next 9 sts, inc; rep from * around. | [66] |
| 20 | Even round. | [66] |
| 21 | *Sc in next 10 sts, inc; rep from * around. | [72] |
| 22 | Even round, worked in BLO (tier ridge). | [72] |
| 23 | *Sc in next 11 sts, inc; rep from * around. | [78] |
| 24 | Even round. | [78] |
| 25 | *Sc in next 12 sts, inc; rep from * around. | [84] |
| 26 | Even round, worked in BLO (final tier ridge). | [84] |
| 27 | *Sc in next 13 sts, inc; rep from * around. | [90] |
| 28 | Even round. | [90] |
Begin stuffing lightly from around Rnd 16, adding more as the cone grows so it stays firm but not stretched. Do not fasten off: leave the 90-st opening for the base. The BLO ridge rounds (10, 14, 18, 22 and 26) create the layered branch look. If you prefer a smooth tree, simply work those rounds through both loops.
Want more shaping practice with amigurumi cones and spirals? Try our Crochet Ghost Witch or Amigurumi Star patterns next.
Part 2: Trunk, Base & Tree Trims
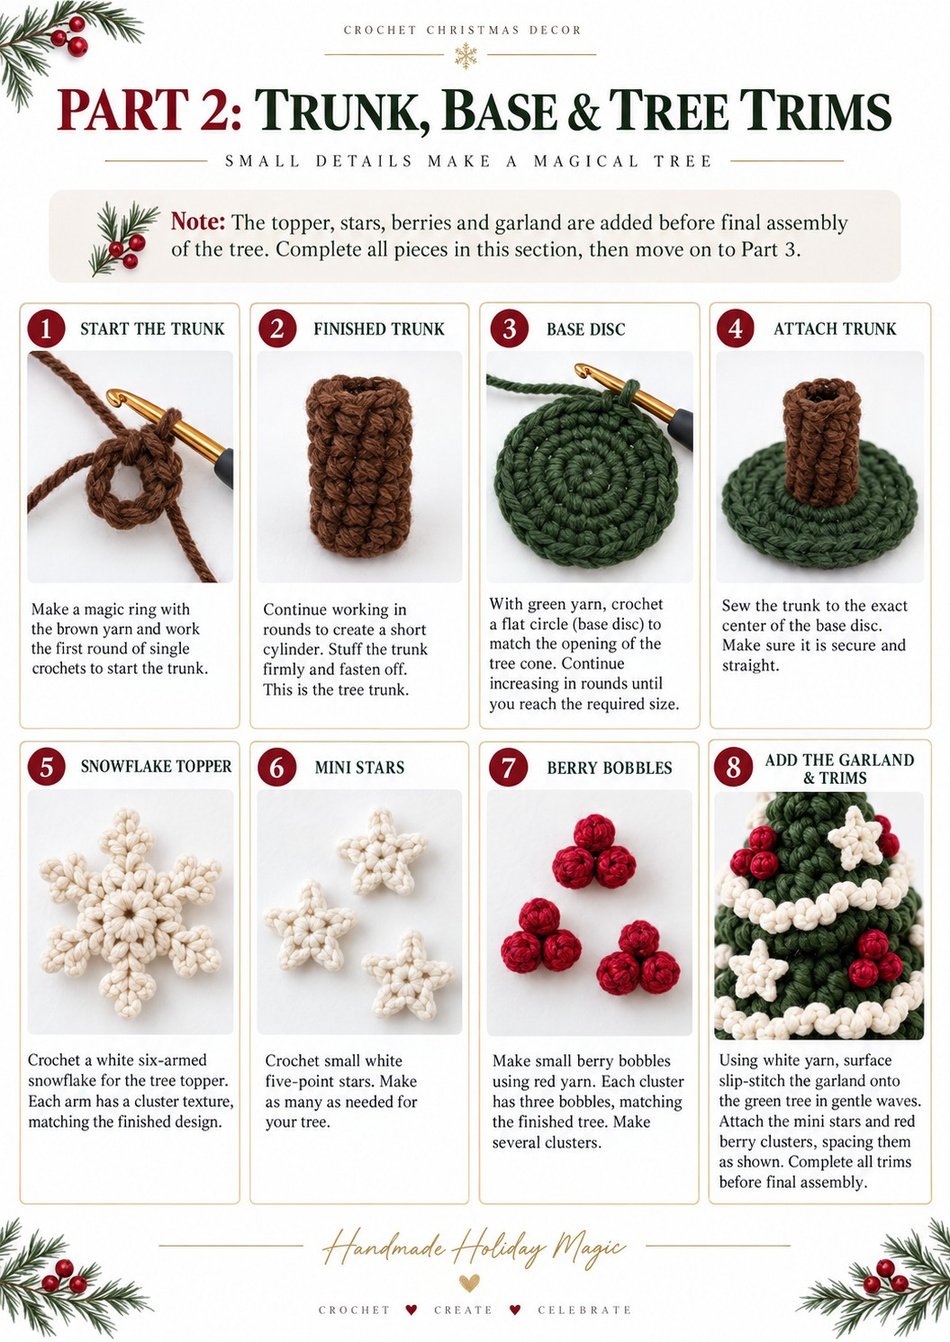
The topper, stars, berries and garland are added before final assembly of the tree. Complete every piece in this section, then move on to Part 3.
Trunk (brown)
| Rnd | Instruction | Sts |
|---|---|---|
| 1 | MR, 8 sc. | [8] |
| 2 | Inc in each st. | [16] |
| 3–7 | Even rounds. | [16] |
Stuff lightly. Fasten off, leaving a long sewing tail.
Base disc (green)
Work a flat circle to match the cone opening: MR, 6 sc; then increase 6 sts every round (Rnd 2 = 12, Rnd 3 = 18 …) through Rnd 15 [90 sts]. Sew the trunk to the exact centre of the disc, then set the disc aside for assembly.
Snowflake topper (make 1, white)
- Rnd 1: MR, 12 sc, sl st to join. [12]
- Arms (make 6, one in every 2nd st): *ch 7; working back along the chain: sl st in 2nd ch from hook, sc in next ch, then in the next ch work (ch 3, sl st in 2nd ch from hook, sl st) for a side spike, sc in next ch, another side spike (ch 3, sl st in 2nd ch from hook, sl st), sc in last 2 ch, sl st into the ring; sl st in next 2 base sts; rep from * 5 more times.
- Fasten off, leave a tail, and weave in so the six arms lie flat and even.
Mini stars (make 8–10, white)
- Rnd 1: MR; *ch 2, hdc in ring, ch 2, sl st in ring; rep from * 4 more times to make 5 points. [5 points]
- Pull the ring tight, fasten off, and leave a tail for sewing.
Berry bobbles (make 12–15, red)
- Rnd 1: MR, 6 sc. [6]
- Rnd 2: inc in each st. [12]
- Rnd 3: even round. [12]
- Rnd 4: *dec; rep around. [6] Add a tiny bit of stuffing, close the hole and leave a tail.
- Group the bobbles in clusters of three for the classic holly-berry look. Small red beads may be substituted or mixed in.
Garland (white)
Make four wavy white garlands. For each, ch a length roughly 1.5x the tree circumference at that height, then surface slip-stitch it to the tree in a gentle up-and-down wave, spacing the four garlands evenly down the cone. Alternatively, work the garland directly onto the surface with slip stitches. Secure the ends under a berry cluster.
Looking for more little festive trims to stitch? Our Easy Crochet Christmas Baubles photo tutorial and the Christmas Cracker Crown are quick, giftable companions to this ornament.
Part 3: Spiral Tail
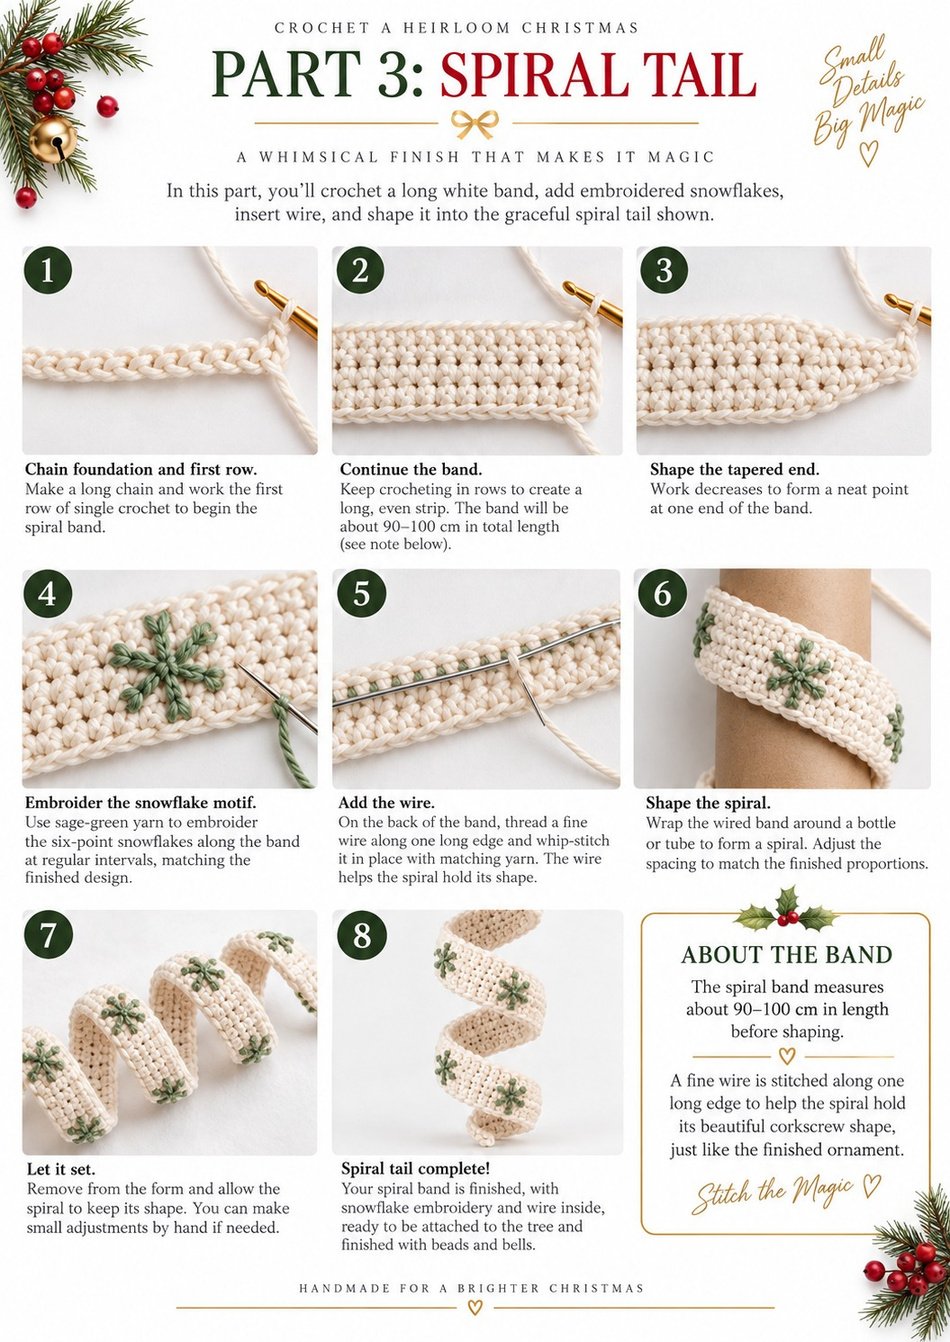
Worked flat in white as a long band, then wired and set into a coil. The band is a straight strip of single crochet. A fine wire threaded along the long edges lets you bend it into the open corkscrew shown in the photos and hold the shape. Work the whole strip first, then shape it.
- Foundation: ch 13.
- Row 1: sc in 2nd ch from hook and in each ch across, turn. [12]
- Rows 2 onward: ch 1, sc in each st across, turn. [12] Repeat until the band measures approx. 90–100 cm (35–40 in) unstretched. The band length sets how many coils you get; longer = more turns.
- Taper: over the last 10 cm, dec 1 st at the start of every row until 3 sts remain, then sl st the last 3 together to a point.
- Fasten off. Do not block flat.
Snowflake embroidery
Using sage-green yarn or embroidery floss, work small six-point snowflake motifs (a straight-stitch star with tiny side branches) spaced every 8–10 cm along the band, keeping them on what will be the outward-facing side of the coil.
Shaping the coil
- Thread a fine wire along each long edge of the band, tucking it just under the edge stitches (or whip-stitch it in place on the back). The photo tutorial shows wire along one edge; wiring both edges gives a firmer coil.
- Wrap the band firmly around a bottle, tube or dowel about 8–10 cm across to form the coil, easing it into an even open spiral.
- Mist with water or fabric stiffener and let it dry fully on the form so the coil holds. Cotton will relax without this step.
Part 4: Assembly & Finishing
- Finish the tree. Stuff the cone firmly. Pin the green base disc (with trunk attached) over the 90-st opening and sew all the way around, adding a little more stuffing before you close the last gap. The trunk should point straight down from the centre.
- Add the trims. Sew the snowflake topper securely to the apex. Distribute the mini stars and berry clusters evenly across the branches and along the white garland waves, and stitch them down.
- Prepare the central cord. Cut a length of strong cord about 10 cm (4 in) longer than the finished piece. Fold the top into a loop, thread it through the hanging ring, and knot. This loop carries all the weight.
- Run the cord through the tree. Pass the cord down through the snowflake, through the centre of the tree and out through the trunk, so the ring sits just above the topper. Lay the long armature wire alongside the cord inside the tree and secure the top end so the piece hangs straight.
- Attach the spiral. Anchor the top (wide) end of the coil to the base of the trunk. Let the central cord run down through the middle of the coil; tack the coil to the cord at one or two points so it stays centred but keeps its open shape.
- Bead the tail. Thread gold spacer and red beads onto the cord below the spiral in a pattern you like.
- Add the bells. Split the cord (or add two short cord ends) and tie the gold and red bells so they hang side by side at the very bottom. Knot securely and dab the knots with a little glue if you wish.
- Final set. Hang the ornament and gently adjust the coil spacing. Re-mist and let it settle if the spiral needs to relax into shape.
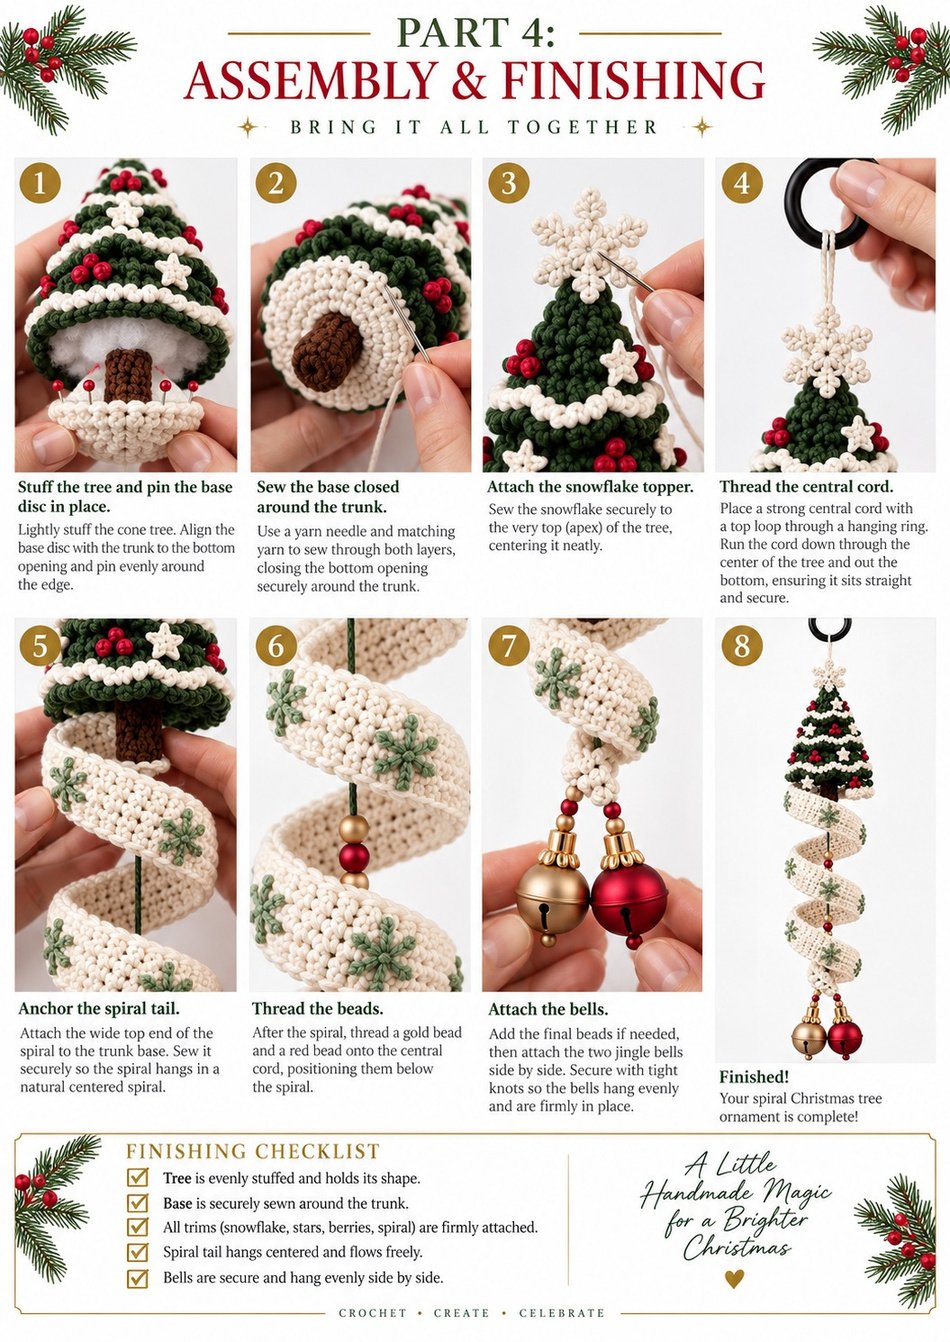
Finishing checklist
- Cone stuffed firmly and evenly; base closed neatly around the trunk.
- Topper and mini stars attached securely.
- Garland waves and berry clusters spread evenly.
- Spiral holds an open, even coil with snowflakes facing out.
- Central cord takes the weight; bells and beads secured at the bottom.
Stitch Count Summary
| Part | Key counts |
|---|---|
| Cone tree body | 6 sts at Rnd 1, 90 sts at Rnd 28 (open base); BLO ridges on Rnds 10, 14, 18, 22 and 26 |
| Trunk | 8 sc at Rnd 1, 16 sts from Rnd 2 to Rnd 7 |
| Base disc | MR 6 sc, +6 sts every round to Rnd 15 [90] |
| Snowflake topper | 12 sc ring, 6 arms with side spikes |
| Mini stars | 5 points each (make 8–10) |
| Berry bobbles | 6 sc, 12 sts, then dec to 6 (make 12–15) |
| Spiral band | 13 ch foundation, 12 sc per row, 90–100 cm long, tapered to a point |
Care & Pattern Use
Care: dust gently or spot-clean only. The wire and bells mean this piece should not be machine washed. Store it flat or hanging so the spiral keeps its shape, and re-mist and re-form the coil at the start of each season if needed.
- This pattern is for your personal use. You may sell a reasonable number of finished items you make yourself from it.
- Please do not copy, republish or redistribute this pattern or its photos in whole or in part, and do not claim the pattern as your own design.
- When selling finished pieces, a credit to Crochet Patterns Hub with a link back to this page is appreciated but not required.
Spiral Christmas Tree Crochet Pattern FAQ
Is this spiral Christmas tree crochet pattern really free?
Yes. The full pattern and photo tutorial are free to read and use for personal projects. See the pattern use notes above if you would like to sell finished ornaments.
How difficult is this ornament?
It is rated advanced because it combines amigurumi shaping, a wired spiral band and a cord-and-bead assembly. Every individual part is simple single crochet, so work through the parts one at a time and read the full pattern before you start.
Can I make the tree without the ridges?
Yes. The BLO ridge rounds create the layered branch look, but if you prefer a smooth tree you can work those rounds through both loops.
Why does the spiral tail need wire and stiffener?
Cotton will not corkscrew on its own. A fine wire along the band edge and a light mist of water or fabric stiffener while it dries on a bottle or tube help the coil keep its shape. Re-mist and re-form it each season if it relaxes.
How do I hang it?
A strong central cord with a top loop goes through the hanging ring, down through the snowflake and tree, and out through the trunk. The cord, not the crochet, carries the weight from the ring down to the bells.
More Free Christmas Crochet Patterns
Loved this ornament? Try these festive makes next, or browse every design on our free crochet patterns page.
Keep learning: visit our crochet tutorials for step-by-step technique guides, or read the crochet blog for tips, yarn advice and fresh ideas.
Plan Your Next Project With Our Free Tools
Every pattern on Crochet Patterns Hub works with the same free calculators, from gauge and yarn estimates to hook conversions and abbreviation help.
Made your own spiral Christmas tree? We would love to see it, so get in touch and share a photo, or read more about Crochet Patterns Hub. Happy hooking and happy holidays!