
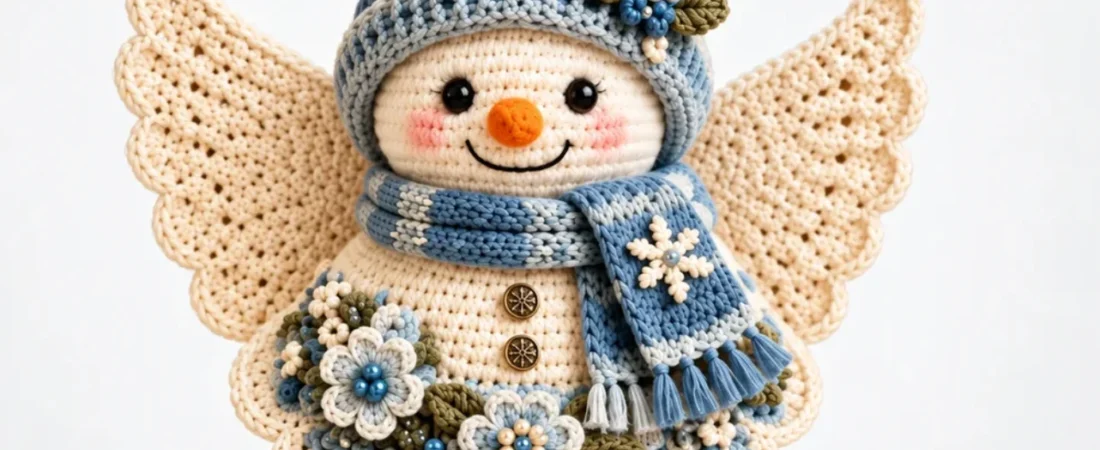
- Advanced
- US Terms
- ≈ 19 cm tall
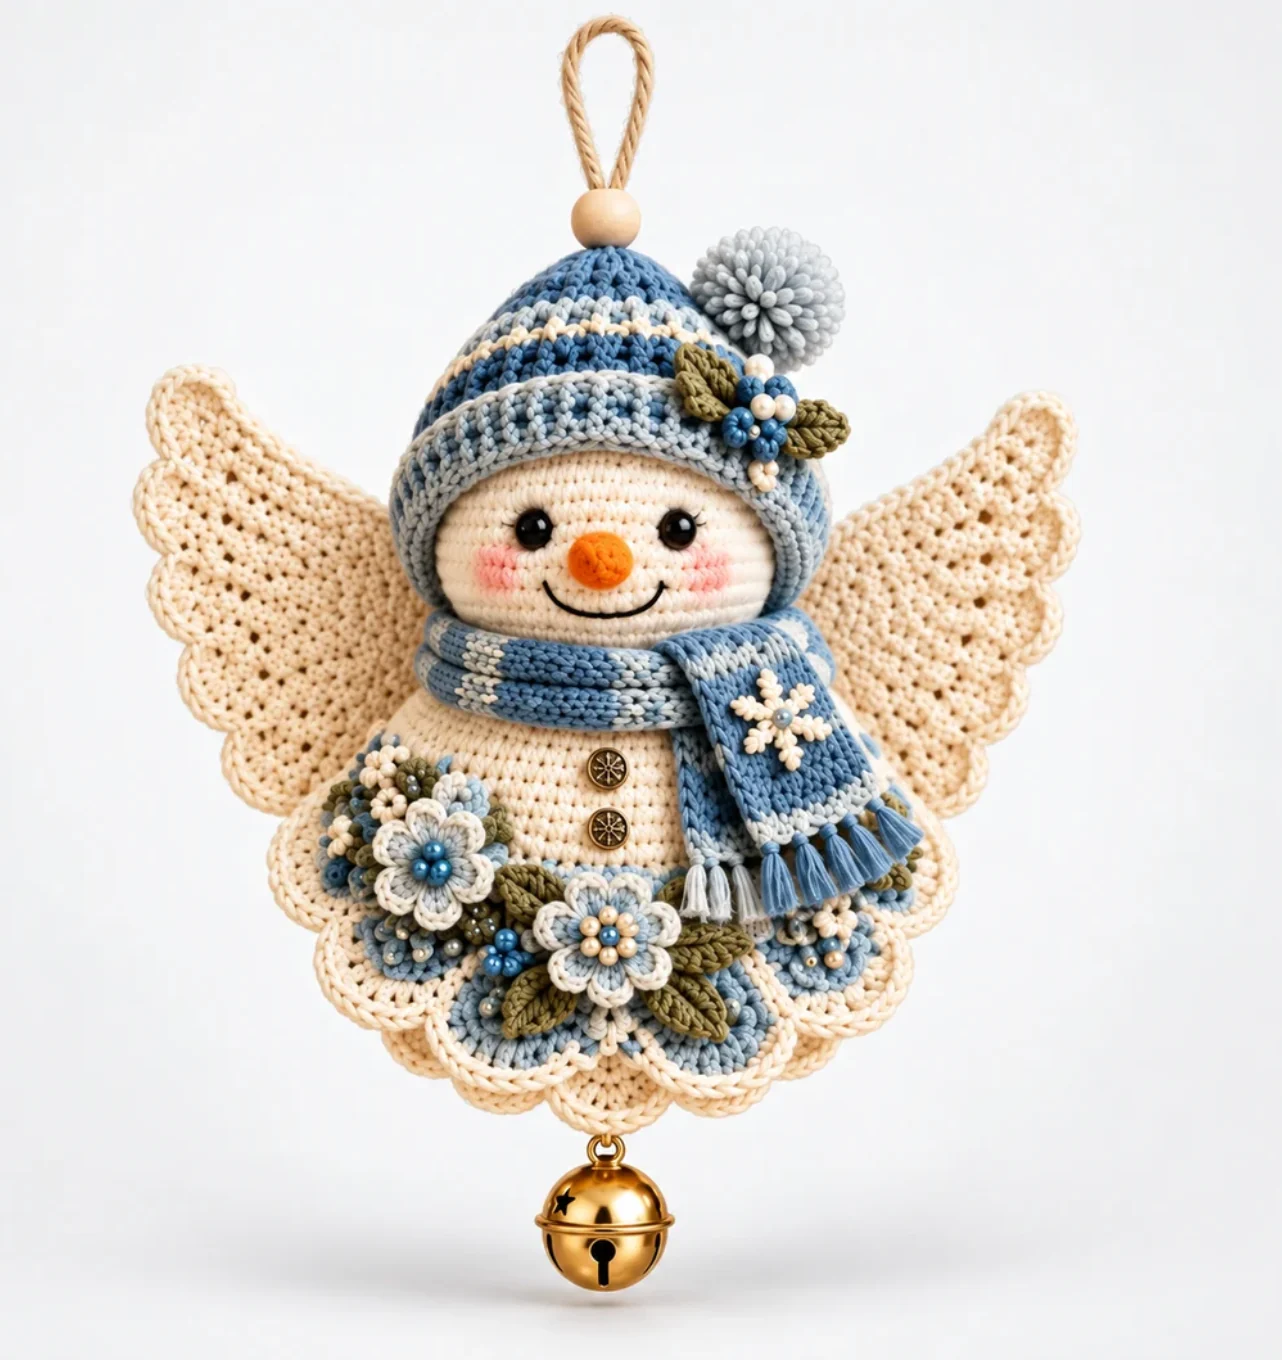
This free Winter Snow Angel crochet pattern turns a cosy snowman into a keepsake Christmas ornament: a stuffed amigurumi head and bell-shaped body, soft lace wings, a scalloped dress, a pom-pom hat with a striped scarf and a tumble of beaded winter flowers, finished with a golden jingle bell. It is one of our free Christmas and holiday crochet patterns, written in US terms with clear placement maps and five photo step guides.
Before you cast on: if the abbreviations are new to you, our guide to how to read crochet patterns explains them, and the Crochet Calculator & Tools page has an abbreviation lookup, gauge calculator, yarn estimator and hook size converter you can keep open beside this pattern.
- Skill level
- Advanced
- Finished size
- ≈ 19–21 cm tall
- Terms
- US terms
- Yarn
- Sport / light DK cotton, ≈ 55 g
- Hook
- 2.5 mm (or size for gauge)
- Techniques
- Amigurumi, flat lace, floral appliqué
Welcome
A keepsake snow angel who brings a little snow-day cheer to the tree — a cosy snowman face tucked inside a pom-pom hat and striped scarf, with soft lace wings, a scalloped dress and a tumble of winter flowers, finished with a golden bell that chimes when it swings.
This pattern blends amigurumi, flat lace shaping and layered floral appliqué. Each piece is worked separately, then assembled and decorated using the clear placement maps near the end of the guide. Take your time with the floral arrangement — that is where the ornament truly comes to life.
Work a gauge swatch and a quick test of the head and body before making the full set. Yarn weight, hook size and tension all affect the finished look, so small adjustments are normal and expected. Read the General Notes (Section 4) once through before you start.
Materials & Tools
Yarn
Sport-weight or light DK cotton of even thickness (approx. 125–160 m per 50 g). Eight shades are used; most are needed only in small amounts.
| Shade | Used for | Approx. |
|---|---|---|
| A — Warm Ivory | Head, body, wings, dress edging, petal outlines | 25 g |
| B — Denim Blue | Hat, scarf, flowers, berries | 12 g |
| C — Mist Blue | Hat band, scarf stripes, skirt fans, flower centres | 8 g |
| D — Pearl Gray | Pom-pom, flower shading | 4 g |
| E — Olive Green | Leaves, stems, greenery | 4 g |
| F — Pumpkin Orange | Nose | 1 g |
| G — Soft Pink | Cheek embroidery | < 1 g |
| H — Black | Mouth & eyelash embroidery | < 1 g |
Total yarn: roughly 55 g. Amounts include a small allowance for sewing and finishing; exact use varies with gauge and tension.
Changing the size or making a batch of ornaments? Run your swatch through the Yarn Estimator to see how much of each shade you will need, and read our best yarn for crochet projects guide if you are choosing between cottons.
Hook & Notions
- 2.5 mm crochet hook (or size needed for gauge)
- Stitch markers
- Tapestry needle & fine embroidery needle
- Polyester fiberfill, approx. 20–30 g
- Strong sewing thread to match beads
- Scissors, ruler, pins
- 12–15 mm dowel (for even pom-pom loops)
Finishing Hardware
- 2 × black safety eyes, 8 mm
- 2 × antique-brass buttons, 9–10 mm
- 1 × gold jingle bell, 20–22 mm
- 1 × wooden bead, 12–14 mm (wide hole)
- 1 × jump ring, 5–6 mm
- ≈ 30 cm natural cotton cord, 2 mm
- 21 × ivory pearl beads, 3–4 mm
- 4 × blue beads, 4–5 mm
Small beads, safety eyes, buttons and the bell make this a decorative ornament, not a children’s toy. For a child-safe version, replace the eyes and beads with embroidered details and omit the bell.
Size, Gauge & Abbreviations
Finished Size
| Overall height (hat to bell) | ≈ 19–21 cm |
| Width across wings | ≈ 19–21 cm |
| Hanging loop | ≈ 4–5 cm |
| Head diameter | ≈ 7.5–8 cm |
| Hat diameter | ≈ 8.5–9 cm |
| Dress max width | ≈ 12–13 cm |
| Each wing span | ≈ 9–11 cm |
| Scarf | ≈ 24 cm × 2 cm |
Measurements are approximate and depend on gauge.
Gauge
24 sc × 32 rounds = 10 × 10 cm, worked firmly over stuffed amigurumi fabric with the main yarn and hook.
Work a flat swatch about 30 sts × 36 rows and measure the centre 24 sts × 32 rows. Aim for a dense fabric with no stuffing showing between stitches — go down a hook size if the fabric feels loose.
For a mini / keychain size, use a 4-ply crochet cotton with a 1.75–2 mm hook; the whole piece scales down proportionally.
Enter your swatch counts into the Gauge Calculator to see how close you are to 24 sc × 32 rounds, and use the Hook Size Converter to swap the 2.5 mm hook (or the 1.75–2 mm mini hook) for US or UK sizes. Planning the mini version? The Yarn Estimator helps you scale the yardage.
Abbreviations — US Terminology
- MR
- magic ring
- ch
- chain
- sl st
- slip stitch
- sc
- single crochet
- hdc
- half double crochet
- dc
- double crochet
- tr
- treble crochet
- inc
- 2 sc in one stitch
- invdec
- invisible sc decrease
- BLO
- back loop only
- FLO
- front loop only
- fpdc
- front-post dc
- bpdc
- back-post dc
- lp-sc
- loop single crochet
- st(s)
- stitch(es)
- rep
- repeat
- RS / WS
- right / wrong side
- FO
- fasten off
- ( ) ×n
- repeat n times
- (00)
- stitch count at round end
Not sure what an abbreviation means or how it differs in UK terms? Look it up in the Abbreviations lookup, or paste a row into the Pattern Decoder. For a refresher on the stitches themselves, start with the 6 basic crochet stitches, and see how to read crochet patterns for US vs UK terms.
General Notes & Stitch Guide
How to work this pattern
- Amigurumi pieces (head, nose, body, base, pom-pom) are worked in continuous spiral rounds — do not join unless told to. Mark the first stitch of each round.
- Flat pieces (wings, fans, scarf, flowers, leaves) are turned at the end of each row. Turning chains do not count as a stitch.
- Numbers in brackets, e.g. (60), are the stitch count at the end of that round or row.
- All appliqués are made with the RS facing out. Weave in structural ends; keep a sewing tail on pieces that are sewn on later.
Special stitches
Invisible decrease (invdec): insert hook in the front loops of the next 2 sts, yarn over and draw through both front loops, yarn over and draw through the remaining loops.
Front-post dc (fpdc): yarn over, insert hook front-to-back-to-front around the post of the next stitch, draw up a loop and complete a dc. Back-post dc (bpdc): the same, inserting back-to-front-to-back around the post.
Loop sc (lp-sc): wrap the yarn around a dowel to form a 12–15 mm loop toward the RS, then complete an sc around the working yarn without closing the loop. Counts as one sc.
Surface slip stitch: with a loop of yarn held behind the fabric, insert the hook through the front of a finished piece, draw the yarn through, then through the loop on the hook. Repeat along the line without working through the full thickness.
Padded cord: hold 2 strands of yarn as a core; work sc around the core (not into it), sliding stitches together for a firm, flexible stem.
If a line of this pattern does not make sense, paste just that row into the Pattern Decoder for a plain-English explanation. New to post stitches or invisible decreases? Browse our crochet stitch tutorials, or see how to hold a crochet hook if your tension feels tight.
Parts list
| Piece | Qty | Shade |
|---|---|---|
| Head · Nose · Body · Base disc | 1 each | A (nose F) |
| Scalloped dress border | integral | A |
| Lace angel wings | 2 | A |
| Skirt fan appliqués | 7 | B, C, A |
| Hat · Pom-pom · Scarf | 1 each | B/C/A · D · B/C |
| Large flowers / Small flowers | 2 / 5 | C, D, A |
| Large leaves / Small leaves | 8 / 2 | E |
| Padded stems / Berries | 2 / 13 | E / B |
The Snowman — Head, Nose & Face
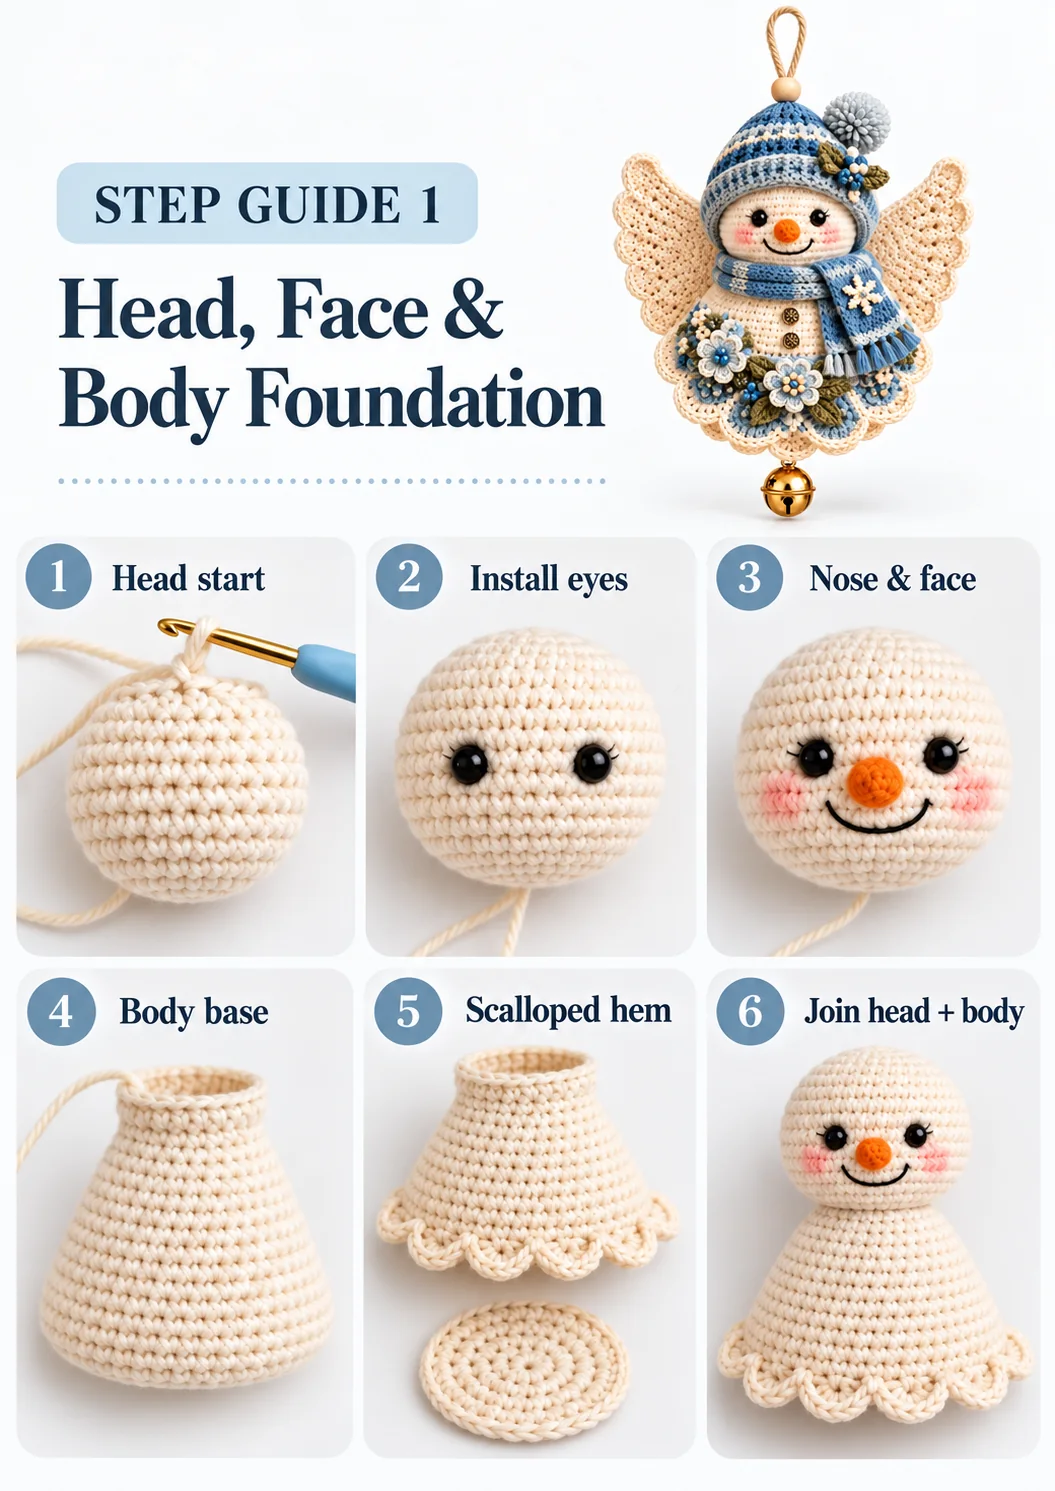
Part A · HeadShade A, spiral rounds
| R1 | 6 sc in MR | 6 |
|---|---|---|
| R2 | inc ×6 | 12 |
| R3 | (1 sc, inc) ×6 | 18 |
| R4 | (2 sc, inc) ×6 | 24 |
| R5 | (3 sc, inc) ×6 | 30 |
| R6 | (4 sc, inc) ×6 | 36 |
| R7 | (5 sc, inc) ×6 | 42 |
| R8 | (6 sc, inc) ×6 | 48 |
| R9 | (7 sc, inc) ×6 | 54 |
| R10 | (8 sc, inc) ×6 | 60 |
| R11–18 | sc in each st | 60 |
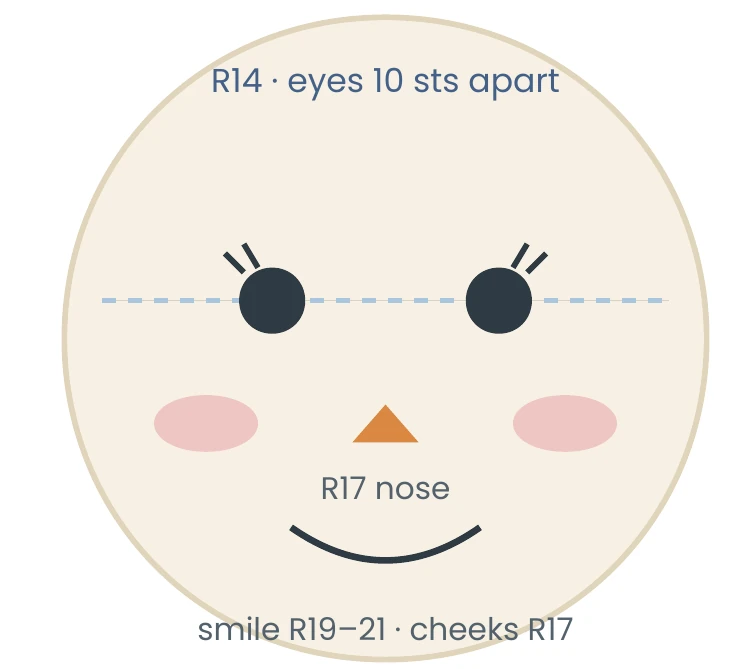
Install the two 8 mm safety eyes between R14 and R15 before closing. Mark the front-centre stitch; place one eye 5 sts to the left and one 5 sts to the right, so the eyes sit 10 sts apart. Fix the washers firmly inside.
| R19 | (8 sc, invdec) ×6 | 54 |
|---|---|---|
| R20 | (7 sc, invdec) ×6 | 48 |
| R21 | (6 sc, invdec) ×6 | 42 |
| R22 | (5 sc, invdec) ×6 — begin stuffing | 36 |
| R23 | (4 sc, invdec) ×6 | 30 |
| R24 | (3 sc, invdec) ×6 | 24 |
| R25 | (2 sc, invdec) ×6 — finish stuffing | 18 |
| R26 | (1 sc, invdec) ×6 | 12 |
| R27 | invdec ×6 | 6 |
FO leaving a 25 cm tail; close the last 6 sts through the front loops. Keep the face softly rounded. Do not join to the body yet.
Part B · NoseShade F
| R1 | 6 sc in MR | 6 |
|---|---|---|
| R2 | (1 sc, inc) ×3 | 9 |
| R3 | sc in each st | 9 |
| R4 | (1 sc, invdec) ×3 | 6 |
Add a tiny bit of stuffing; FO, close, leave a 20 cm tail. Shape into a small rounded carrot nose. Sew centred over R17 of the head, between and just below the eyes, on the front-centre line.
Part C · Face
Smile (H): with black, backstitch a gentle curve — left corner at R19 (5 sts left of centre), lowest point at R21 centre, right corner at R19 (5 sts right). Use ~10 small backstitches; don’t pull tight.
Cheeks (G): centred at R17, about 9 sts either side of centre, work 6 short satin stitches each (3 across R17, 3 across R18) for a soft blush.
Lashes (H): at the outer top corner of each eye, add 2 short upward lashes (2–3 mm), angled outward. Secure all ends inside the head.
The Body, Dress & Base
Part D · Bell bodyShade A, worked top-down
Alternating increase and plain rounds give the body its gentle bell flare. Keep stuffing until later.
| R1 | 6 sc in MR | 6 |
|---|---|---|
| R2 | inc ×6 | 12 |
| R3 | (1 sc, inc) ×6 | 18 |
| R4 | (2 sc, inc) ×6 | 24 |
| R5 | (3 sc, inc) ×6 | 30 |
| R6 | sc in each st | 30 |
| R7 | (4 sc, inc) ×6 | 36 |
| R8 | sc in each st | 36 |
| R9 | (5 sc, inc) ×6 | 42 |
| R10 | sc in each st | 42 |
| R11 | (6 sc, inc) ×6 | 48 |
| R12 | sc in each st | 48 |
| R13 | (7 sc, inc) ×6 | 54 |
| R14 | sc in each st | 54 |
| R15 | (8 sc, inc) ×6 | 60 |
| R16 | (9 sc, inc) ×6 | 66 |
| R17 | (10 sc, inc) ×6 | 72 |
| R18 | sc in each st | 72 |
Do not cut the yarn. Mark the front-centre stitch of R18. The back loops of R18 are kept free to join the base disc; the scalloped border is worked into the front loops.
Part E · Scalloped dress
Work into the front loops of R18. Begin 3 sts before the front-centre stitch. Work this 8-st repeat 9 times:
- 1 sc in next st
- skip 2 sts
- 9 dc in next st
- skip 2 sts
- 1 sc in each of next 2 sts
9 × 8 = 72 front loops used · 9 scallops = 108 sts. Join with sl st to the first sc; FO. The border ruffles into nine soft cream scallops — the front-centre scallop (S1) will hold the bell.
Shape the scallops: lightly dampen the border, then pin each of the nine fans into an even, rounded curve of equal width and let it dry fully. Blocking is what sets the crisp, uniform scalloped flare seen in the photo, so the fans and flowers sit cleanly on top.
Part F · Base discShade A
| R1 | 6 sc in MR | 6 |
|---|---|---|
| R2 | inc ×6 | 12 |
| R3 | (1 sc, inc) ×6 | 18 |
| R4 | (2 sc, inc) ×6 | 24 |
| R5 | (3 sc, inc) ×6 | 30 |
| R6 | (4 sc, inc) ×6 | 36 |
| R7 | (5 sc, inc) ×6 | 42 |
| R8 | (6 sc, inc) ×6 | 48 |
| R9 | (7 sc, inc) ×6 | 54 |
| R10 | (8 sc, inc) ×6 | 60 |
| R11 | (9 sc, inc) ×6 | 66 |
| R12 | (10 sc, inc) ×6 | 72 |
FO with a 35 cm tail.
Hold the disc against the underside, WS together. Whipstitch each of its 72 edge sts to the 72 free back loops of Body R18. Stuff firmly after about three-quarters of the seam, then finish sewing. Keep the nine scallops free, outside the seam.
Photo Step Guide 1 · Head, Face & Body Foundation
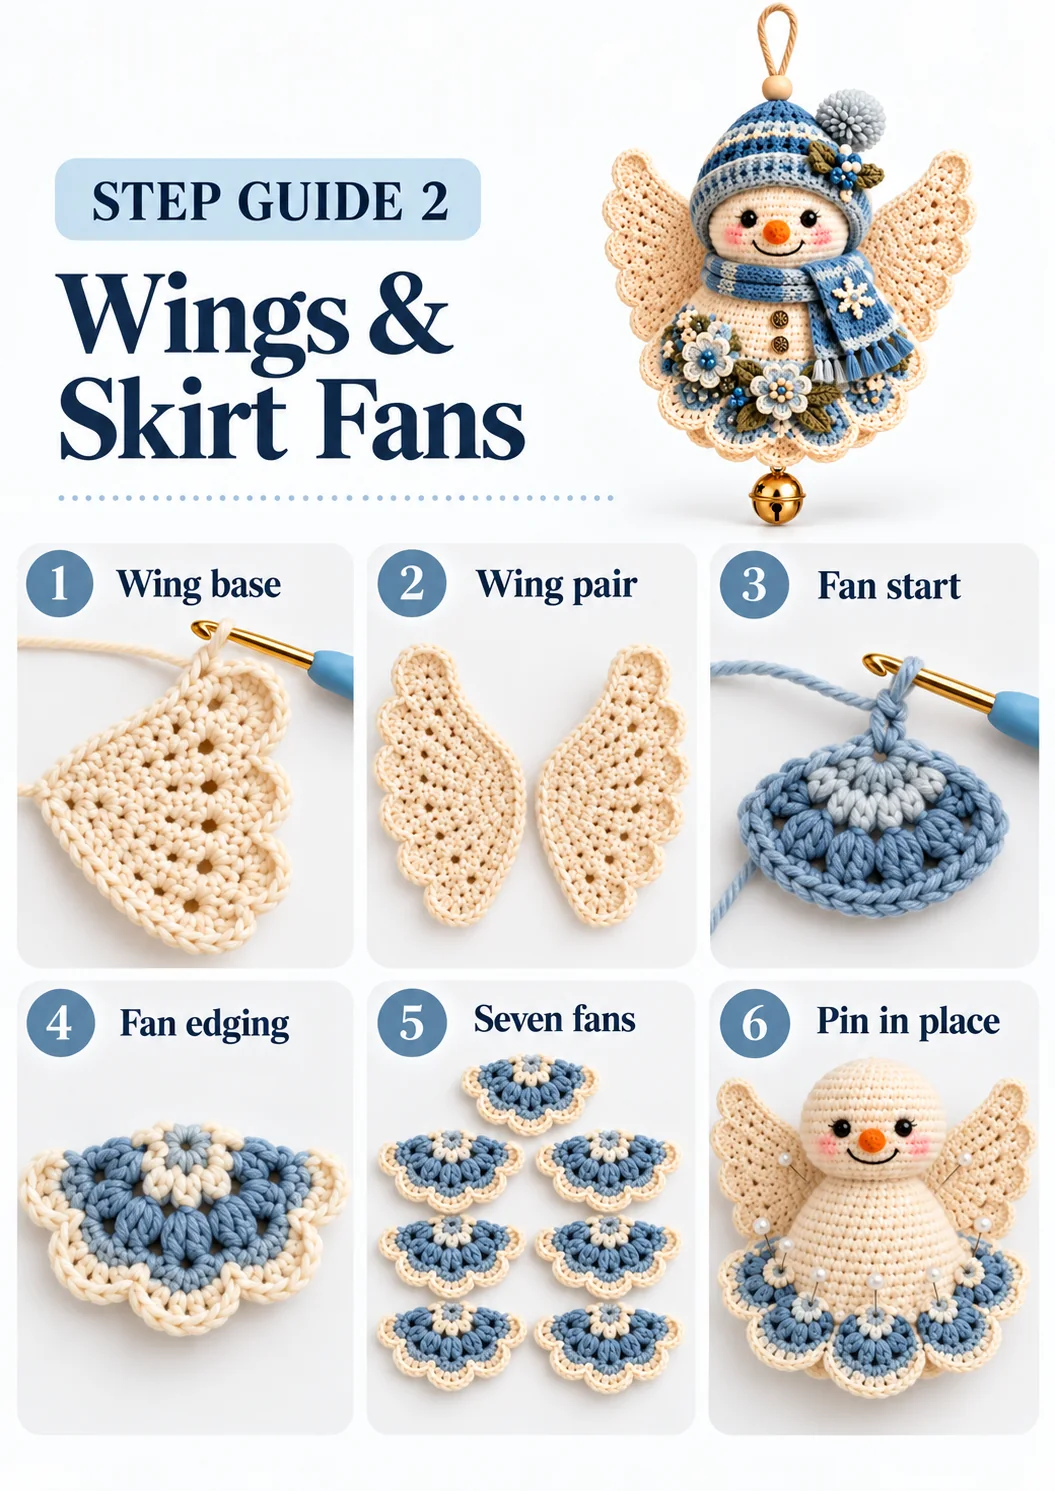
Wings & Skirt Fans
Part G · Lace angel wingsShade A · make 2
A wide, open panel grown over sixteen increase rows (R2–R17) with eyelets for an airy lace, finished with a six-lobe scalloped edge. At the end of every row ch 1 and turn (this turning ch is not counted). Each eyelet is (ch 1, skip 1 st); on the following row, work 1 sc into that ch-1 space as you pass it — the eyelet replaces one stitch, so the count still rises by just one per row.
| Foundation | ch 11 | — |
|---|---|---|
| R1 | 10 sc from 2nd ch | 10 |
| R2 | 2 sc in first, 9 sc | 11 |
| R3 | 2 sc in first, 3 sc,(ch1,sk1),3 sc,(ch1,sk1), 2 sc | 12 |
| R4 | 2 sc in first, [2 sc,(ch1,sk1)]×3, 2 sc | 13 |
| R5 | 2 sc in first, 12 sc | 14 |
| R6 | 2 sc in first, 4 sc,(ch1,sk1),4 sc,(ch1,sk1), 3 sc | 15 |
| R7 | 2 sc in first, [3 sc,(ch1,sk1)]×3, 2 sc | 16 |
| R8 | 2 sc in first, 15 sc | 17 |
| R9 | 2 sc in first, 4 sc,(ch1,sk1),[3 sc,(ch1,sk1)]×2,3 sc | 18 |
| R10 | 2 sc in first, [4 sc,(ch1,sk1)]×2,3 sc,(ch1,sk1),3 sc | 19 |
| R11 | 2 sc in first, 18 sc | 20 |
| R12 | 2 sc in first, [4 sc,(ch1,sk1)]×3, 4 sc | 21 |
| R13 | 2 sc in first, 4 sc,(ch1,sk1),[3 sc,(ch1,sk1)]×3,3 sc | 22 |
| R14 | 2 sc in first, 21 sc | 23 |
| R15 | 2 sc in first, [5 sc,(ch1,sk1)]×3, 4 sc | 24 |
| R16 | 2 sc in first, [4 sc,(ch1,sk1)]×4, 3 sc | 25 |
| R17 | 2 sc in first, 24 sc (do not turn) | 26 |
Outer scallops (symmetrical): across the 26 sts of R17 — sl st in the first st, then rep 6 times → [sk 1, 7 dc in next st, sk 1, sl st in next st], and sl st in the last st. This centres the six lobes (42 dc) with a balancing slip stitch at each end, so both corners of the wing match. Edge the sides: ~15 sc down the first side, 10 sc across the foundation, ~15 sc up the second side, sl st to join. FO with a 40 cm tail. Make the second wing the same, then flip it to mirror. Block both flat and matching — open the eyelets gently, but don’t stretch them wide.
Part H · Skirt fansmake 7 · B, C, A
| R1 | B · 3 dc in MR, ch2, turn | 3 |
|---|---|---|
| R2 | B · 2 dc in each st, ch2, turn | 6 |
| R3 | C · (1 dc, 2 dc in next) ×3, ch2, turn | 9 |
| R4 | B · (2 dc, 2 dc in next) ×3, ch1, turn | 12 |
| R5 | A · 1 sc in each st | 12 |
FO with a 25 cm tail. Each fan has a narrow point and a curved 12-st outer edge. Make all seven identical.
Photo Step Guide 2 · Wings & Skirt Fans
Hat, Pom-pom & Scarf
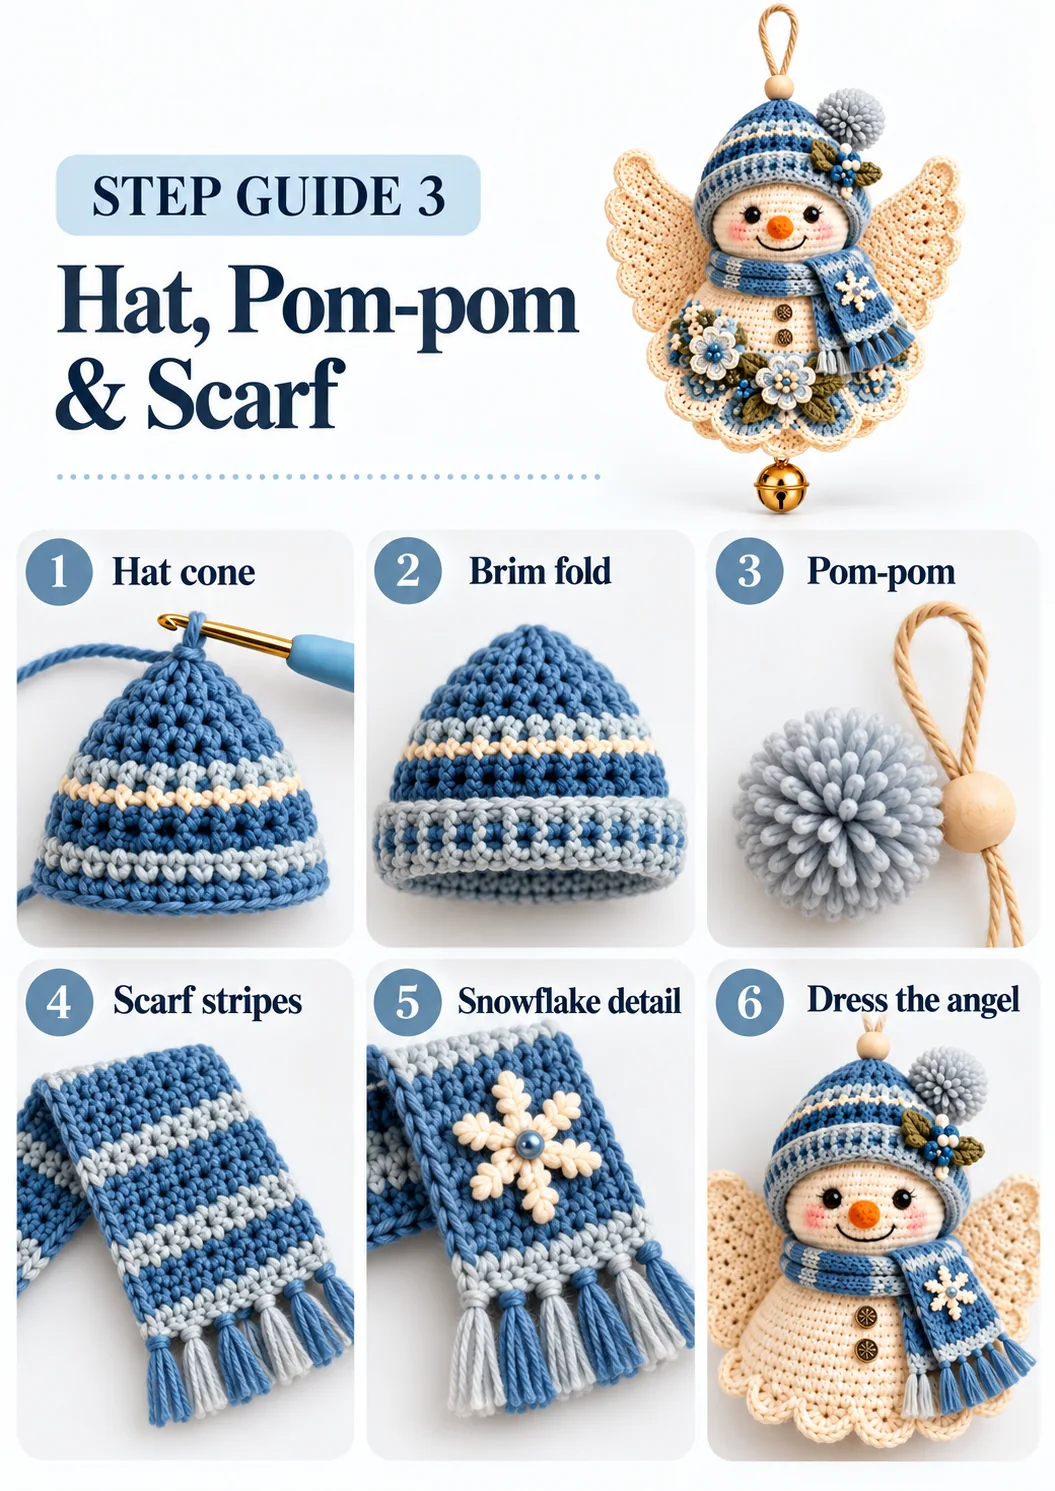
Part I · Winter hatB, C, A · worked top-down
Plain rounds between increases build a tall, soft point that leans to one side. Work R1–15 in B.
| R1 | 6 sc in MR | 6 |
|---|---|---|
| R2 | inc ×6 | 12 |
| R3 | sc | 12 |
| R4 | (1 sc, inc) ×6 | 18 |
| R5 | sc | 18 |
| R6 | (2 sc, inc) ×6 | 24 |
| R7 | sc | 24 |
| R8 | (3 sc, inc) ×6 | 30 |
| R9 | sc | 30 |
| R10 | (4 sc, inc) ×6 | 36 |
| R11 | sc | 36 |
| R12 | (5 sc, inc) ×6 | 42 |
| R13 | sc | 42 |
|---|---|---|
| R14 | (6 sc, inc) ×6 | 48 |
| R15 | sc | 48 |
| R16 | C · (7 sc, inc) ×6 | 54 |
| R17 | A · sc | 54 |
| R18 | C · (8 sc, inc) ×6 | 60 |
| R19 | B · (9 sc, inc) ×6 | 66 |
| R20–23 | B · sc | 66 |
R16–18 form the cream & mist band near the brim.
Ribbed brim: R24 (B) ch2, dc in each st, join (66). R25–27 (C): ch2, (fpdc, bpdc) ×33, join (66). R28 (B): ch1, 1 sc in the top of each stitch around (work into the two top loops at the top of each fpdc/bpdc from R27), join (66). FO with a 30 cm tail. Fold the ribbed brim up against the outside of the cap and tack with 4 hidden stitches.
Part J · Loop pom-pomShade D
| R1 | 6 lp-sc in MR | 6 |
|---|---|---|
| R2 | 2 lp-sc in each | 12 |
| R3 | lp-sc in each | 12 |
| R4 | invdec ×6 | 6 |
Add a little stuffing; close, leave a 25 cm tail. Keep all loops ~12–15 mm and even (≈ 2.5–3 cm ball). Sew to the upper-right slope of the hat, through base stitches only — never through the loops.
Part K · ScarfB, C · worked widthwise
With B, ch 6. R1: sc in 2nd ch from hook and across (5). Ch1, turn. Work every row in sc (5 sts), turning each time. Change colour by row for crosswise stripe bands:
- Rows 1–6 B · 7–8 C · 9–20 B
- Rows 21–22 C · 23–54 B
- Rows 55–56 C · 57–68 B
- Rows 69–70 C · 71–76 B
FO (≈ 24 cm long). The long middle wraps the neck; the stripes gather near both ends.
Fringe: cut 10 × 6 cm lengths of C. Attach 5 evenly along each short (5-st) end with a lark’s-head knot; trim to ~2 cm. Snowflake (A): on the hanging end, ~3 cm from the fringe, embroider 6 straight arms (~6 mm) in a star, each with two 3 mm side branches, and sew one ivory pearl at the centre.
Fond of the striped winter hat? Browse more free crochet hat patterns, or see our crochet stitch tutorials for the post stitches used in the ribbed brim.
Photo Step Guide 3 · Hat, Pom-pom & Scarf
Flowers, Leaves, Stems & Berries
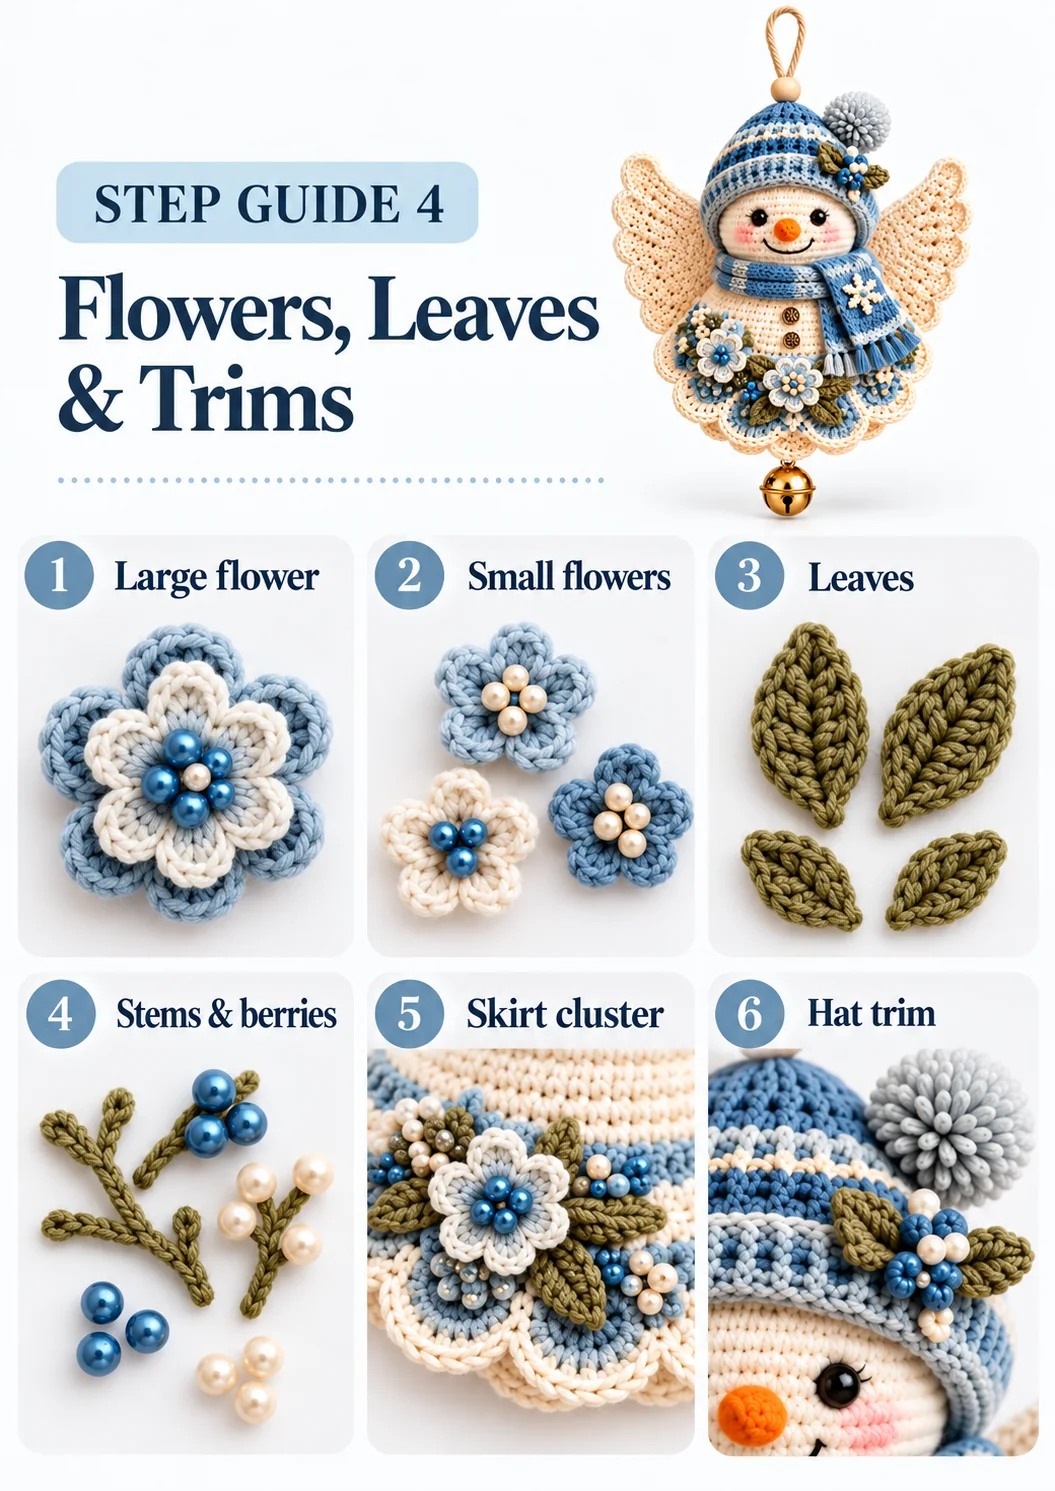
Part L · Large flowersmake 2 · C/D + A
| R1 | C · 7 sc in MR | 7 |
|---|---|---|
| R2 | C · inc in each | 14 |
| R3 | petals · rep ×7: sl st in next st, 5 dc in the next st | 7 petals |
| R4 | A · sl st in each of the 42 sts | 42 |
Join, FO, 25 cm tail. Seven rounded petals with a cream outline. For one flower, use D in place of C for the grey-blue variation.
Optional under-layer (for extra depth): make a second, fuller round — R1: 10 sc in MR; R2: [sl st in next, 4 dc in next] ×5, sl st to close (5 petals). Stack it under the main flower, offsetting the petals so they peek between the top petals, and bead through both layers at once for a rounder, layered bloom.
Centres: Flower 1 — three blue beads in a cluster. Flower 2 — one blue bead centre, ringed by six ivory pearls. Secure each bead separately.
Part M · Small flowersmake 5 · A (3) + C (2)
| R1 | 6 sc in MR | 6 |
|---|---|---|
| R2 | in each R1 st work one petal — all into the same stitch: [sl st, ch2, 2 hdc, ch2, sl st] | 6 petals |
Each R1 stitch holds one complete petal (sl st, ch2, 2 hdc, ch2, sl st all in that one stitch), giving six even petals. FO, 20 cm tail. Sew one ivory pearl at the centre of each.
Part N · LeavesE · 8 large + 2 small
Large (ch 12): lay a 15 cm padding strand along the chain and work over it. First side from 2nd ch: sl st, sc, hdc, 5 dc, hdc, sc, sl st (11). Base: ch1, sl st in the same end ch. Second side in the free loops back to the tip: sc, hdc, 5 dc, hdc, sc, sl st (10). Tip: ch2, sl st to the first sl st. FO, 20 cm tail. Work 11 surface sl sts along the chain for a raised centre vein. The one-stitch difference between the sides is just the base turn — pin and block the finished leaf so both halves mirror evenly.
Small (ch 8): first side: sl st, sc, hdc, dc, hdc, sc, sl st (7); base ch1 + sl st; second side: sc, hdc, dc, hdc, sc, sl st (6); tip ch2 + sl st. Add a 7-st surface vein. Make 2.
Part O · Stemsmake 2 · E
Hold two 12 cm strands of E as a core and work 14 sc around the core (not into it), sliding stitches close so no core shows. FO, 20 cm tail (≈ 4–5 cm long).
Part P · Berriesmake 13 · B
| R1 | 5 sc in MR | 5 |
|---|---|---|
| R2 | sc in each | 5 |
Tuck a tiny scrap inside, draw the top closed into a bud, 15 cm tail. 5 berries for the hat, 8 for the skirt.
21 ivory pearls — 1 snowflake · 6 in large Flower 2 · 5 small flowers · 3 on the hat · 6 scattered on the skirt. 4 blue beads — 3 in large Flower 1 · 1 in Flower 2.
Photo Step Guide 4 · Flowers, Leaves & Trims
Placement Maps
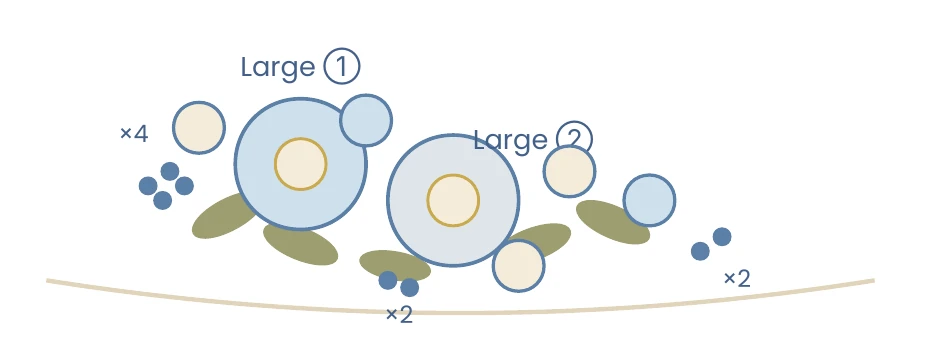
Use these schematic maps while you pin and sew. They show relative positions, not exact stitch gauge — pin everything first and adjust by eye before sewing.
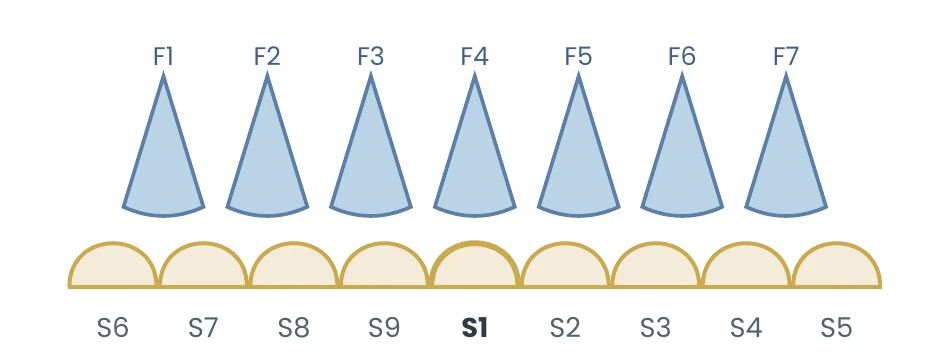
Scallops & Skirt Fans — Front
Skirt Flowers & Leaves — Front
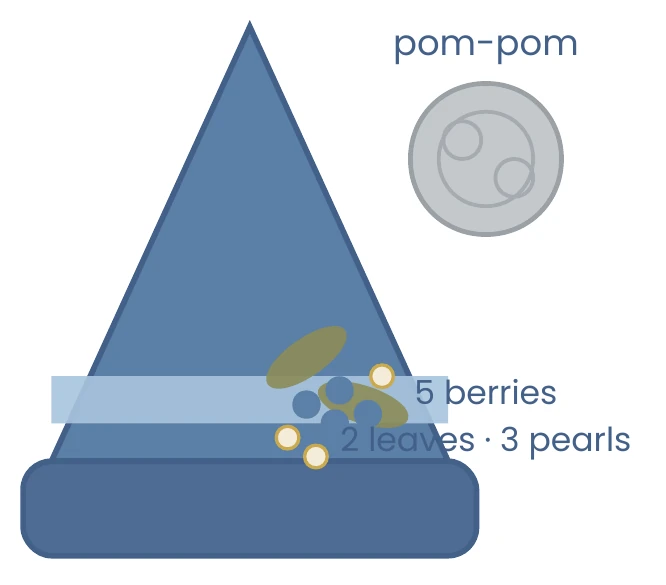
Hat Trim — Right Side
Face Map
Assembly & Placement
Work with the face up. The front-centre line runs through the nose, smile, buttons and bell. Number the nine cream scallops from the front-centre scallop (S1) going right.
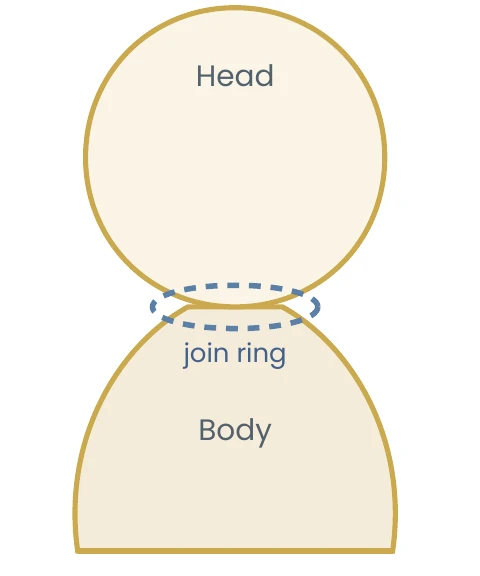
- Join head & body. Both pieces are already stuffed and closed. Line up the front-centre markers and rest the head on the body so the head’s closed base sits into the body’s narrow top; the two circles that meet are roughly Head R24 and Body R4 (24 sts each), with the closed tips tucking inside the neck. With a long strand of A, whipstitch right around this contact circle — catch one head stitch and one body stitch each time, working all the way around (~24 stitches) and keeping even tension so the head stays centred. Go around a second time for strength, then add 4 anchoring stitches at front, back and both sides. The join should hold the head upright with no wobble.
- Attach the wings. Place both behind the head and torso, narrow edges toward the centre, scallops outward, top lobes angled up. Sew each wing’s 10 foundation sts: upper 3 to the side of Head R21–23, lower 7 to the body around R6–12. Add a reinforcing stitch top and bottom. Don’t sew the outer scallops down or close the eyelets.
- Skirt fans. Pin all 7 across the lower body, narrow points up at ~Body R14, curved edges down toward the scallops, leaving the cream trim visible. Overlap neighbours by 5–8 mm in order F1→F7. Sew the point and two outer corners; leave the curved edge free for lift.
- Buttons. Sew the two antique-brass buttons on the front centre line at ~R10 and ~R13, vertically aligned, clear of the flowers.
- Build the skirt flowers in this order: stems → large leaves → outer small flowers → berries → left large flower → centre large flower → remaining small flowers → scattered pearls. Place the left flower ~2.5 cm left of centre over F2–F3; the centre flower slightly lower and ~0.5 cm right over F4–F5, overlapping in front. Sew each large flower at its centre and two opposite petal bases only — leave outer petals free.
- Leaf direction. Behind the left flower: one tip up-left, one down-left, one toward centre. Behind the centre flower: one down-left, one up-right, one down-right. The two outer leaves point out to the left and right of the cluster. Hide each leaf base under a flower or berry; tack the base and mid-vein, leave the tip free.
- Berries & pearls. Skirt berries in three groups — 4 near the left flower, 2 between the flowers, 2 at the right. Scatter the 6 remaining pearls — 2 left, 2 centre, 2 right — sewn through the fabric, not onto other beads.
- Fit the hat. Sit the folded brim just above the eyes, crown centred, leaving eyes, cheeks and smile clear. Tack with 5 hidden stitches (back, both sides, two at the front) inside the fold.
- Hat trim. On the right of the brim, sew the 2 small leaves first, then 5 blue berries (3 front, 2 behind) over the bases, then 3 ivory pearls between them. Sew the pom-pom to the upper-right, clear of where the cord will sit.
- Scarf. Wrap once around the neck, crossing on the right below the cheek; the long embroidered end hangs down the front, fringe finishing above the dress edge. Tack behind the neck and at the crossing with a few hidden stitches; leave the hanging end loose.
- Hanging loop. Fold the 30 cm cord in half, thread both ends through the wooden bead to leave a 4–5 cm loop above it. Pass the ends through the hat crown into the top of the head, bring them out to opposite sides, and knot firmly under the hat so the weight hangs from the stuffed head, not the hat. Test before adding the bell.
- Bell. With A, ch 6 and join into a loop; sew it under the fifth (centre) dc of the nine-dc scallop S1. Open the jump ring, pass it through the loop and the bell, and close. The bell should hang free and centred below the dress.
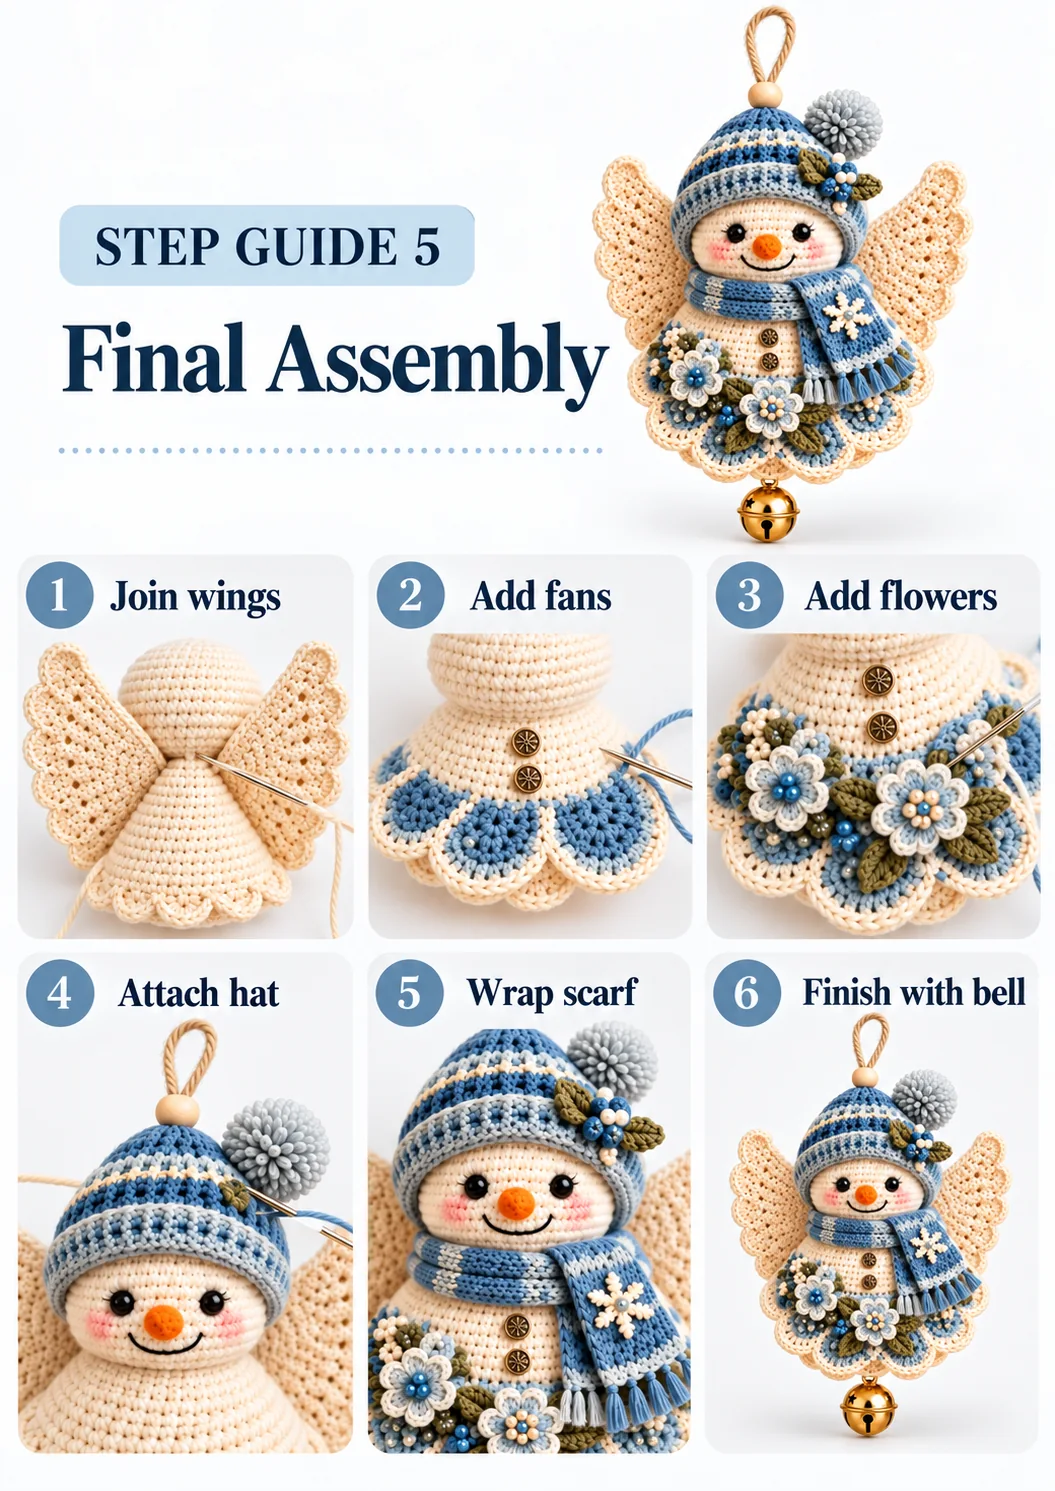
Photo Step Guide 5 · Final Assembly
Finishing Checklist
Gently shape the cheeks, brim, wing and dress scallops, petals, leaves, pom-pom loops and scarf ends. Trim all tails. Tick each as you check it.
Spot-clean only. Don’t steam directly over the eyes, beads, buttons or bell — if blocking, protect the hardware and lightly dampen the wings or fan edges only.
Winter Snow Angel Crochet Pattern FAQ
How big is the finished snow angel ornament?
It stands about 19–21 cm tall from hat to bell and is about 19–21 cm wide across the wings. Exact size depends on your gauge (24 sc × 32 rounds = 10 × 10 cm) — check yours with the Gauge Calculator.
What yarn and hook do I need?
Sport-weight or light DK cotton in eight shades, roughly 55 g in total, worked with a 2.5 mm hook or the size that gives you the gauge. If you are choosing a cotton, our best yarn for crochet projects guide helps, and the Hook Size Converter translates hook sizes between systems.
Is this pattern beginner friendly?
It is marked Advanced because it combines amigurumi shaping, lace wings and floral appliqué. If you are newer to crochet, build confidence with the 6 basic crochet stitches and how to crochet for absolute beginners first, then try a simpler ornament from our holiday patterns.
Is the snow angel safe for children?
It is a decorative ornament, not a children’s toy, because of the small beads, safety eyes, buttons and bell. For a child-safe version, replace the eyes and beads with embroidered details and omit the bell.
Can I make a smaller, mini version?
Yes. Use a 4-ply crochet cotton with a 1.75–2 mm hook and the whole piece scales down proportionally. The Yarn Estimator can help you work out the yardage.
Do I need to block the wings and scallops?
Blocking is what sets the crisp, uniform scalloped flare. Lightly dampen the wing and dress-fan edges, pin them into an even shape and let them dry fully. Protect the eyes, beads, buttons and bell, and do not steam over them.
How do I hang the ornament?
A 30 cm cotton cord threads through a wooden bead and passes through the hat crown into the head, so the weight hangs from the stuffed head. See Step 11 of the assembly instructions.
More Free Christmas Crochet Patterns
Love making ornaments? These free patterns from Crochet Patterns Hub pair beautifully with your Winter Snow Angel on the tree.
Plan Your Next Project With Our Free Tools
Everything below lives on one page — the Crochet Calculator & Tools — and works in your browser while you crochet.
Keep Learning
- How to read crochet patterns
- 6 basic crochet stitches
- Crochet for absolute beginners
- How to hold a crochet hook
- Best yarn for crochet projects
- Crochet stitch tutorials
- All crochet tutorials
Happy crocheting!
Made your Winter Snow Angel? Share it with us on Pinterest and browse more in our free crochet patterns.