
- Intermediate
- US Terms
- 22 cm tall
- Amigurumi
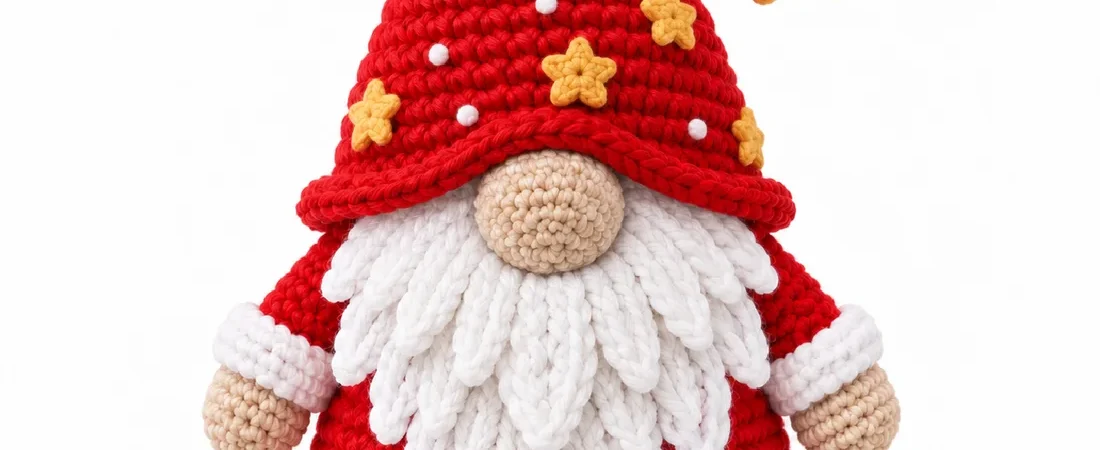
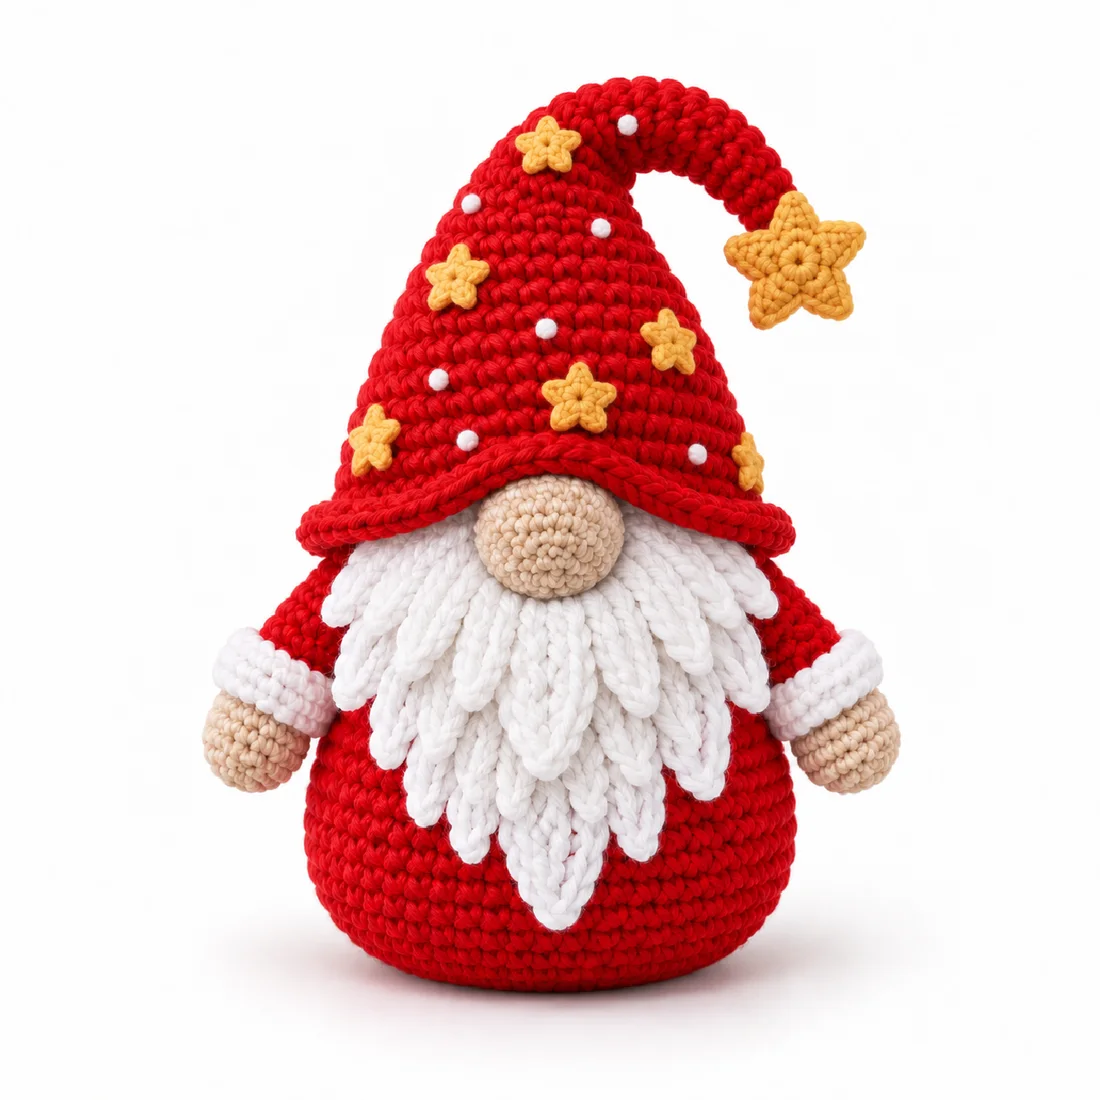
This free Nordic Star Gnome crochet pattern makes Twinkle, a plump, happy little Christmas gnome with a bendy star-tipped hat, a soft layered leaf beard and a scatter of golden stars. He stands about 22 cm (8.6 in) tall in sport-weight cotton and comes with full stitch counts and photo step guides. Add him to your collection of free amigurumi patterns, browse more free Christmas and holiday crochet patterns, or see the whole Free Patterns library.
Before you cast on: if the abbreviations are new to you, our guide to how to read crochet patterns explains them, and the free Crochet Calculator & Tools page can check your gauge, hook size and yarn amounts.
- Skill level
- Intermediate – comfortable with magic rings, increases and decreases
- Finished size
- approx. 22 cm (8.6 in) tall x 13 cm (5.1 in) wide at the base
- Make time
- A relaxed weekend project – roughly 6-9 hours
- Terms
- US crochet terms
- Yarn
- Sport weight / Fine (Category 2), 100% cotton
- Hook
- 2.5 mm (US C-2) – convert hook sizes
1Before You Begin
Please read this page through before casting on
So glad you are here! You are about to make Twinkle, a plump little gnome who is basically all hat, all beard and all heart. His tall hat leans into a cheeky curl, his beard tumbles down in soft layered points, and a sprinkle of golden stars finishes him off like a little bit of Christmas magic.
This pattern walks you through every single round, with the running stitch count shown on the right of each line so you always know you are on track. Nothing is rushed and nothing is skipped. Make a warm drink, pick your coziest corner and let’s begin. Every stitch count has been checked round by round, so if your numbers match the count badges, your gnome will come out just right.
Brush up first with our guide to the 6 basic crochet stitches, the tutorial on increasing in a crochet circle (the magic ring and stitch chart) and our crochet for absolute beginners guide. Comfortable grip? See how to hold a crochet hook.
- Read the round first. Glance over each line before hooking it – your future self will thank you.
- Mark your first stitch. Because we work in a spiral, a stitch marker in the first stitch of each round is your best friend.
- Keep stitches snug. Exact gauge is not critical, but a tight fabric means the stuffing never peeks through.
- Safety note. If this gnome is for a baby or young child, embroider all details, skip any beads or pellets and stuff firmly instead.
2Gauge, Tension & Size
Exact gauge is not critical for this pattern. Just keep your stitches snug so the fabric is firm and the stuffing does not show through. If you crochet loosely, drop down a hook size.
With sport-weight cotton and a 2.5 mm hook, the finished gnome stands approx. 22 cm (8.6 in) tall and 13 cm (5.1 in) wide at the base. Thicker yarn and a bigger hook give you a bigger gnome, so a cotton yarn that stays crisp is the best choice for defined stars and beard points.
Work a quick swatch and run it through the Gauge Calculator, and use the Hook Size Converter to match the 2.5 mm (US C-2) hook to the sizes in your own kit.
3Materials
| Item | Used for |
|---|---|
| Yarn | Sport weight / Fine (Category 2), 100% cotton. A crisp cotton keeps the stars and beard points nicely defined. |
| Color A – Red | Main body, hat and sleeves – approx. 60 g |
| Color B – White | Layered leaf beard, arm cuffs and French-knot snow dots – approx. 35 g |
| Color C – Beige / skin tone | Nose and hands – approx. 15 g |
| Color D – Golden yellow | Large tip star and 7 small hat stars – approx. 10 g |
- 2.5 mm (US C-2) hook – or whatever hook gives you a tight, even fabric
- Polyester fiberfill stuffing – approx. 70 g
- Base weight: plastic pellets or glass beads in a sealed pouch, approx. 50 g, which makes Twinkle sit so proudly upright
- Tapestry needle for assembly and the little French-knot snow dots
- Stitch markers – at least one, to mark the start of each round
- Floral wire or a pipe cleaner (optional) – one piece, approx. 15 cm, tucked inside the hat tip to hold the signature curl permanently
- Scissors and a few spare pins to position pieces before sewing
No cotton on hand? A smooth sport-weight acrylic works beautifully too – just match all four colors in the same weight so your gnome keeps his tidy proportions.
Making a whole row of gnomes for gifts or a craft fair? Use the Yarn Estimator to work out how much red, white, beige and gold you need, and read our guide to the best yarn for crochet projects before you shop.
4Abbreviations (US terms)
- MR
- magic ring
- ch
- chain
- sl st
- slip stitch
- hdc
- half double crochet
- inc
- increase – 2 sc in the same stitch (how to increase)
- hdc-inc
- 2 hdc in the same stitch
- dec
- decrease – sc 2 together (sc2tog)
- BLO
- back loop only
- FLO
- front loop only
- st(s)
- stitch(es)
- rnd(s)
- round(s)
- [ ] x N
- repeat what is in the brackets N times
- (N)
- total stitch count for that round
Example: Rnd 3: [sc 1, inc] x6 (18). Work 1 single crochet, then 2 sc into the next stitch, and repeat that pair six times around. When you finish, you should have 18 stitches in the round. Simple as that!
Not sure what an abbreviation means? Look it up in the Abbreviations lookup, or paste a round into the Pattern Decoder for a plain-English explanation. Our guide to how to read crochet patterns and the pattern reading tutorials cover the rest.
Keep it snug and keep counting. If a round ends on the wrong number, it is almost always a missed or doubled stitch – pop it back a few stitches rather than pushing on.
5Making Twinkle
Part by part, round by round
- Part 1 · Main Body
- Part 2 · Nose
- Part 3 · Pointed Curved Hat
- Part 4 · Arms
- Part 5 · Layered Leaf Beard
- Part 6 · The Little Stars
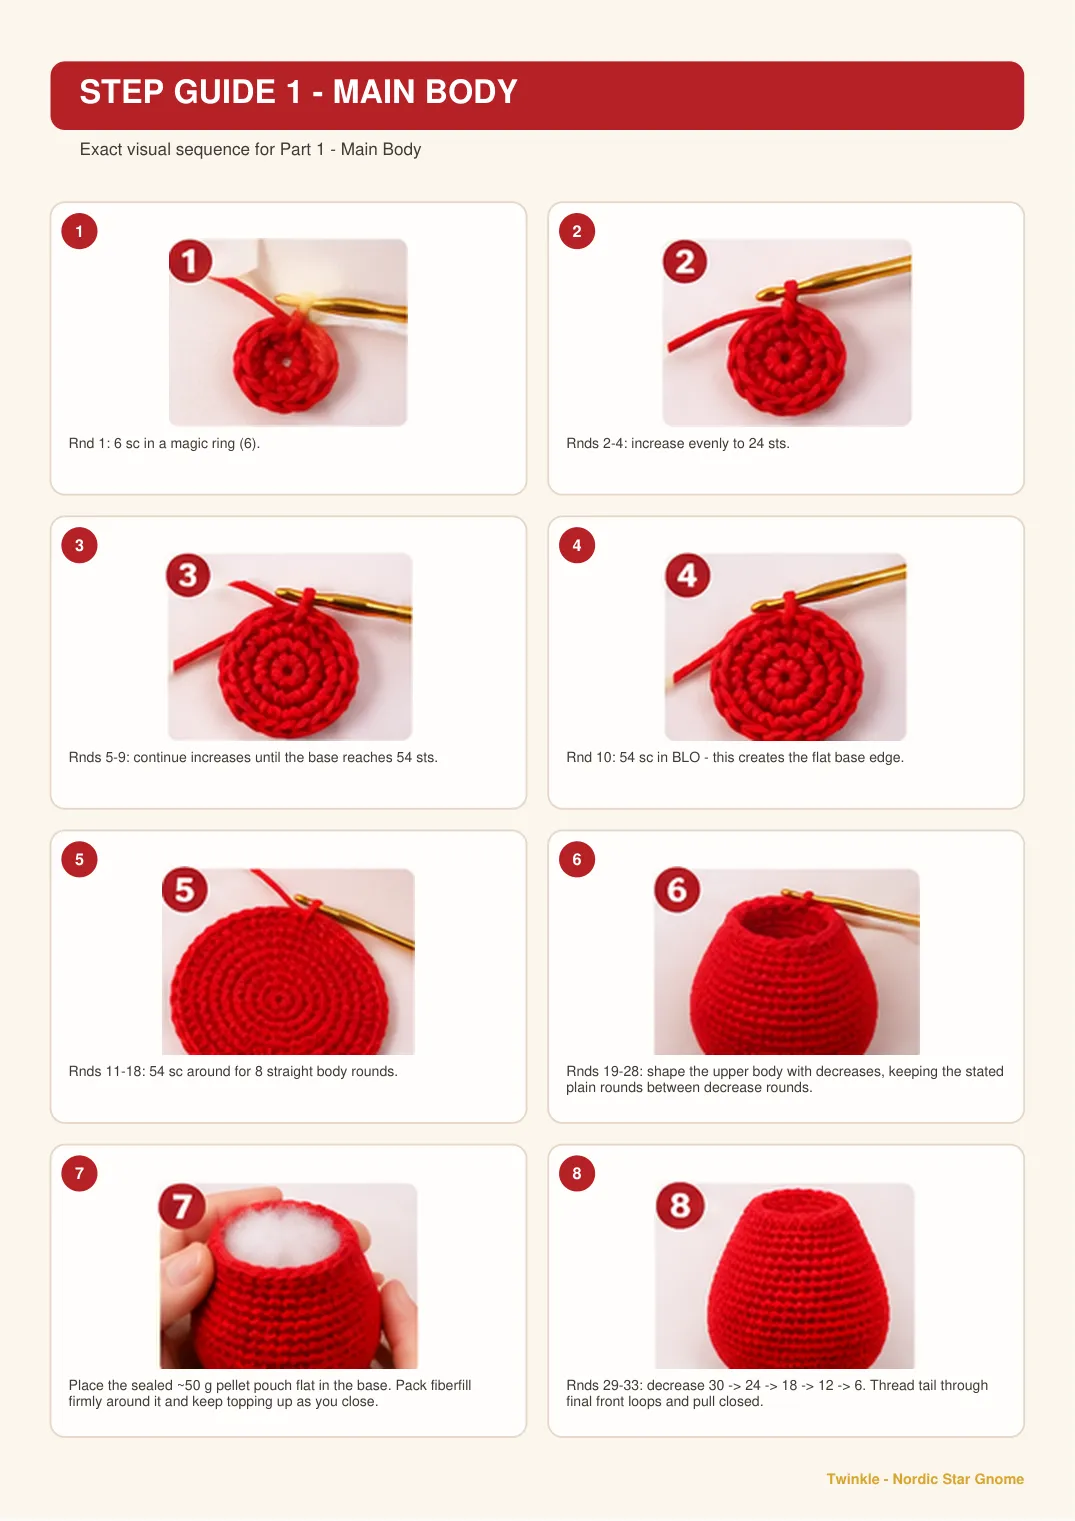
Part 1 · Main BodyColor A – Red · worked in a continuous spiral, start at the base
| Rnd 1 | 6 sc in MR | 6 |
|---|---|---|
| Rnd 2 | [inc] x6 | 12 |
| Rnd 3 | [sc 1, inc] x6 | 18 |
| Rnd 4 | [sc 2, inc] x6 | 24 |
| Rnd 5 | [sc 3, inc] x6 | 30 |
| Rnd 6 | [sc 4, inc] x6 | 36 |
| Rnd 7 | [sc 5, inc] x6 | 42 |
| Rnd 8 | [sc 6, inc] x6 | 48 |
| Rnd 9 | [sc 7, inc] x6 | 54 |
| Rnd 10 | sc in each st around, working in BLO (this sets the flat base edge) | 54 |
| Rnds 11-18 | sc in each st around (8 rounds – the straight body) | 54 |
| Rnd 19 | [sc 7, dec] x6 | 48 |
| Rnds 20-22 | sc in each st around | 48 |
| Rnd 23 | [sc 6, dec] x6 | 42 |
| Rnds 24-25 | sc in each st around | 42 |
| Rnd 26 | [sc 5, dec] x6 | 36 |
| Rnds 27-28 | sc in each st around | 36 |
| Now stuff and weight the body (see the box below) before the opening gets small. | ||
| Rnd 29 | [sc 4, dec] x6 | 30 |
| Rnd 30 | [sc 3, dec] x6 | 24 |
| Rnd 31 | [sc 2, dec] x6 | 18 |
| Rnd 32 | [sc 1, dec] x6 | 12 |
| Rnd 33 | [dec] x6 | 6 |
| Fasten off, leaving a short tail. Thread it through the front loops of the final 6 stitches and pull snug to close the top neatly, then weave the end inside. Twinkle’s body is done – give him a happy squish! | ||
Drop the sealed pellet pouch flat into the base, then begin filling firmly with fiberfill around it. Keep topping up as you close so Twinkle stays plump and sits rock-steady.
Photo Step Guide 1
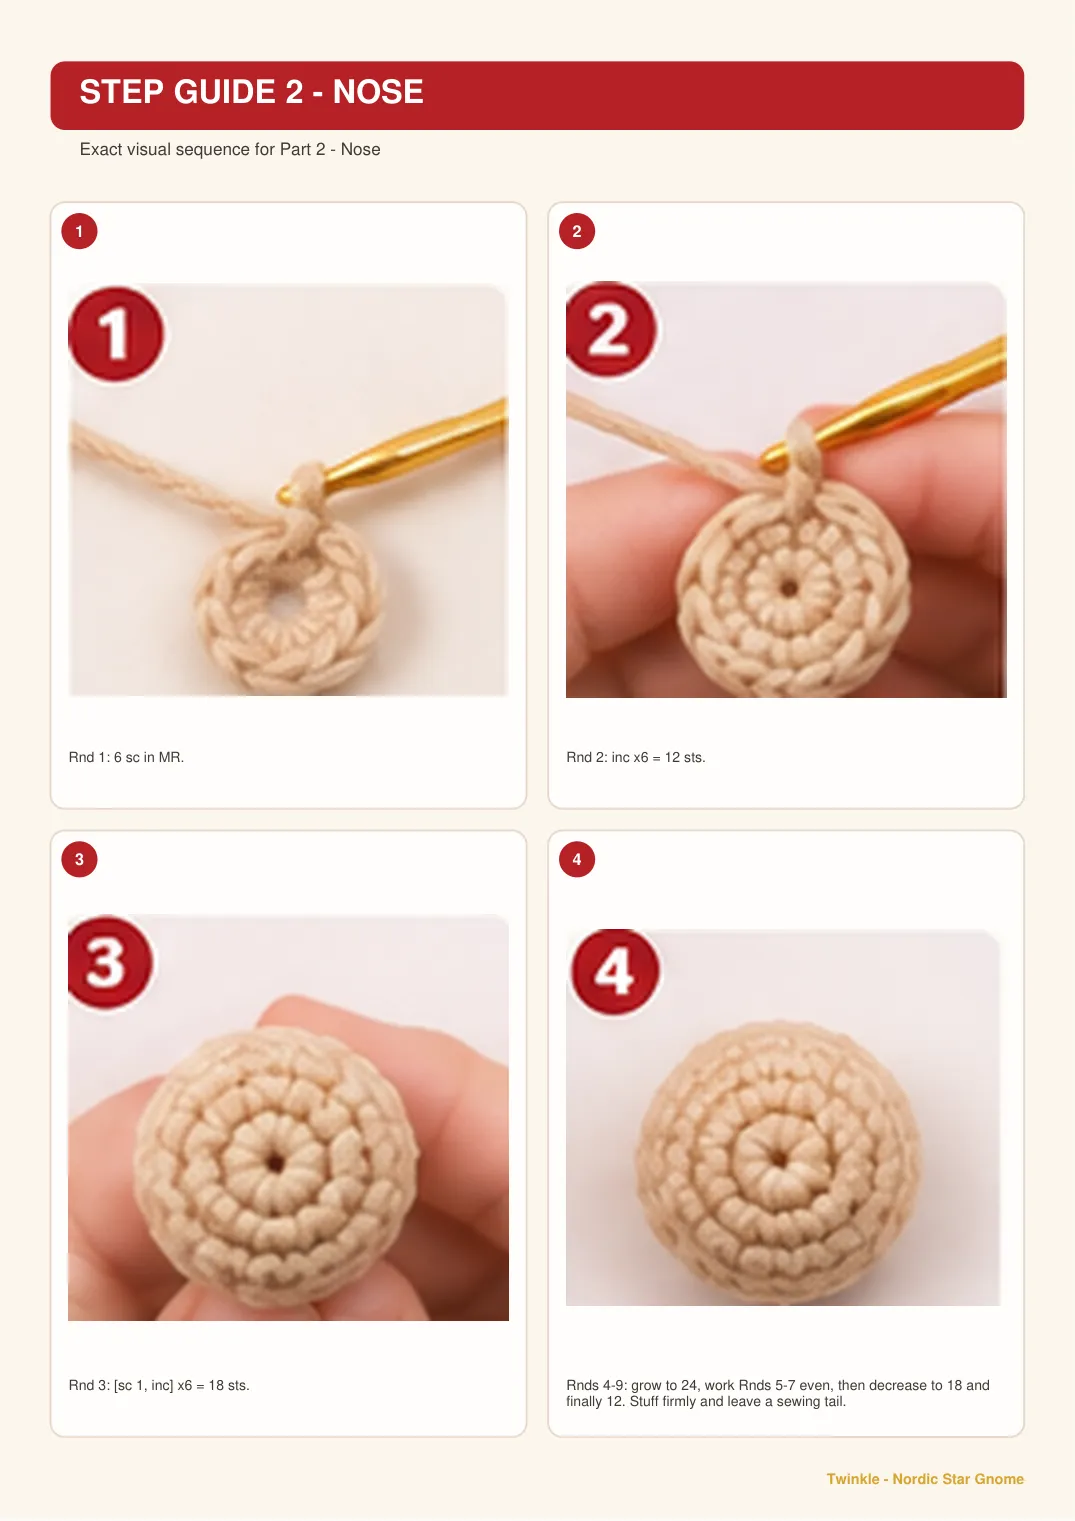
Part 2 · NoseColor C – Beige · worked in a continuous spiral
| Rnd 1 | 6 sc in MR | 6 |
|---|---|---|
| Rnd 2 | [inc] x6 | 12 |
| Rnd 3 | [sc 1, inc] x6 | 18 |
| Rnd 4 | [sc 2, inc] x6 | 24 |
| Rnds 5-7 | sc in each st around | 24 |
| Rnd 8 | [sc 2, dec] x6 | 18 |
| Rnd 9 | [sc 1, dec] x6 | 12 |
| Stuff firmly – a round, proud nose is the whole charm here. Fasten off, leaving a long tail for sewing. | ||
Pack the nose a touch firmer than feels necessary; cotton relaxes a little once it is stitched in place.
Photo Step Guide 2
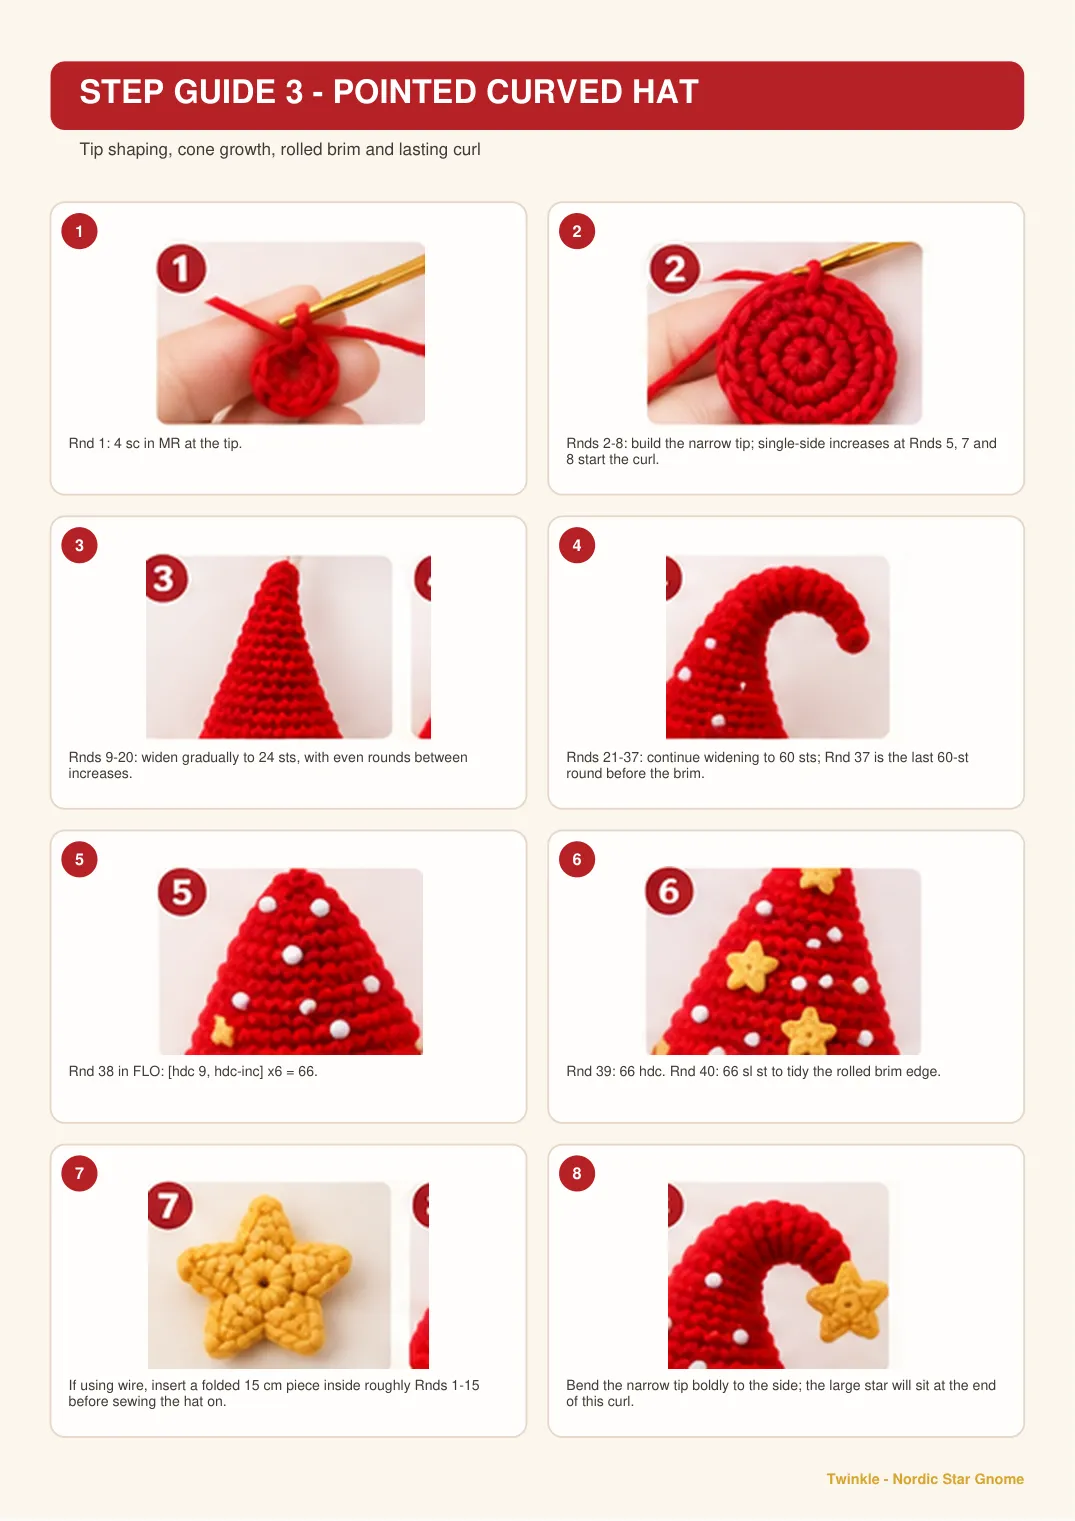
Part 3 · Pointed Curved HatColor A – Red · worked in a continuous spiral from the tip down
| Rnd 1 | 4 sc in MR | 4 |
|---|---|---|
| Rnd 2 | [sc 1, inc] x2 | 6 |
| Rnds 3-4 | sc in each st around | 6 |
| Rnd 5 | sc 4, inc, sc 1 (single-side increase – starts the curl) | 7 |
| Rnd 6 | sc in each st around | 7 |
| Rnd 7 | sc 5, inc, sc 1 | 8 |
| Rnd 8 | sc 6, inc, sc 1 | 9 |
| Rnd 9 | [sc 2, inc] x3 | 12 |
| Rnds 10-11 | sc in each st around | 12 |
| Rnd 12 | [sc 3, inc] x3 | 15 |
| Rnds 13-14 | sc in each st around | 15 |
| Rnd 15 | [sc 4, inc] x3 | 18 |
| Rnds 16-17 | sc in each st around | 18 |
| Rnd 18 | [sc 2, inc] x6 | 24 |
| Rnds 19-20 | sc in each st around | 24 |
| Rnd 21 | [sc 3, inc] x6 | 30 |
| Rnds 22-23 | sc in each st around | 30 |
| Rnd 24 | [sc 4, inc] x6 | 36 |
| Rnds 25-26 | sc in each st around | 36 |
| Rnd 27 | [sc 5, inc] x6 | 42 |
| Rnds 28-29 | sc in each st around | 42 |
| Rnd 30 | [sc 6, inc] x6 | 48 |
| Rnds 31-32 | sc in each st around | 48 |
| Rnd 33 | [sc 7, inc] x6 | 54 |
| Rnds 34-35 | sc in each st around | 54 |
| Rnd 36 | [sc 8, inc] x6 | 60 |
| Rnd 37 | sc in each st around | 60 |
| Rnd 38 | Brim: working in FLO, [hdc 9, hdc-inc] x6 | 66 |
| Rnd 39 | hdc in each st around | 66 |
| Rnd 40 | sl st in each st around (tidies the rolled brim edge) | 66 |
| Fasten off and weave in the end. Do not stuff the hat – its shape comes alive once it is bent into that signature curl during assembly (see The curl that stays put in Part 7). | ||
Using thicker yarn or a larger hook? The Hook Size Converter and Gauge Calculator help you check that your hat brim still fits over the body before you sew.
Photo Step Guide 3
Part 4 · ArmsMake 2 · Colors C, B & A · worked in a continuous spiral
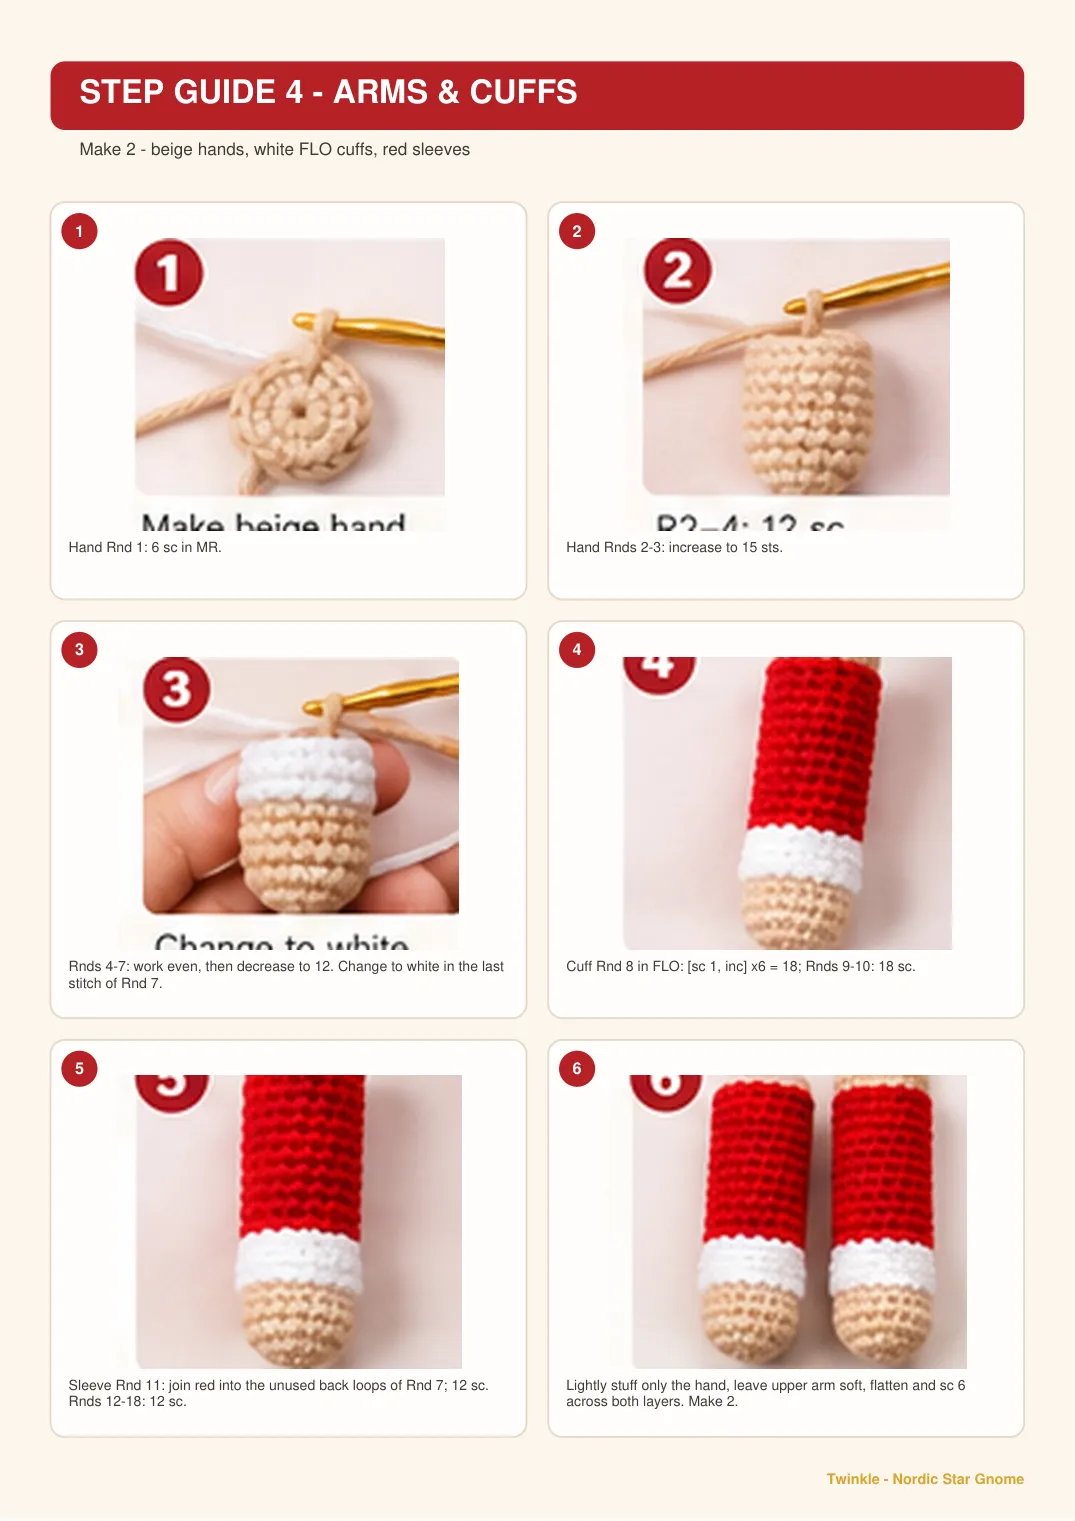
Hand (Color C – Beige)
| Rnd 1 | 6 sc in MR | 6 |
|---|---|---|
| Rnd 2 | [inc] x6 | 12 |
| Rnd 3 | [sc 3, inc] x3 | 15 |
| Rnds 4-6 | sc in each st around | 15 |
| Rnd 7 | [sc 3, dec] x3 – change to Color B (white) in the last stitch | 12 |
Cuff (Color B – White)
| Rnd 8 | working in FLO, [sc 1, inc] x6 | 18 |
|---|---|---|
| Rnds 9-10 | sc in each st around | 18 |
| Fasten off white. The cuff flares out like a little snow trim. | ||
Sleeve (Color A – Red)
| Rnd 11 | join Color A into the remaining back loops of Rnd 7 (behind the cuff); sc in each st around | 12 |
|---|---|---|
| Rnds 12-18 | sc in each st around | 12 |
| Lightly stuff just the lower hand and leave the upper arm soft and empty. Flatten the top opening and sc 6 across both layers to seal it shut. Fasten off, leaving a tail for sewing. Make a second arm. | ||
Working the cuff in the front loops of Rnd 7, then the sleeve in the leftover back loops, is the trick that gives that crisp folded-cuff ledge. Take it slow the first time – it clicks instantly once you see it.
Photo Step Guide 4
Part 5 · Layered Leaf BeardColor B – White · the showpiece
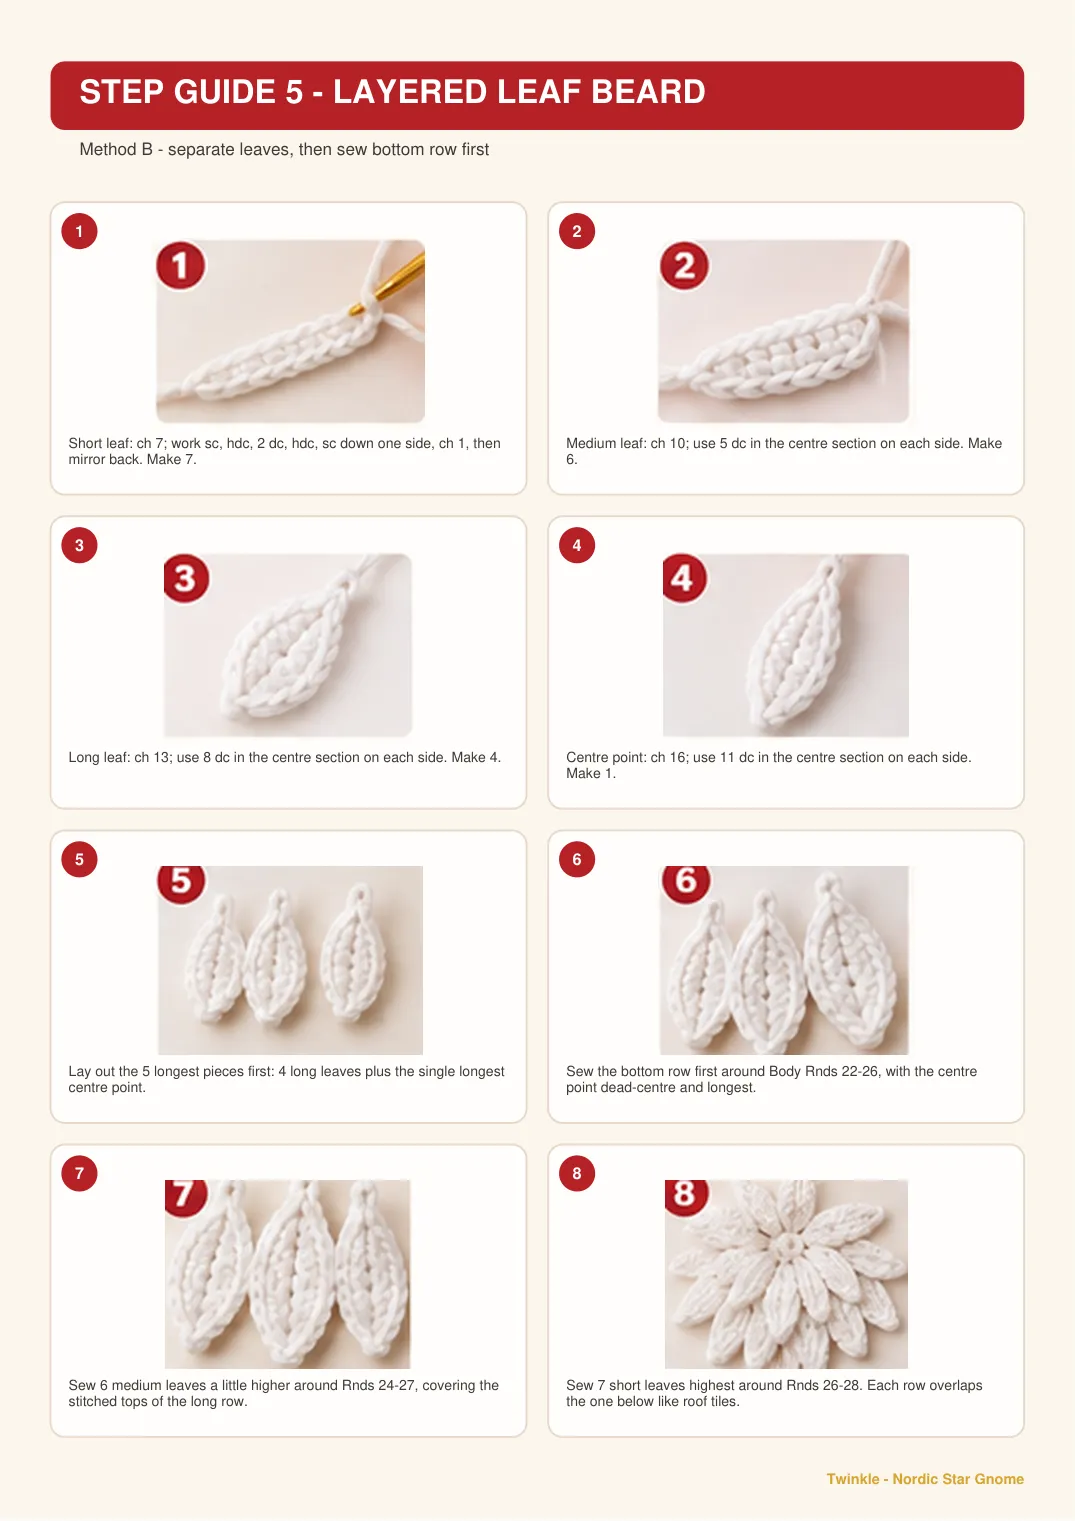
Twinkle’s beard is three rows of pointed leaves that overlap into soft, snowy points. There are two ways to make it, and both give the same look. Method A works all the leaves onto one foundation strip. Method B makes each leaf as a loose piece and sews them on in rows. New to layered beards? Go straight to Method B – it is the most reliable way to get the full, overlapping look, with nothing to anchor mid-work.
Each leaf is a chain crocheted down one side to a point, then back up the mirror side. The dc stitches in the middle fatten it, then it tapers, and a slip stitch along the strip locks each leaf in place. If chains are new to you, see how to start a crochet chain.
Method A · Foundation strip
| Base | With Color B, ch 25 | |
|---|---|---|
| Row 1 | sc in 2nd ch from hook and in each ch across; turn (this strip sits highest on the face) | 24 |
- 1. Ch 7.
- 2. From the 2nd ch from hook, down side 1: sc 1, hdc 1, dc 2, hdc 1, sc 1 (you are now at the tip).
- 3. At the tip, ch 1 and pivot to the opposite loops of the same chain; up side 2: sc 1, hdc 1, dc 2, hdc 1, sc 1.
- 4. sl st into the next 3 sts of the strip to anchor the leaf and move along. Repeat steps 1-4 a total of 7 times across the strip.
Reattach Color B into the free back loops just below Tier 1. This tucks Tier 2 under and behind Tier 1. Repeat x6: ch 10; down side 1 from the 2nd ch: sc 1, hdc 1, dc 5, hdc 1, sc 1; ch 1, pivot; up side 2: sc 1, hdc 1, dc 5, hdc 1, sc 1; sl st into the next 4 sts.
Reattach along the slip-stitch ridge at the base of the Tier 2 leaves (the anchor stitches between each leaf), so Tier 3 sits lowest and behind. Make 4 side leaves (2 left, 2 right), then 1 centre point.
- Side leaves x4: ch 13; down: sc 1, hdc 1, dc 8, hdc 1, sc 1; ch 1, pivot; up: sc 1, hdc 1, dc 8, hdc 1, sc 1; sl st into the next 4 sts.
- Centre point x1: ch 16; down: sc 1, hdc 1, dc 11, hdc 1, sc 1; ch 1, pivot; up: sc 1, hdc 1, dc 11, hdc 1, sc 1; sl st to the centre. Fasten off with a long tail and finger-press so the tiers fan.
Method B · The easy way (separate leaves)
If working into back loops feels fiddly, make every leaf as a loose piece and sew them onto the body in three overlapping rows. Nothing to anchor mid-work, and it is easy to arrange them exactly like the photo.
Ch (length); from the 2nd ch from hook, down one side: sc 1, hdc 1, dc xk, hdc 1, sc 1; ch 1, pivot; up the mirror side: sc 1, hdc 1, dc xk, hdc 1, sc 1; sl st to the first st. Fasten off, leaving a tail for sewing.
| Leaf | Chain | DC count (k) | Make |
|---|---|---|---|
| Short – top row | ch 7 | 2 | 7 |
| Medium – middle row | ch 10 | 5 | 6 |
| Long – bottom row | ch 13 | 8 | 4 |
| Centre point | ch 16 | 11 | 1 |
- Bottom row first. On the body front, sew the 5 long leaves across first – the centre point dead-centre and longest, two side leaves either side, fanning down over the belly (around Rnds 22-26).
- Middle row. Sew the 6 medium leaves a little higher, so their tops cover where the long leaves were stitched (around Rnds 24-27).
- Top row. Sew the 7 short leaves highest of all, hiding the medium tops – this is the row the nose will sit just above (around Rnds 26-28).
Each row should hide the sewn tops of the row below, like roof tiles. Pin the whole beard first, check it against the photo, then sew. As a guide, the beard should spread about as wide as the body front (roughly two-thirds of the way around) and reach down to around Rnd 22, but trust the photo over any number, since your exact width depends on your gauge.
Photo Step Guide 5
Part 6 · The Little StarsColor D – Golden yellow
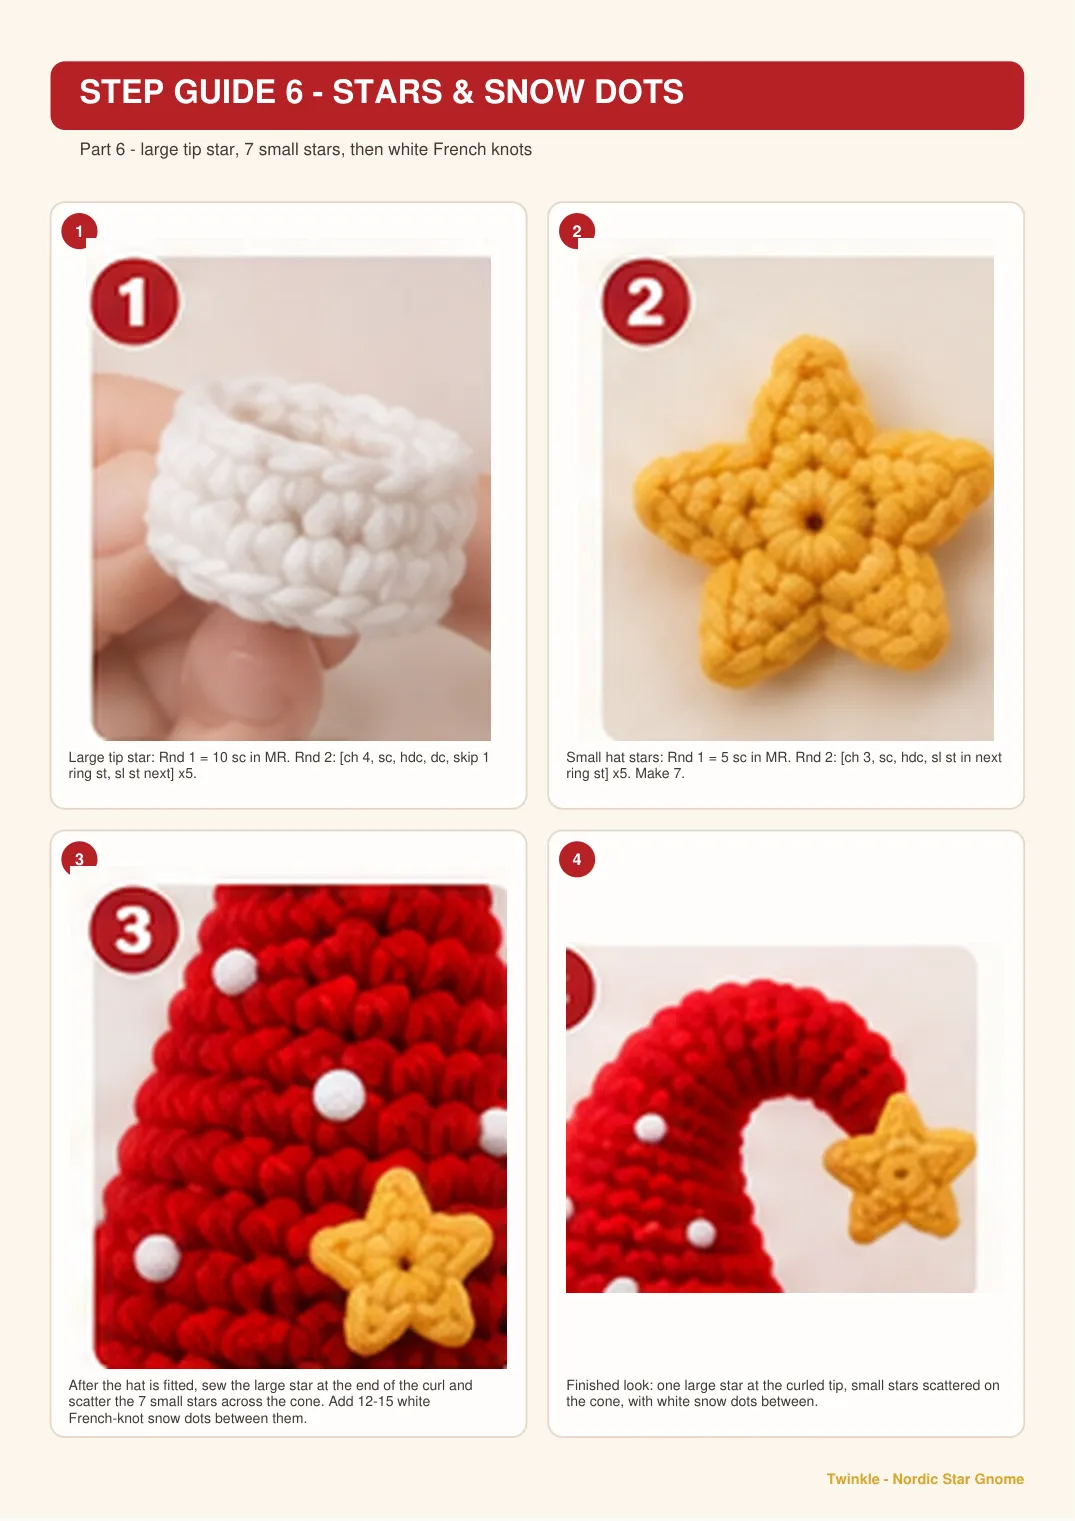
Large tip star – make 1
| Rnd 1 | 10 sc in MR, sl st to 1st sc | 10 |
|---|---|---|
| Rnd 2 | Points: [ch 4, sc in 2nd ch from hook, hdc in next ch, dc in next ch, skip 1 st on the centre ring, sl st in next st] x5 | 5 points |
| Fasten off, leaving a tail for sewing. | ||
Small hat stars – make 7
| Rnd 1 | 5 sc in MR, sl st to 1st sc | 5 |
|---|---|---|
| Rnd 2 | Points: [ch 3, sc in 2nd ch from hook, hdc in next ch, sl st in next st of ring] x5 | 5 points |
| Fasten off each star, leaving a tail for sewing. | ||
These work up in under two minutes each – perfect little TV-night makes. Crochet a couple of spares; a star or two always wants to wander off to decorate something else. Want a bigger, flatter ornament? Try our amigurumi star pattern or the easy Silmë Star ornament.
- 1 x Body, 1 x Nose and 1 x Hat
- 2 x Arms
- 1 x Layered beard (Method A strip or Method B loose leaves)
- 1 large + 7 small stars
Lay everything out and admire the little pile of pieces – this is the fun part. Next we bring Twinkle to life.
Photo Step Guide 6
6Stitch-Count Map
A quick reference for key milestones – whenever you pause, glance here
| Part | Milestone | Count |
|---|---|---|
| Main Body | Rnd 9 – widest point of the base | 54 sts |
| Main Body | Rnds 10-18 – straight body tube | 54 sts |
| Main Body | Rnd 33 – top closure | 6 sts |
| Nose | Rnd 4 – widest point | 24 sts |
| Hat | Rnd 37 – just before the brim | 60 sts |
| Hat | Rnds 38-40 – outward brim | 66 sts |
| Arm (each) | Rnd 3 hand · Rnd 11 sleeve | 15 / 12 sts |
| Large star | 5 points · 3 sts per point | 5 points |
| Small star | 5 points · 2 sts per point | 5 points |
If your widest base is 54 and your pre-brim hat is 60, you are perfectly on course.
7Putting It Together
Twinkle’s whole personality lives in placement – pin every piece first, step back for a look, nudge things until he is smiling at you, then stitch
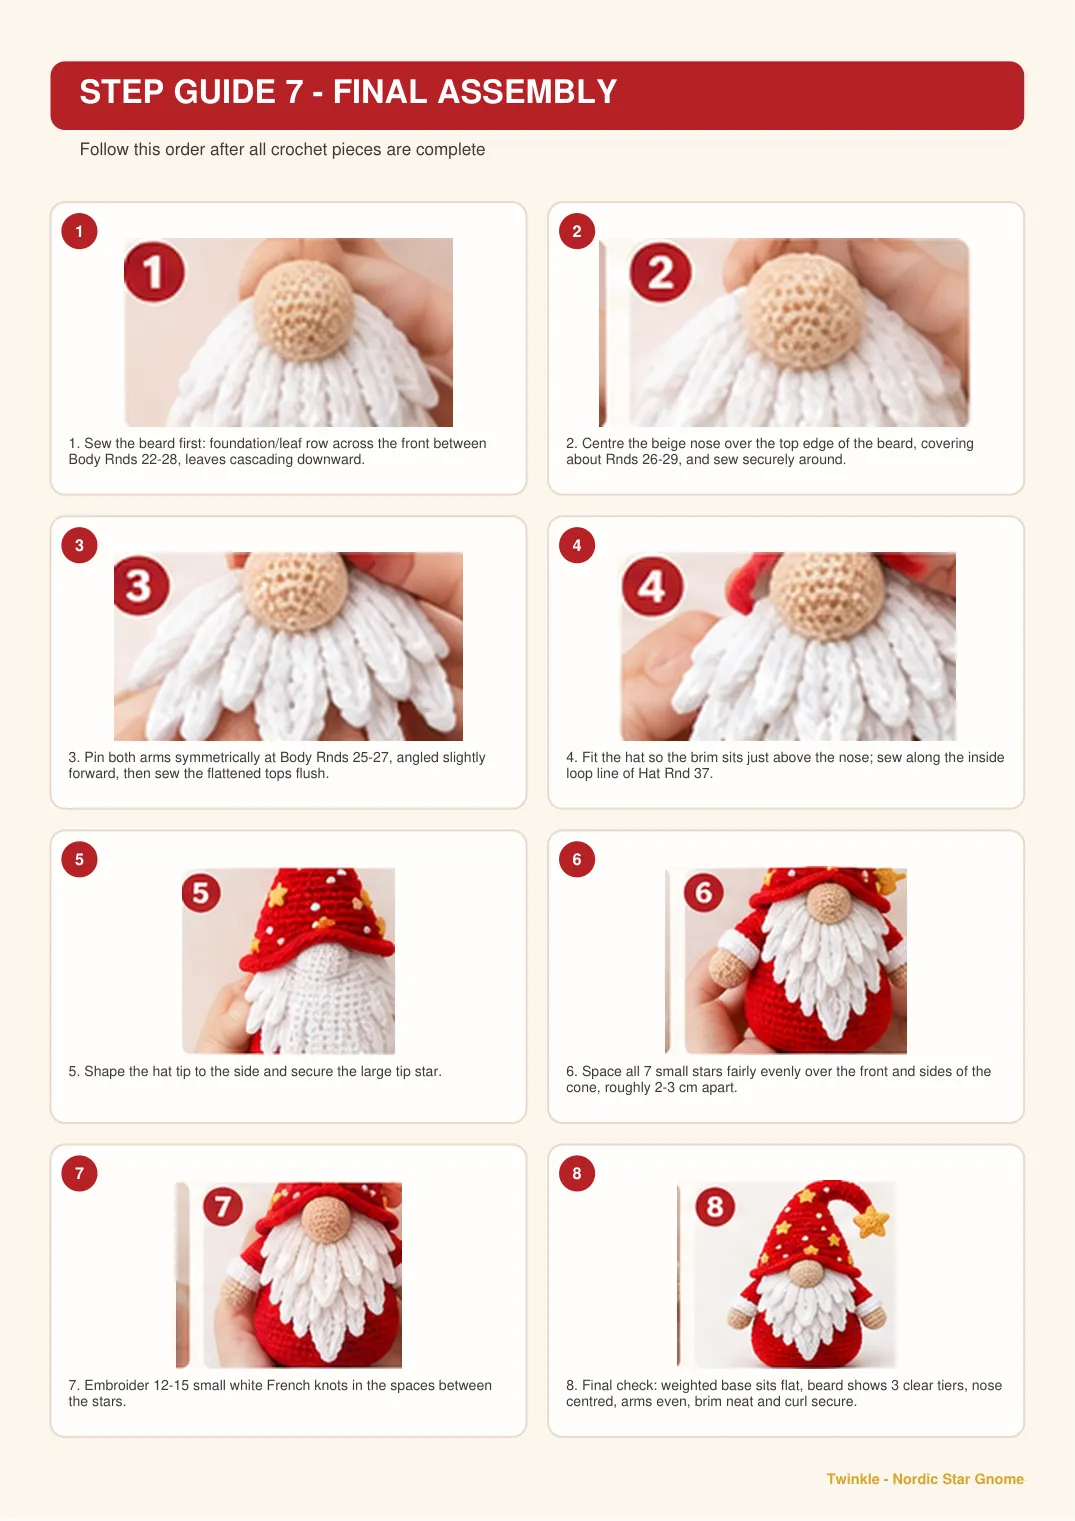
- Beard first. Sew the foundation strip (or the three rows of loose leaves) horizontally across the front, between Rnds 22 and 28, letting the pointed leaves spill downward over the lower body.
- Add the nose. Centre it over the top edge of the beard (covering Rnds 26-29) and stitch securely all the way around the perimeter.
- Attach the arms. Pin them symmetrically at Rnds 25-27, angled gently forward beside the beard. Sew the flattened tops flush to the body.
- Fit the hat. If using the wire, slide it inside the tip now. Settle the hat over the head so the brim rests right above the nose and slants a touch toward the back. Sew along the inside loop line of Rnd 37, then bend the narrow tip into that happy curl, sweeping it to one side (to the right, as in the photo).
- Stars on. Sew the large gold star right at the end of the bent tip. Space the 7 small stars fairly evenly across the front and sides of the cone, roughly 2-3 cm apart and clear of the brim and the very tip. Pin them first and nudge until the spacing looks happy.
- Snow dots. With white yarn, embroider 12-15 small French knots dotted in the spaces between the stars.
- Body – base: stuffed, weighted and sealed so it sits flat and steady.
- Beard – across the front: Rnds 22-28, leaves cascading down.
- Nose – centre: overlaps the top edge of the beard, around Rnds 26-29.
- Arms – sides: symmetrical at Rnds 25-27, angled slightly forward.
- Hat – on top: rests just above the nose, tip curled to the side.
- Stars & snow dots: large star on the tip, 7 small ones scattered, French knots between.
For a curl that holds forever, fold a 15 cm length of floral wire (or a pipe cleaner) in half, give it a twist, and slide it up inside the narrow hat tip – roughly Rnds 1-15 – before you sew the hat down. Now the tip bends into any shape and stays there. Do not be shy with the bend; that bold sideways curl is what turns a plain cone into Twinkle. For a baby-safe gnome, skip the wire and simply shape the tip by hand.
Photo Step Guide 7
8Final Checklist
A little checklist before he is done
A tiny dab of fabric stiffener on the hat tip will hold that curl forever – lovely if Twinkle is heading to a shelf, a mantel or a gift box.
Making a few gnomes for gifts or a craft fair? Keep track of your yarn and hours in the Project Planner, and work out a fair price for your finished makes with the Crochet Pricing Calculator.
This pattern is a single-maker license for your personal creative use. You may sell the finished gnomes you make from it in small amounts, at craft fairs, markets and your own little shop – a kind credit back to Crochet Patterns Hub is always appreciated but never required. Please do not copy, share, resell, translate or give away the pattern (in part or whole), and please do not claim the design as your own or use the photos as your own listings. Thank you for respecting the many hours of design, testing and love that went into it.
You did it! Twinkle is finished – and somewhere out there he is already deciding whose shelf he belongs on. Thank you for choosing this pattern and for the care you have poured into every stitch. If you make him, we would love to see your photos – tag your makes and share a little handmade joy.
More Free Christmas Crochet Patterns
Love making Christmas characters? Keep the holiday crocheting going with these free patterns from Crochet Patterns Hub.
- All holiday crochet patterns
- Free amigurumi patterns
- Crochet hat patterns
- Seasonal crochet ideas
- Crochet tutorials
- All free crochet patterns
Plan your next project with our free tools
Everything below lives on our Crochet Calculator & Tools page, free to use as often as you like.
Happy crocheting!
Browse more free crochet patterns, learn new skills in our tutorials, read the blog, or meet Crochet Patterns Hub. Questions or pattern ideas? Get in touch.