
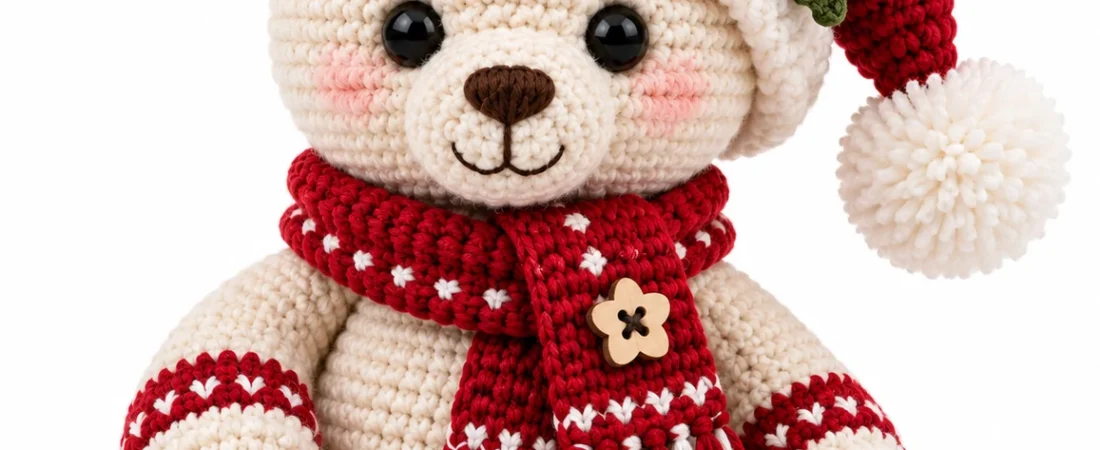
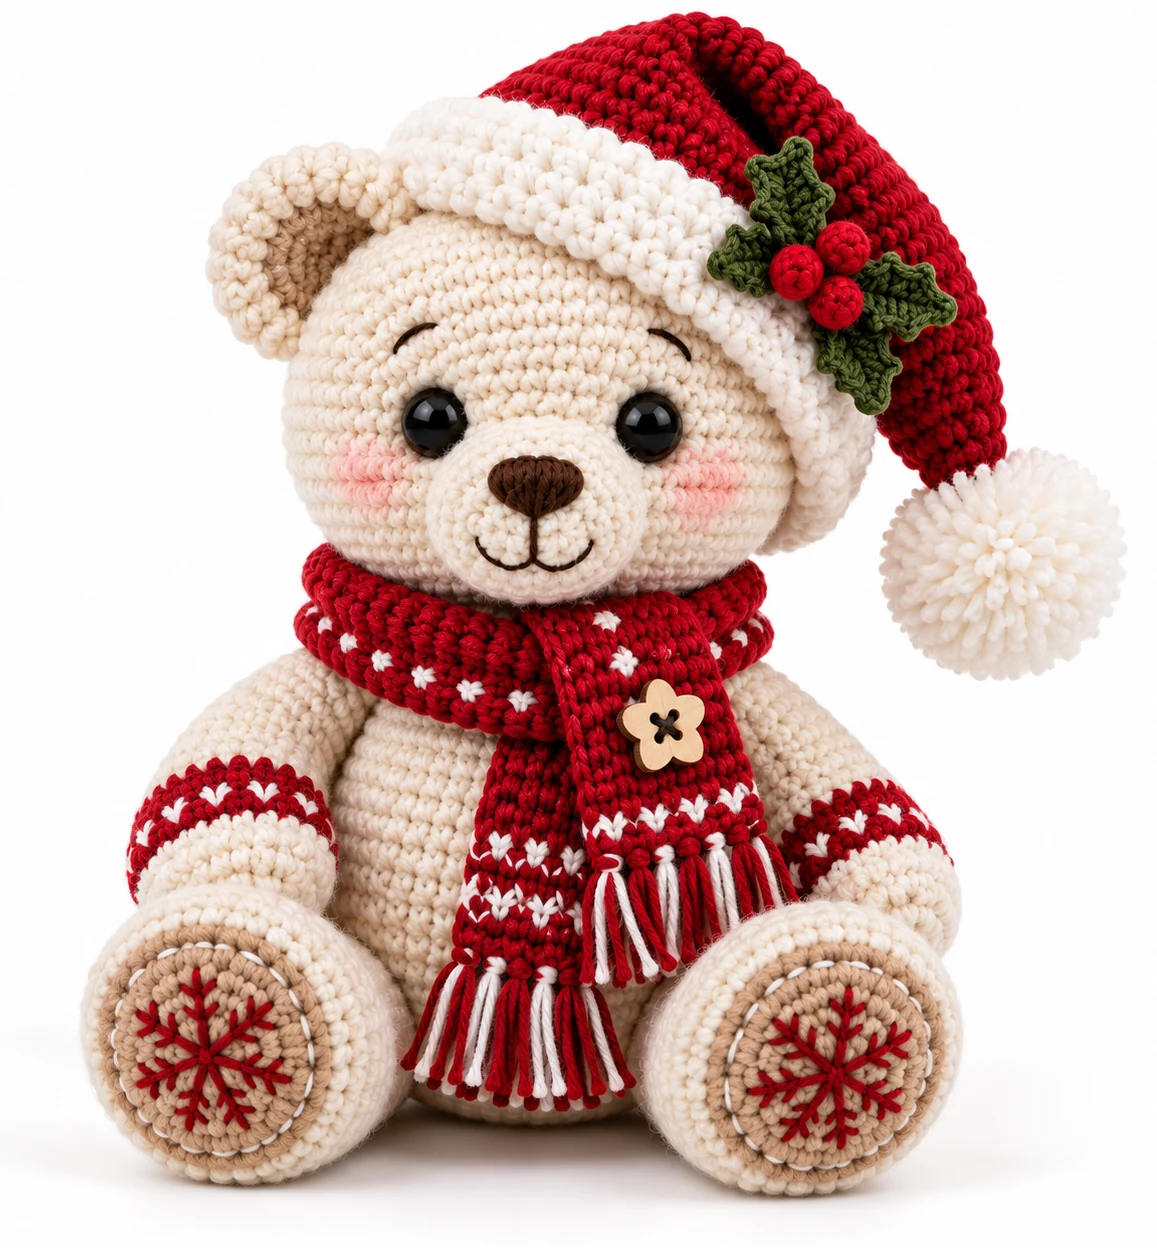
- Intermediate
- US Terms
- 14-16 cm tall
This free Nordic Santa Bear crochet pattern makes a cosy Christmas teddy with a slouchy Santa hat, snowflake paws & a fair-isle scarf. It is a free amigurumi pattern worked in continuous spiral rounds with a small hook for a tight, gap-free finish, and it belongs with our other free Christmas and holiday crochet patterns. Browse the whole collection on the Free Patterns page.
Before you cast on: if the abbreviations are new to you, our guide to how to read crochet patterns explains them, and the Crochet Calculator & Tools page has an abbreviation lookup, gauge calculator, yarn estimator and hook size converter you can keep open beside this pattern.
- Skill level
- Intermediate
- Finished size
- approx. 14-16 cm
- Terms
- US crochet terms
- Hook
- 2.5 mm (US C/2)
- Techniques
- Amigurumi, fair-isle colourwork, embroidery
1Before You Begin
Please read this page through before casting on
This little bear is worked in continuous spiral rounds with a small hook for a tight, gap-free finish.
Take your time with the colourwork cuffs, the snowflake soles and the Santa hat, as these are the details that give the bear its Christmas charm. Everything is worked separately and sewn together at the end, so you can enjoy it one piece at a time.
Brush up first with our 6 basic crochet stitches, the guide to increasing in a crochet circle (magic ring & stitch chart) and our crochet for absolute beginners guide. Comfortable grip? See how to hold a crochet hook.
2Gauge, Tension & Size
Exact gauge is not critical, but the fabric must be firm so the stuffing does not show through. As a guide, 20 sc × 22 rounds should measure about 5 × 5 cm (2 × 2 in) with the 2.5 mm hook. If your stitches look loose or gappy, drop to a 2.0 mm hook.
With DK yarn and the 2.5 mm hook, the finished bear sits about 14-16 cm (5.5-6.3 in) tall to the fold of the hat. The pattern scales with your materials: for a larger bear, use the same instructions with worsted yarn and a 3.0 mm hook (approx. 18 cm) or aran yarn and a 3.5 mm hook (approx. 22 cm). Always match your hook to the yarn so the fabric stays firm.
Run your swatch through the Gauge Calculator to check you are close to 20 sc × 22 rounds, and use the Hook Size Converter to match the 2.5 mm, 3.0 mm and 3.5 mm hooks to US and UK sizes if you are making the larger bear.
3Materials
| Item | Used for |
|---|---|
| Yarn | DK / light-worsted weight (100% cotton or a good acrylic) |
| Color A – Off-white / Cream | Head, muzzle, body, outer ears, arms, legs, hat brim, pom-pom – approx. 60 g |
| Color B – Red | Santa hat, scarf, cuff & scarf motifs, holly berries – approx. 30 g |
| Color C – Warm beige / tan | Inner ears & foot sole pads – approx. 15 g |
| Color D – Forest green | Holly leaves – approx. 5 g |
| Color E – Dark brown | Nose, mouth & eyebrow embroidery – a few metres |
- 2.5 mm (US C/2) hook – plus an optional 2.0 mm if you crochet loosely
- 12 mm black safety eyes with backings
- Polyester fibrefill stuffing
- Tapestry / yarn needle, stitch marker, pins
- One 5-petal wooden flower button (approx. 15 mm) for the scarf
- Soft pink blush or pastel for the cheeks
Making the larger 18 cm or 22 cm bear, or a batch for gifts? Use the Yarn Estimator to work out how much of each colour you will need, and read our best yarn for crochet projects guide if you are choosing between cotton and acrylic.
4Abbreviations (US terms)
- mr
- magic ring
- sl st
- slip stitch
- hdc
- half double crochet
- tr
- treble crochet
- dec
- invisible decrease – sc2tog in front loops
- FLO
- front loop only
- bpsc
- back post single crochet
- rnd(s)
- round(s)
- (N)
- stitch count at end of round
- ch
- chain
- inc
- increase – 2 sc in one stitch
- BLO
- back loop only
- fpsc
- front post single crochet
- st(s)
- stitch(es)
- [ ] x N
- repeat the bracket N times
Not sure what an abbreviation means? Look it up in the Abbreviations lookup, or paste a round into the Pattern Decoder for a plain-English explanation. New to reading patterns? Start with how to read crochet patterns and the pattern reading tutorials.
- Work in a continuous spiral – do not join or chain up between rounds unless told to. Move your marker up each round.
- A round written as plain “30 sc” means one sc in every stitch around.
- Stuff firmly and in small amounts as you go, especially the head and body.
- For the cuff colourwork, carry the unused colour loosely along the inside of the round.
5Making the Bear
Parts are listed in a good order to work them
- Part 1 · Head
- Part 2 · Muzzle
- Part 3 · Ears
- Part 4 · Body
- Part 5 · Foot Sole Pads
- Part 6 · Legs
- Part 7 · Arms
- Part 8 · Santa Hat
- Part 9 · Holly Leaves & Berries
- Part 10 · Scarf
Part 1 · HeadColor A – Cream · worked in a spiral, start at the top
| Rnd 1 | 6 sc in mr | 6 |
|---|---|---|
| Rnd 2 | [inc] x6 | 12 |
| Rnd 3 | [1 sc, inc] x6 | 18 |
| Rnd 4 | [2 sc, inc] x6 | 24 |
| Rnd 5 | [3 sc, inc] x6 | 30 |
| Rnd 6 | [4 sc, inc] x6 | 36 |
| Rnd 7 | [5 sc, inc] x6 | 42 |
| Rnd 8 | [6 sc, inc] x6 | 48 |
| Rnd 9 | [7 sc, inc] x6 | 54 |
| Rnd 10 | [8 sc, inc] x6 | 60 |
| Rnds 11-22 | 60 sc — 12 rounds | 60 |
| Rnd 23 | [8 sc, dec] x6 | 54 |
| Rnd 24 | [7 sc, dec] x6 | 48 |
| Now fit the face (see box) before the opening gets small. | ||
| Rnd 25 | [6 sc, dec] x6 | 42 |
| Rnd 26 | [5 sc, dec] x6 | 36 |
| Rnd 27 | [4 sc, dec] x6 | 30 |
| Rnd 28 | [3 sc, dec] x6 | 24 |
| Stuff the head firmly, keeping a round shape. Fasten off, leaving a long tail to sew to the body. | ||
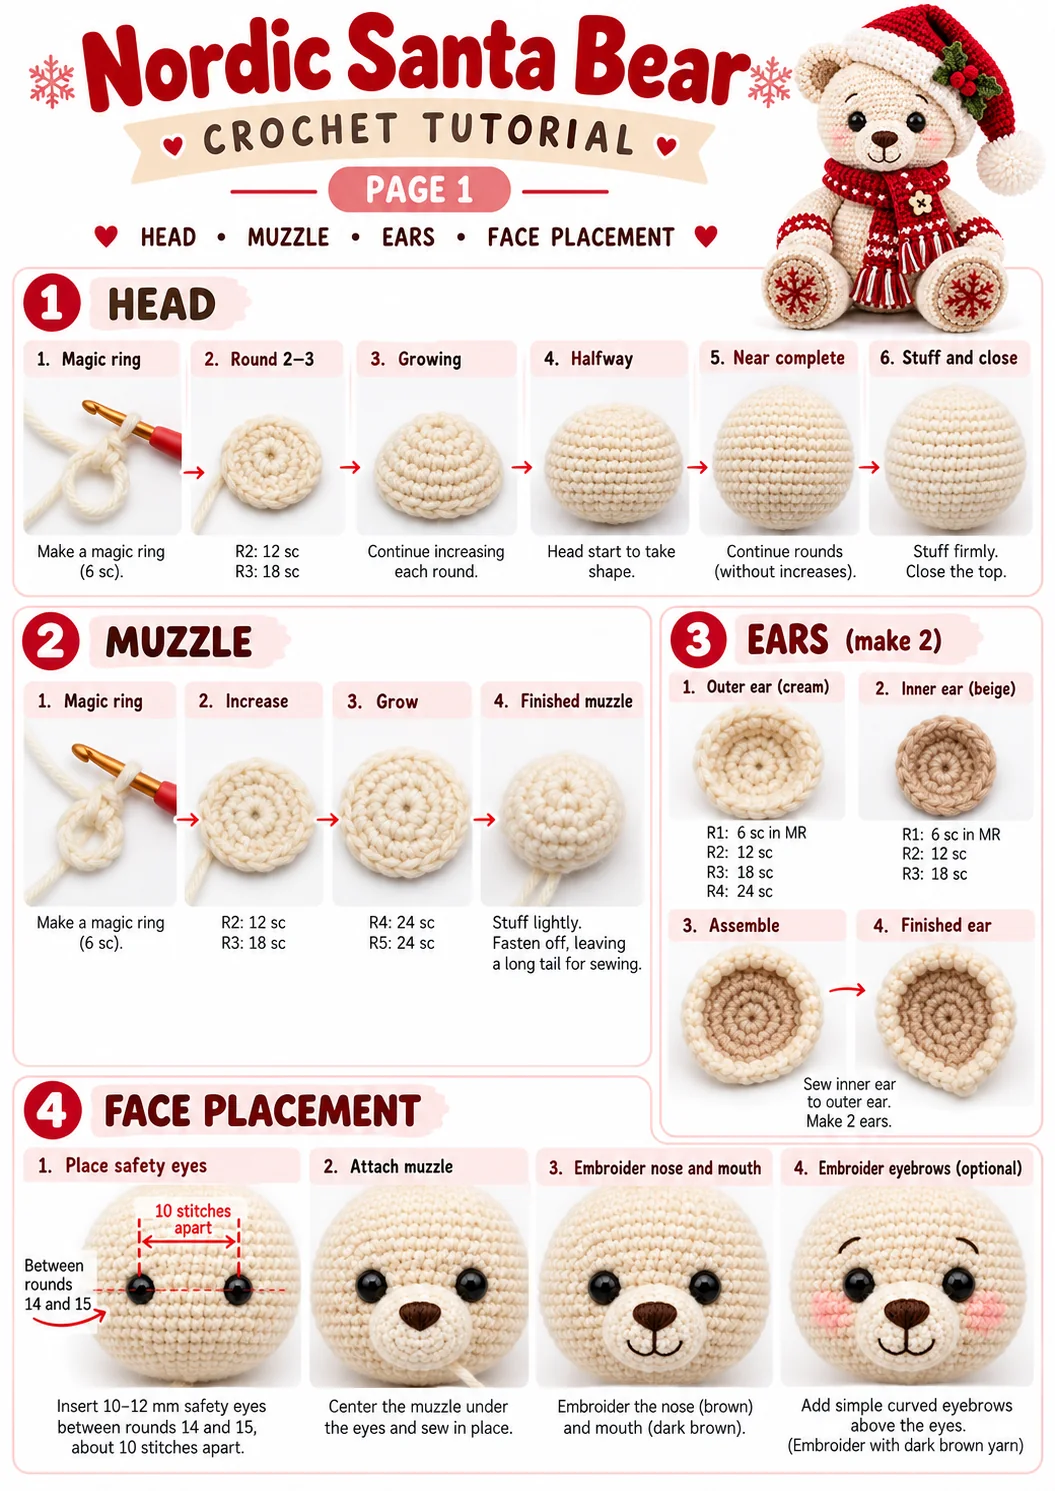
- Place the 12 mm safety eyes between Rnds 14 and 15, about 10 stitches apart, and fix the backings.
- The muzzle (Part 2) sits centrally just below and between the eyes, roughly across Rnds 14-19. Pin it first, then sew once you are happy with the placement.
Part 2 · MuzzleColor A – Cream · sewn to the face
| Rnd 1 | 6 sc in mr | 6 |
|---|---|---|
| Rnd 2 | [inc] x6 | 12 |
| Rnd 3 | [1 sc, inc] x6 | 18 |
| Rnd 4 | [2 sc, inc] x6 | 24 |
| Rnd 5 | [3 sc, inc] x6 | 30 |
| Rnds 6-7 | 30 sc — 2 rounds | 30 |
| Fasten off, leaving a 25 cm tail. Stuff the muzzle lightly before sewing so it stays rounded. | ||
- Nose: fill a small rounded triangle over Rnds 1-3 of the muzzle with satin stitch, dipping slightly in the centre top so it reads as a soft heart shape.
- Mouth: bring the yarn straight down from the nose about 4-5 mm, then work two small gentle curves out to each side for a soft smile.
- Eyebrows: two short straight stitches, about 2 rounds above each eye.
- Cheeks: brush a little pink blush below the eyes once the head is assembled.
Part 3 · EarsMake 2 outer in Color A, 2 inner in Color C
Inner ear (Color C – Beige, flat circle):
| Rnd 1 | 6 sc in mr | 6 |
|---|---|---|
| Rnd 2 | [inc] x6 | 12 |
| Rnd 3 | [1 sc, inc] x6 | 18 |
| Fasten off, leaving a short tail. Do not stuff – it stays flat. | ||
Outer ear (Color A – Cream, cupped):
| Rnd 1 | 6 sc in mr | 6 |
|---|---|---|
| Rnd 2 | [inc] x6 | 12 |
| Rnd 3 | [1 sc, inc] x6 | 18 |
| Rnd 4 | [2 sc, inc] x6 | 24 |
| Rnds 5-7 | 24 sc — 3 rounds | 24 |
| Do not stuff. Sew the smaller inner ear centred onto the front of the outer ear. Flatten the open edge, pinch the base slightly and leave a long tail for attaching. | ||
Photo Step Guide 1 · Head, Muzzle, Ears & Face Placement
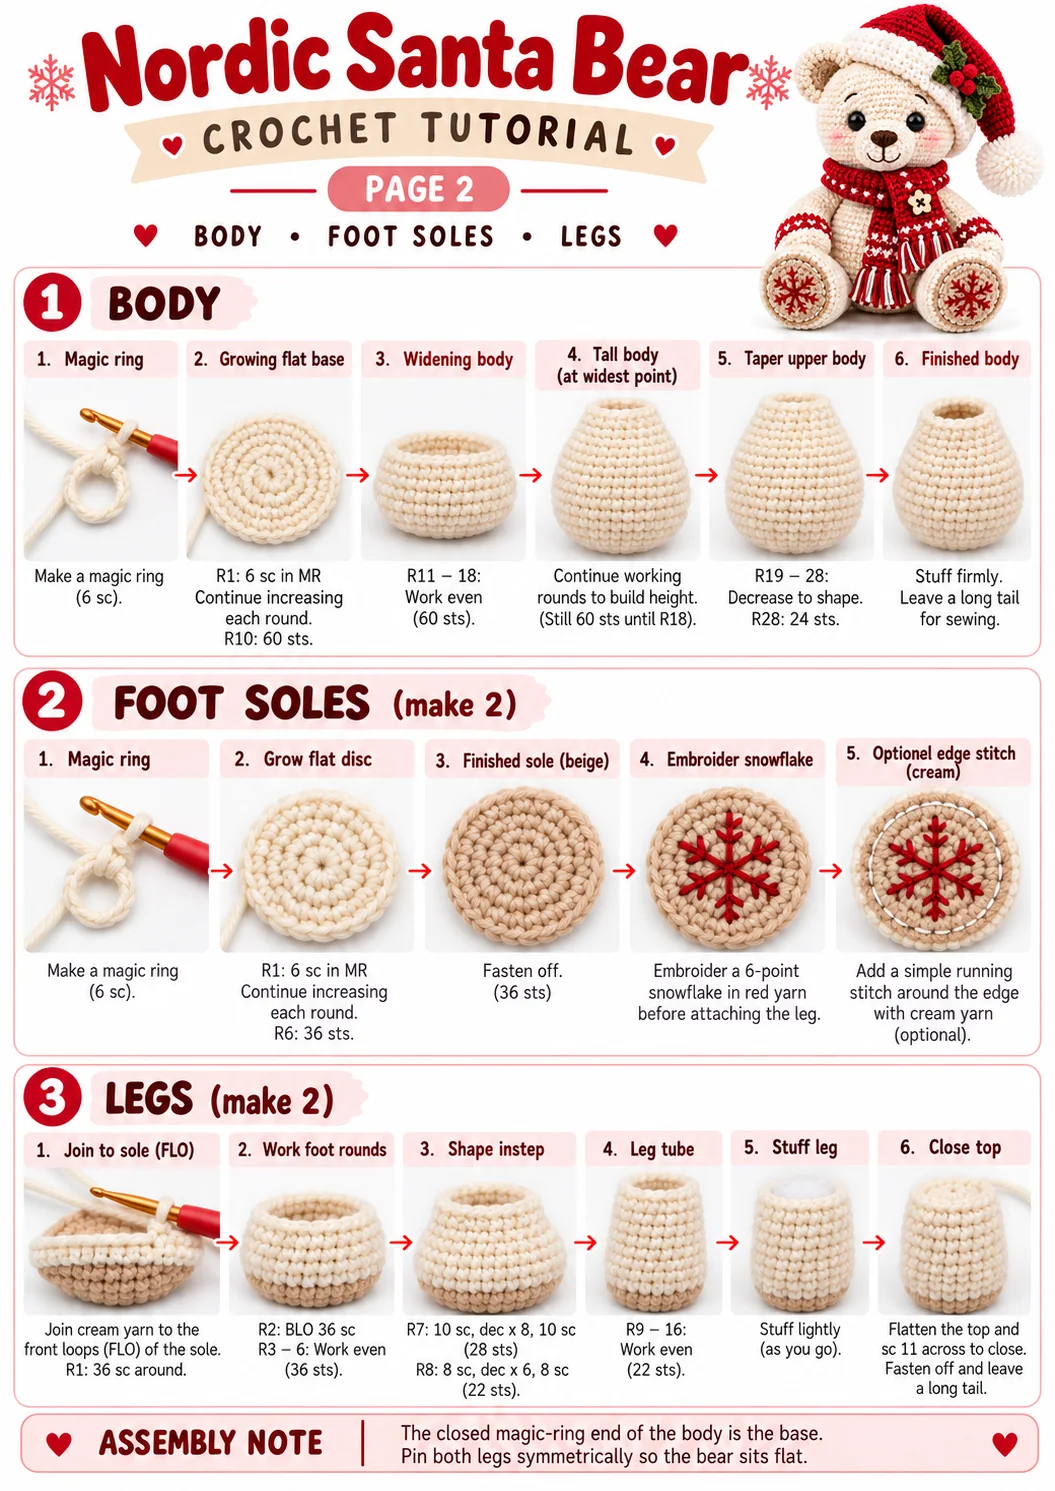
Part 4 · BodyColor A – Cream · worked in a spiral, start at the top
| Rnd 1 | 6 sc in mr | 6 |
|---|---|---|
| Rnd 2 | [inc] x6 | 12 |
| Rnd 3 | [1 sc, inc] x6 | 18 |
| Rnd 4 | [2 sc, inc] x6 | 24 |
| Rnd 5 | [3 sc, inc] x6 | 30 |
| Rnd 6 | [4 sc, inc] x6 | 36 |
| Rnd 7 | [5 sc, inc] x6 | 42 |
| Rnd 8 | [6 sc, inc] x6 | 48 |
| Rnd 9 | [7 sc, inc] x6 | 54 |
| Rnd 10 | [8 sc, inc] x6 | 60 |
| Rnds 11-18 | 60 sc — 8 rounds | 60 |
| Rnd 19 | [8 sc, dec] x6 | 54 |
| Rnd 20 | 54 sc | 54 |
| Rnd 21 | [7 sc, dec] x6 | 48 |
| Rnd 22 | 48 sc | 48 |
| Rnd 23 | [6 sc, dec] x6 | 42 |
| Rnd 24 | 42 sc | 42 |
| Rnd 25 | [5 sc, dec] x6 | 36 |
| Rnd 26 | [4 sc, dec] x6 | 30 |
| Rnd 27 | [3 sc, dec] x6 | 24 |
| Rnd 28 | 24 sc | 24 |
| The closed magic-ring end (Rnd 1) is the base the bear sits on; the open 24-stitch end (Rnd 28) is the neck that joins the head. | ||
| Stuff the body firmly. Fasten off, leaving a long tail — or leave the 24 stitches open and pin to the head first for a neat join. | ||
Part 5 · Foot Sole PadsMake 2 in Color C – Beige · round flat disc
| Rnd 1 | 6 sc in mr | 6 |
|---|---|---|
| Rnd 2 | [inc] x6 | 12 |
| Rnd 3 | [1 sc, inc] x6 | 18 |
| Rnd 4 | [2 sc, inc] x6 | 24 |
| Rnd 5 | [3 sc, inc] x6 | 30 |
| Rnd 6 | [4 sc, inc] x6 | 36 |
| Fasten off on the first sole (it becomes the base of the leg in Part 6). Make the second sole the same way. | ||
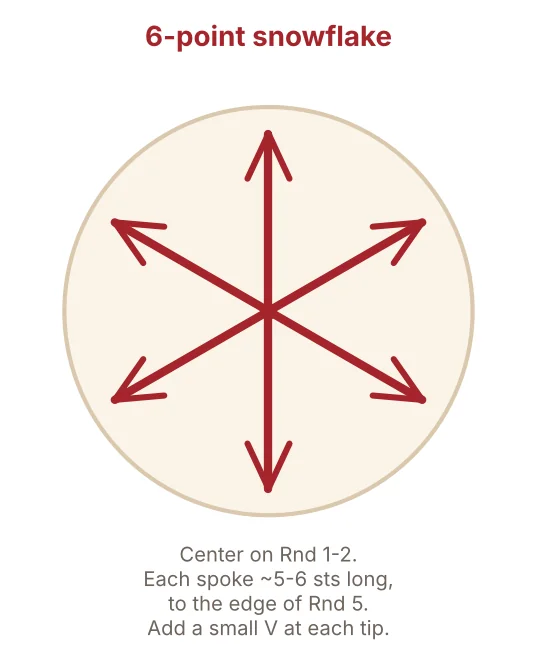
- With Color B (red), embroider a simple 6-point snowflake in the centre: start with three long straight stitches crossing through the centre point to form a six-spoke star, then add a short pair of “V” stitches near the tip of each spoke.
- Optional: with Color A (cream) add small running-stitch accents around Rnd 5 to frame the snowflake.
- Work the embroidery before joining the leg so you can hide the ends inside.
Part 6 · LegsMake 2 in Color A – Cream · worked up from the sole
| Rnd 1 | join Color A to the FLO of Rnd 6 of a sole pad: 36 sc around | 36 |
|---|---|---|
| Rnd 2 | BLO 36 sc | 36 |
| Rnds 3-6 | 36 sc — 4 rounds (the foot) | 36 |
| Before Rnd 7, place a marker at the centre front of the foot (above the toe end of the sole). The decreases sit across the top of the foot, so work the first 10 sc up to that marker, make the decreases over the instep, then the last 10 sc down the other side. | ||
| Rnd 7 | 10 sc, [dec] x8, 10 sc — shapes the instep | 28 |
| Rnd 8 | 8 sc, [dec] x6, 8 sc — keep these decreases stacked above the Rnd 7 group | 22 |
| Rnds 9-16 | 22 sc — 8 rounds (the leg) | 22 |
| Stuff the foot firmly and the leg moderately. Flatten the opening and sc 11 across through both layers to close. Leave a long tail for sewing. | ||
Photo Step Guide 2 · Body, Foot Soles & Legs
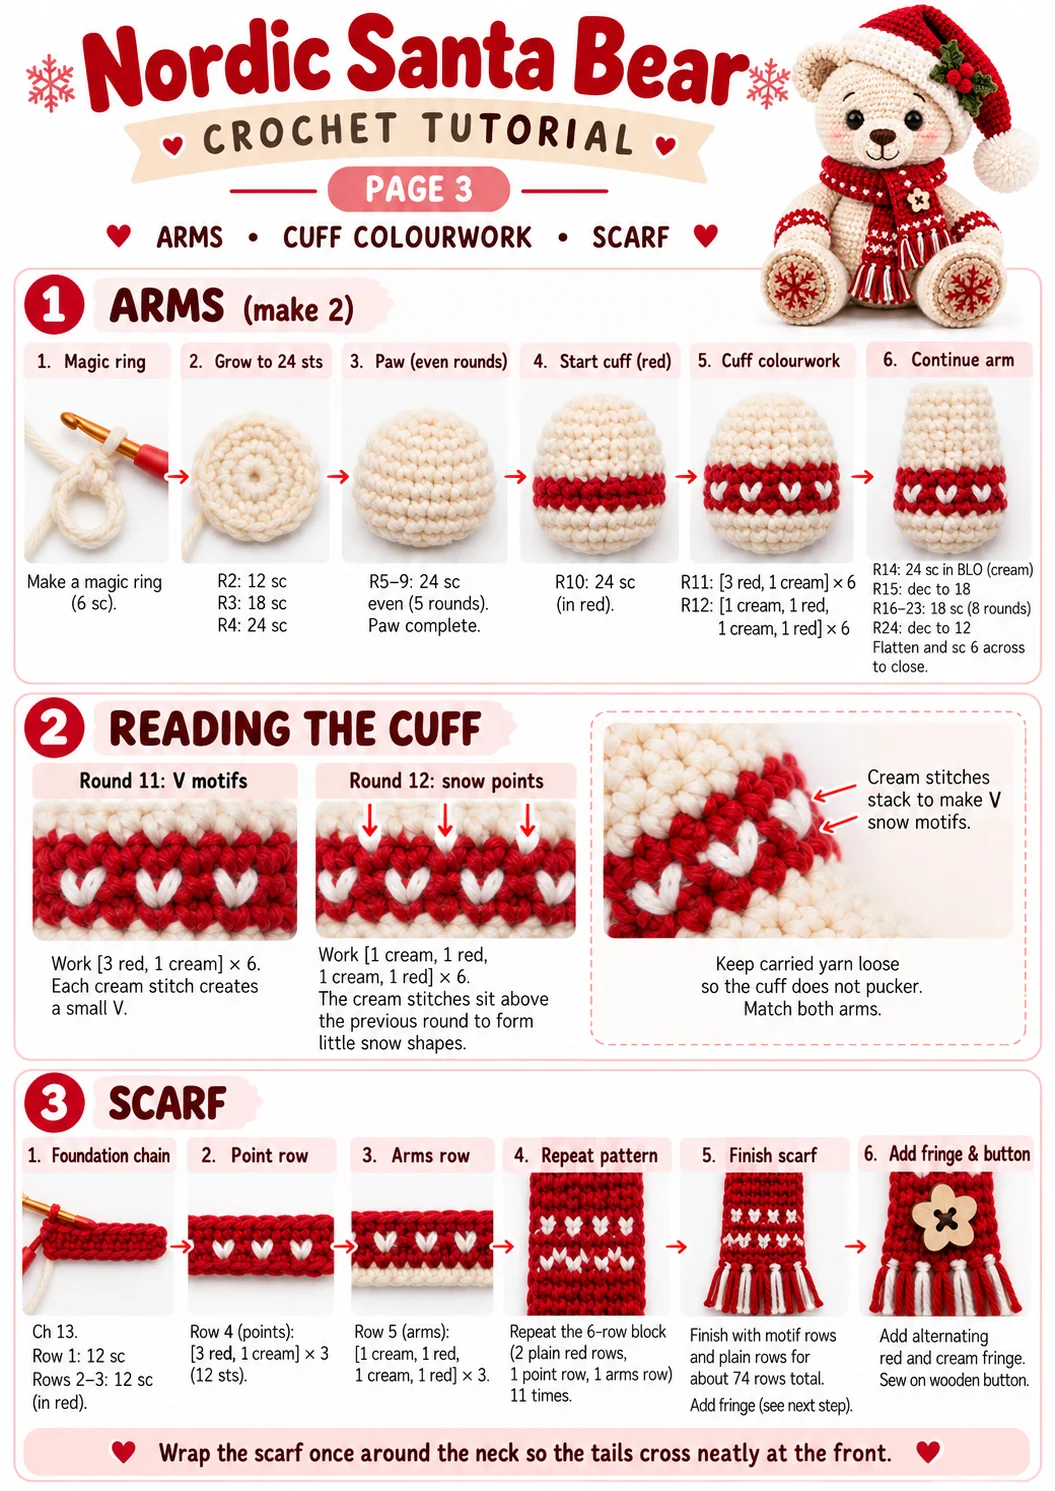
Part 7 · ArmsMake 2 – Color A with a red & cream fair-isle cuff
| Rnd 1 | 6 sc in mr | 6 |
|---|---|---|
| Rnd 2 | [inc] x6 | 12 |
| Rnd 3 | [1 sc, inc] x6 | 18 |
| Rnd 4 | [2 sc, inc] x6 | 24 |
| Rnds 5-9 | 24 sc — 5 rounds (the paw) | 24 |
| Join Color B (red) and begin the cuff, carrying the unused colour inside: | ||
| Rnd 10 | 24 sc in Red | 24 |
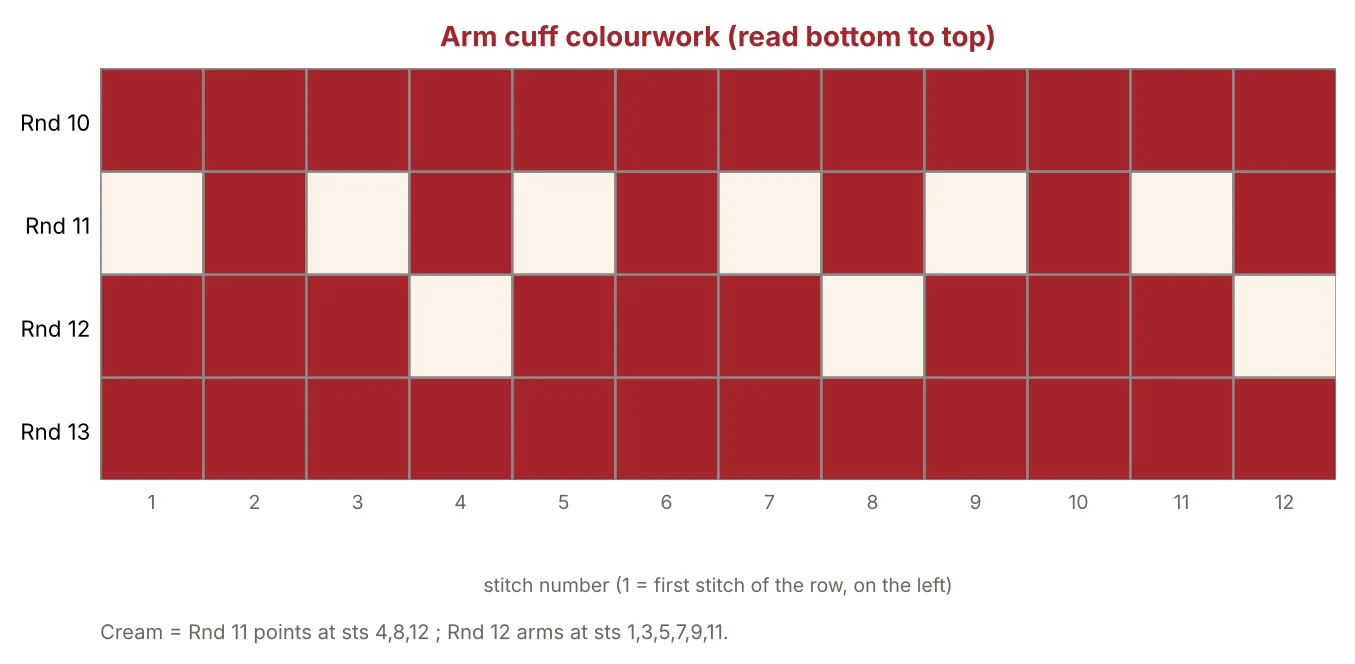
| Rnd 11 | [3 Red, 1 Cream] x6 — single cream stitches = points of the V | 24 |
| Rnd 12 | [1 Cream, 1 Red, 1 Cream, 1 Red] x6 — creams open out into little V / snow shapes | 24 |
| Rnd 13 | 24 sc in Red | 24 |
| Cut Red. Continue in Color A (Cream): | ||
| Rnd 14 | BLO 24 sc — makes a neat ridge above the cuff | 24 |
| Rnd 15 | [2 sc, dec] x6 | 18 |
| Rnds 16-23 | 18 sc — 8 rounds | 18 |
| Rnd 24 | [1 sc, dec] x6 | 12 |
| Stuff the paw lightly; leave the top unstuffed. Flatten and sc 6 across to close. Leave a long tail. | ||
Work Rnds 11 and 12 directly above each other so the cream stitches line up into little V shapes. If you prefer plain dots, simply work Rnd 11 and skip Rnd 12 (replace with a plain red round). Keep the carried colour loose so the cuff does not pucker – match both arms so the pattern sits at the same height.
Part 8 · Santa HatColor B (Red) cone + Color A (Cream) brim
| Start in Color B at the tip of the cone: | ||
| Rnd 1 | 6 sc in mr | 6 |
|---|---|---|
| Rnds 2-3 | 6 sc — a soft tip for the pom-pom to flop | 6 |
| Rnd 4 | [2 sc, inc] x2 | 8 |
| Rnd 5 | 8 sc | 8 |
| Rnd 6 | [3 sc, inc] x2 | 10 |
| Rnd 7 | 10 sc | 10 |
| Rnd 8 | [4 sc, inc] x2 | 12 |
| Rnd 9 | 12 sc | 12 |
| Rnd 10 | [3 sc, inc] x3 | 15 |
| Rnd 11 | 15 sc | 15 |
| Rnd 12 | [4 sc, inc] x3 | 18 |
| Rnd 13 | [5 sc, inc] x3 | 21 |
| Rnd 14 | [6 sc, inc] x3 | 24 |
| Rnd 15 | [3 sc, inc] x6 | 30 |
| Rnd 16 | [4 sc, inc] x6 | 36 |
| Rnd 17 | [5 sc, inc] x6 | 42 |
| Rnd 18 | [6 sc, inc] x6 | 48 |
| Rnd 19 | [7 sc, inc] x6 | 54 |
| The hat sits on top of the head (which is 60 sts around at its widest) and tips to one side, so 54 gives a snug, perched fit. For a deeper hat that pulls further down, work one more round: [8 sc, inc] x6 (60) and keep the rest of the counts the same. | ||
| Rnds 20-27 | 54 sc — 8 rounds; the slouchy lower cone | 54 |
| Change to Color A (Cream) for the brim. Work it deep so it folds up into a thick, chunky band like the photo: | ||
| Rnds 28-37 | 54 sc — 10 rounds. For a ribbed texture, work them in [1 fpsc, 1 bpsc] around. | 54 |
| Fasten off and fold the whole cream band up over the red — because it is 10 rounds deep it doubles over itself into a plump brim. For an even fluffier, thicker look, hold the cream yarn double for the brim, or use a soft plush / chenille yarn in cream just for this band. | ||
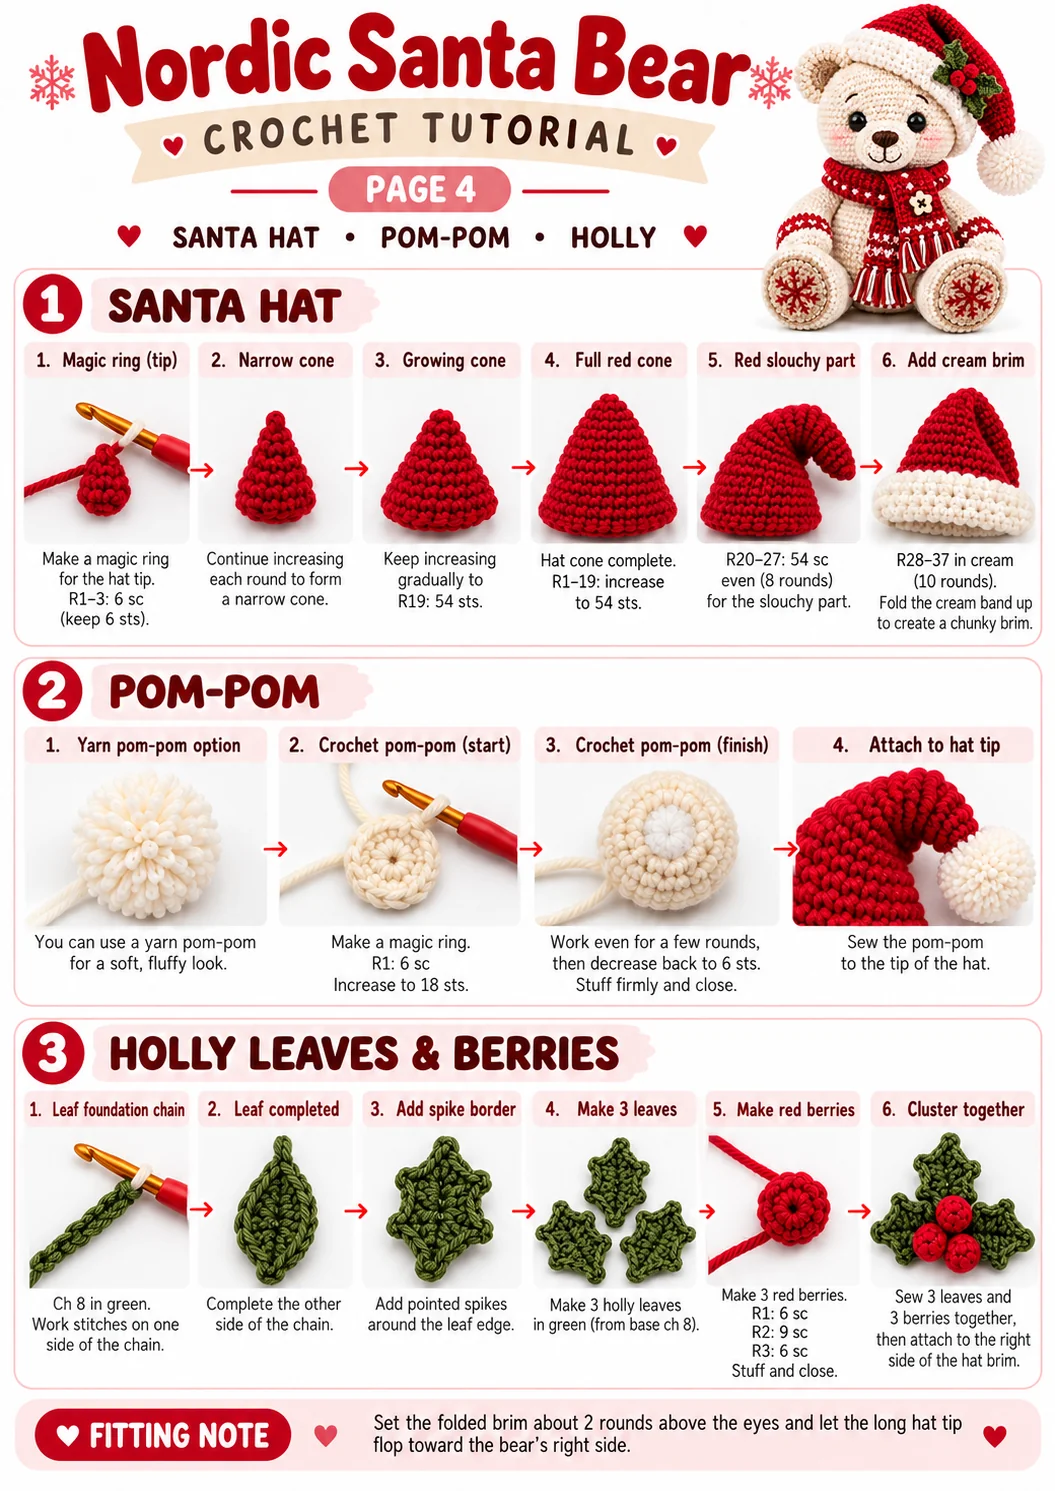
Set the hat on the head so the folded brim rests about 2 rounds above the eyes at the front and just covers the tops of the ears at the sides. Let the long tip flop down toward the bear’s right so the pom-pom hangs beside the cheek. Pin it there, check from the front that the slouch looks even, then sew the brim down all the way around. If the hat feels tight, use the 60-stitch option from Rnd 19.
Hat pom-pom (Color A – Cream):
Make a 4.5 cm yarn pom-pom, or crochet a small ball:
| Rnd 1 | 6 sc in mr | 6 |
|---|---|---|
| Rnd 2 | [inc] x6 | 12 |
| Rnd 3 | [1 sc, inc] x6 | 18 |
| Rnds 4-7 | 18 sc — 4 rounds | 18 |
| Rnd 8 | [1 sc, dec] x6 | 12 |
| Rnd 9 | [dec] x6 | 6 |
| Stuff, close the opening and sew to the tip of the hat. A fluffy yarn pom-pom gives the softest look. | ||
Love the slouchy hat? Our free crochet Santa hat pattern (baby to adult) makes a full-size hat for little heads and grown-ups, and you will find more in free crochet hat patterns.
Part 9 · Holly Leaves & Berries3 leaves in Color D, 3 berries in Color B
Holly leaf (make 3 in Color D – Green):
The leaf is worked around both sides of a starting chain, then given spikes. Work all three leaves exactly the same way and they will match.
| Base | ch 8. | |
|---|---|---|
| Side 1 | starting in the 2nd ch from hook: 1 sc in each of the next 6 ch, then 3 sc in the last ch (the tip). | |
| Side 2 | rotate to work along the free loops on the other side of the chain: 1 sc in each of the next 6 ch, 2 sc in the last loop; sl st to the first sc to join. You now have 17 sts around the leaf. | 17 |
| Spike border | ch 1. Then repeat this exact sequence all the way around: *1 sl st in the next st, then (sl st, ch 3, sl st in 2nd ch from hook, 1 sl st) all in the next st to make one spike*. Because you spike every 2nd stitch, you will make 8 spikes and one plain sl st, evenly spaced. Sl st to the beginning to join. | |
| Fasten off, leaving a tail. For a centre vein, sl st along the top of the foundation chain from tip to base. Repeat for all 3 leaves. | ||
Holly berry (make 3 in Color B – Red):
| Rnd 1 | 6 sc in mr | 6 |
|---|---|---|
| Rnd 2 | [1 sc, inc] x3 | 9 |
| Rnd 3 | 9 sc | 9 |
| Rnd 4 | [1 sc, dec] x3 | 6 |
| Stuff lightly and cinch the opening closed. | ||
Photo Step Guide 4 · Santa Hat, Pom-pom & Holly
Part 10 · ScarfColor B (Red) with Color A (Cream) snow-V motifs
| Foundation | with Color B, ch 13. | |
|---|---|---|
| Row 1 | from 2nd ch from hook, 12 sc across; ch 1, turn | 12 |
| Rows 2-3 | 12 sc, ch 1, turn — plain red. | 12 |
| The snow-V band is 3 rows (follow the chart below, read bottom to top). The cream points of the Point row sit at stitches 4, 8 and 12; the cream stitches of the Arms row sit at 3, 5, 7, 9 and 11, so they fall on either side of each point and open the V’s. | ||
| Point row | [3 Red, 1 Cream] x3; ch 1, turn | 12 |
| Arms row | 2 Red, [1 Cream, 1 Red] x4, 1 Cream, 1 Red; ch 1, turn | 12 |
| Red row | 12 sc in Red; ch 1, turn | 12 |
| Repeat block (6 rows) | Point row, Arms row, then 4 plain red rows. This whole block = 6 rows. | |
| Full sequence | Rows 1-3: red (foundation + 2 rows). Then work the 6-row block 11 times (66 rows). Then finish with 1 Point row, 1 Arms row and 3 plain red rows (5 rows). That is 3 + 66 + 5 = 74 rows, roughly 28-30 cm, with a motif band near each end so both ends match. Carry the cream loosely along the back. | |
Fasten off. The scarf wraps once around the neck with two tails at the front.
Fringe: for each tail, cut 8 cm lengths of yarn, alternating red and cream. Fold each in half and knot through the end stitches (about 6 across). Trim the fringe level to about 3 cm.
Button: sew the 5-petal wooden button through both scarf layers where the tails cross, to hold the wrap in place.
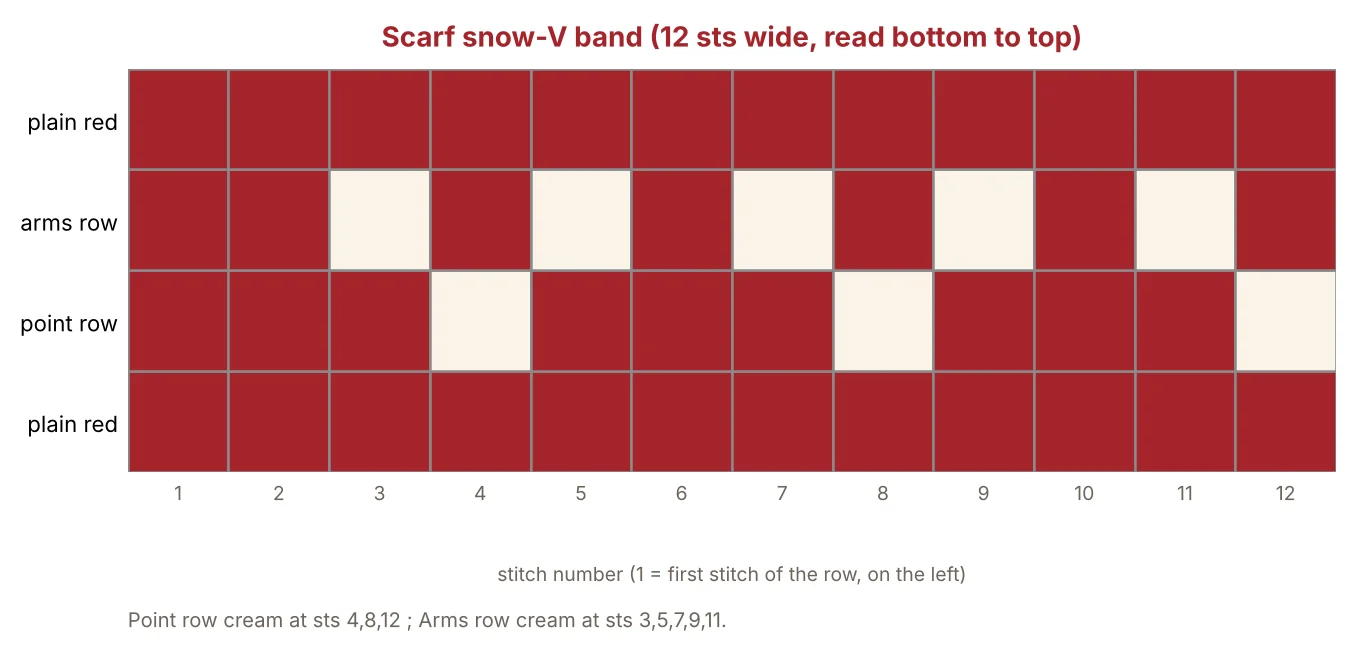
Photo Step Guide 3 · Arms, Cuff Colourwork & Scarf
6Stitch-Count Map
A quick reference for the key milestones in each piece
| Piece | Starts | Widest | Ends |
|---|---|---|---|
| Head | 6 | 60 (Rnds 10-22) | 24 |
| Body | 6 | 60 (Rnds 10-18) | 24 |
| Muzzle | 6 | 30 (Rnds 5-7) | 30 |
| Foot sole | 6 | 36 | 36 |
| Leg | 36 (on sole) | 36 | 22 ➜ sc 11 to close |
| Arm | 6 | 24 (through cuff) | 12 ➜ sc 6 to close |
| Santa hat | 6 | 54 (Rnds 19-27) | 54 + cream brim |
| Pom-pom | 6 | 18 | 6 |
| Holly berry | 6 | 9 | 6 |
7Putting It Together
Pin everything in place and check it from the front before you sew
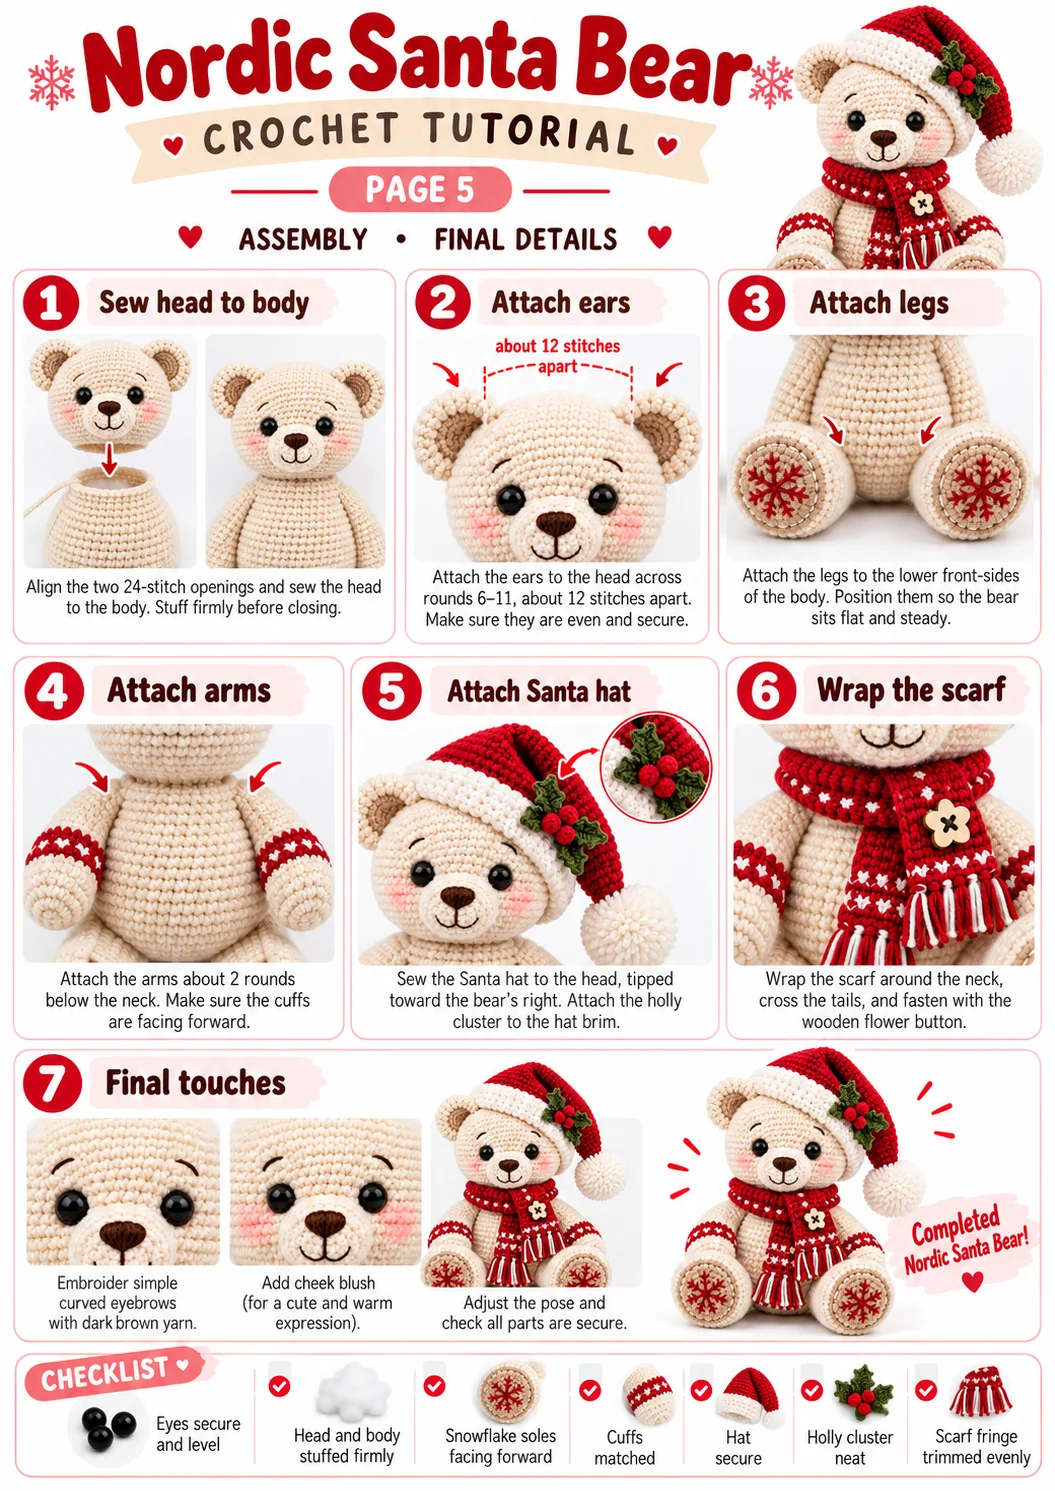
- Head to body: line up the 24-stitch head opening with the 24-stitch body opening and whip stitch all the way around, adding a little more stuffing at the neck before you close it.
- Ears: sew the ears to the head across about Rnds 6-11, roughly 12 stitches apart, curving the inner ear forward.
- Legs: sit the bear on a flat surface and pin the legs to the lower front-sides of the body (around Rnds 6-10) so it balances, then sew with a mattress/ladder stitch.
- Arms: attach to the sides of the body about 2 rounds below the neck, cuffs facing forward and matching height.
- Santa hat & holly: sew the hat to the head, tipped toward the bear’s right. Arrange the 3 holly leaves in a fan on the right of the brim and cluster the 3 berries over the leaf bases.
- Scarf: wrap around the neck, cross the tails at the front and fasten with the wooden button through both layers.
- Finishing touches: embroider the eyebrows, brush on the cheek blush and gently shape all the pieces.
[ Pom-pom ]
     |
[ Santa hat ] ── [ Holly cluster ]
     |
[ Ears ] ─ [ HEAD ] ─ [ Ears ]
     | (muzzle + eyes)
  [ Scarf ]
     |
[ Arms ] ─ [ BODY ] ─ [ Arms ]
     |
[ Legs ] + [ Snowflake soles ]
Photo Step Guide 5 · Assembly & Final Details
8Final Checklist
Making a few bears for Christmas gifts? Build a printable plan with the Project Planner. Selling your finished bears? Work out a fair price from materials, time and margin with the Crochet Pricing Calculator.
This pattern is for your personal use. You are welcome to sell the finished bears you make from it.
More Free Christmas Crochet Patterns
Love making Christmas amigurumi and decorations? These free patterns from Crochet Patterns Hub pair beautifully with your Nordic Santa Bear under the tree.
- All holiday crochet patterns
- Free amigurumi patterns
- Crochet hat patterns
- Seasonal crochet ideas
- Crochet tutorials
- All free crochet patterns
Plan your next project with our free tools
Everything below lives on one page — the Crochet Calculator & Tools — and works in your browser while you crochet.
Happy crocheting!
Browse more free crochet patterns, learn new skills in our tutorials, read the blog, or meet Crochet Patterns Hub. Questions or pattern ideas? Get in touch.