
- Intermediate
- US Terms
- 15½” × 49½”
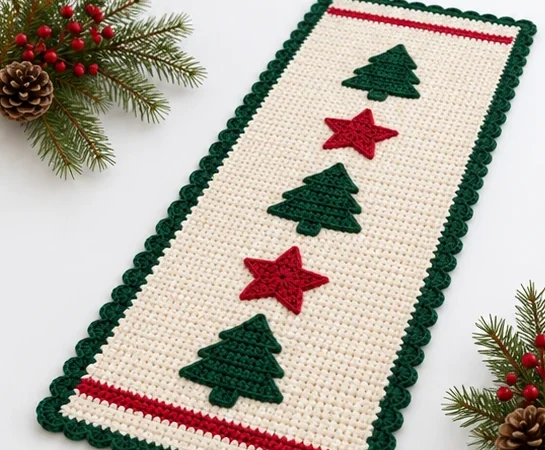
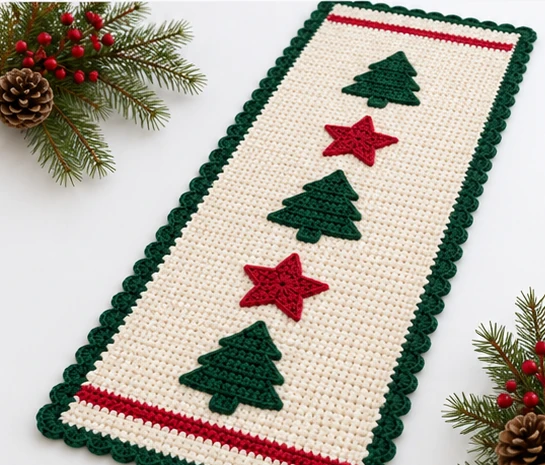
A cozy runner for the holiday table — three raised pine trees and two stars sewn onto a warm cream ground, framed by red accent stripes and a scalloped forest-green shell edge.
This free Christmas table runner crochet pattern features three raised pine trees and two stars sewn onto a plain single crochet panel. It is one of our free Christmas and holiday crochet patterns, written in US terms with charts, exact stitch counts and four photo step guides.
The runner is built from a plain single crochet panel, so it is a relaxing make once you have checked your gauge. If the abbreviations are new to you, read our guide to how to read crochet patterns, and keep the Crochet Calculator & Tools page open for the gauge calculator, yarn estimator and hook size converter.
- Skill level
- Intermediate
- Finished size
- approx. 15½” x 49½” (39.5 x 126 cm), incl. border
- Panel size
- 14″ x 48″ (35.5 x 122 cm), before border
- Technique
- Single crochet panel + sewn-on (applique) motifs
- Hook
- US G/6 (4.0 mm)
- Yarn
- Worsted-weight cotton or acrylic, 3 colors
Getting Started
Materials
Yarn: Worsted-weight (Category 4) cotton or acrylic in three colors:
| Color | Used for | Approx. |
|---|---|---|
| Color A – Cream | background panel & border foundation | approx. 520 yds / 475 m |
| Color B – Forest Green | trees & shell border | approx. 220 yds / 200 m |
| Color C – Crimson Red | stars & accent stripes | approx. 110 yds / 100 m |
- Hook: US G/6 (4.0 mm), or size needed to match gauge
- Notions: tapestry needle, stitch markers, scissors, pins for placing motifs
Making the runner longer or shorter? Use the Yarn Estimator to adjust the yardage for extra or fewer cream rows, and the Hook Size Converter to swap the US G/6 (4.0 mm) hook for another size. Not sure between cotton and acrylic? Our best yarn for crochet projects guide explains the differences.
Gauge
16 sts x 18 rows = 4″ (10 cm) in single crochet. Make a gauge swatch first — matching gauge keeps the panel size and finished measurements correct. Adjust hook size if needed.
Enter your swatch stitches and rows into the Gauge Calculator to see how close you are to 16 sts x 18 rows = 4″.
Abbreviations (US terms)
- ch
- chain
- sc
- single crochet
- hdc
- half double crochet
- dc
- double crochet
- MR
- magic ring
- rep
- repeat
- sl st
- slip stitch
- sc2tog
- single crochet 2 together (dec)
- sc3tog
- single crochet 3 together (dec)
- st(s)
- stitch(es)
- RS / WS
- right / wrong side
- sp
- space
Look up any abbreviation, including its UK equivalent, in the Abbreviations lookup, or paste a row such as the sc2tog tree rows into the Pattern Decoder. New to single crochet? Start with the 6 basic crochet stitches or how to crochet for absolute beginners.
How This Runner Is Made
This runner is worked in three easy stages. First, a plain background panel is crocheted flat in single crochet, cream with a red stripe at each end. Next, the trees and stars are made separately as small crocheted motifs. They are then sewn (appliqued) onto the panel, which gives them the soft, raised, three-dimensional look. Finally, a scalloped shell border is worked directly around the panel. Working the motifs separately means no color-carrying or tapestry crochet — just simple, relaxing rows, plus a little sewing at the end.
Color Key
- A – Cream
- B – Forest Green
- C – Crimson Red
Stage 1 — Background Panel
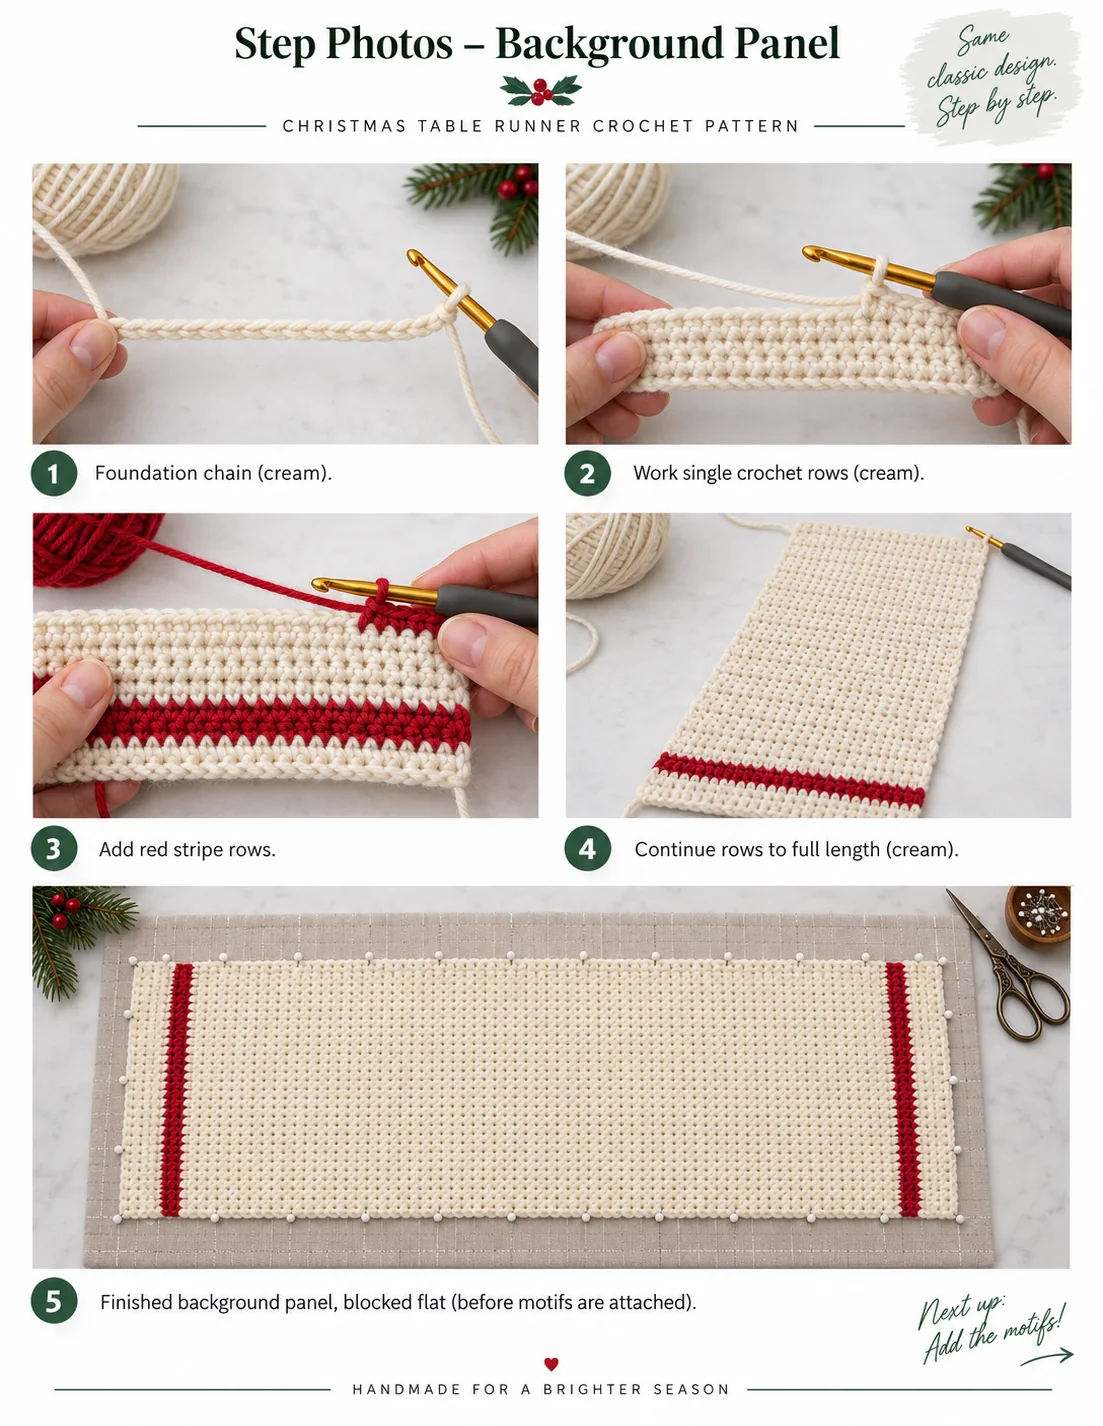
Worked flat in single crochet. Ch 1 at the start of a row does not count as a stitch. Turn at the end of every row. Every row = 56 sc. Change color on the last stitch of the previous row (work the last sc until 2 loops remain, then finish it with the new color).
Panel
| Foundation | With Color A (Cream), ch 57. |
|---|---|
| Row 1 (RS) | sc in 2nd ch from hook and in each ch across. Turn. — 56 sc |
| Rows 2–4 | Ch 1, sc in each st across. Turn. — 56 sc (cream margin) |
| Rows 5–7 | Change to Color C (Red). Ch 1, sc in each st across. Turn. — 56 sc (red stripe) |
| Rows 8–10 | Change to Color A (Cream). Ch 1, sc in each st across. Turn. — 56 sc |
| Rows 11–206 | Continue with Color A. Ch 1, sc in each st across, every row. Turn. — 56 sc (196 plain cream rows — this is where the motifs will be sewn later) |
| Rows 207–209 | Color A. Ch 1, sc in each st across. Turn. — 56 sc |
| Rows 210–212 | Change to Color C (Red). Ch 1, sc in each st across. Turn. — 56 sc (red stripe) |
| Rows 213–216 | Change to Color A (Cream). Ch 1, sc in each st across. Turn. — 56 sc |
| Fasten off. Weave in ends. | |
The finished panel measures 14″ x 48″ (216 rows). Block it flat and square before adding motifs and border.
Long flat panels reward a relaxed grip. If your hand tires over 216 rows, see our guide on how to hold a crochet hook for pencil and knife grips, and keep your tension even by checking your gauge again partway through.
Step Photos · Background Panel
Stage 2 — Pine Tree Motif (make 3)
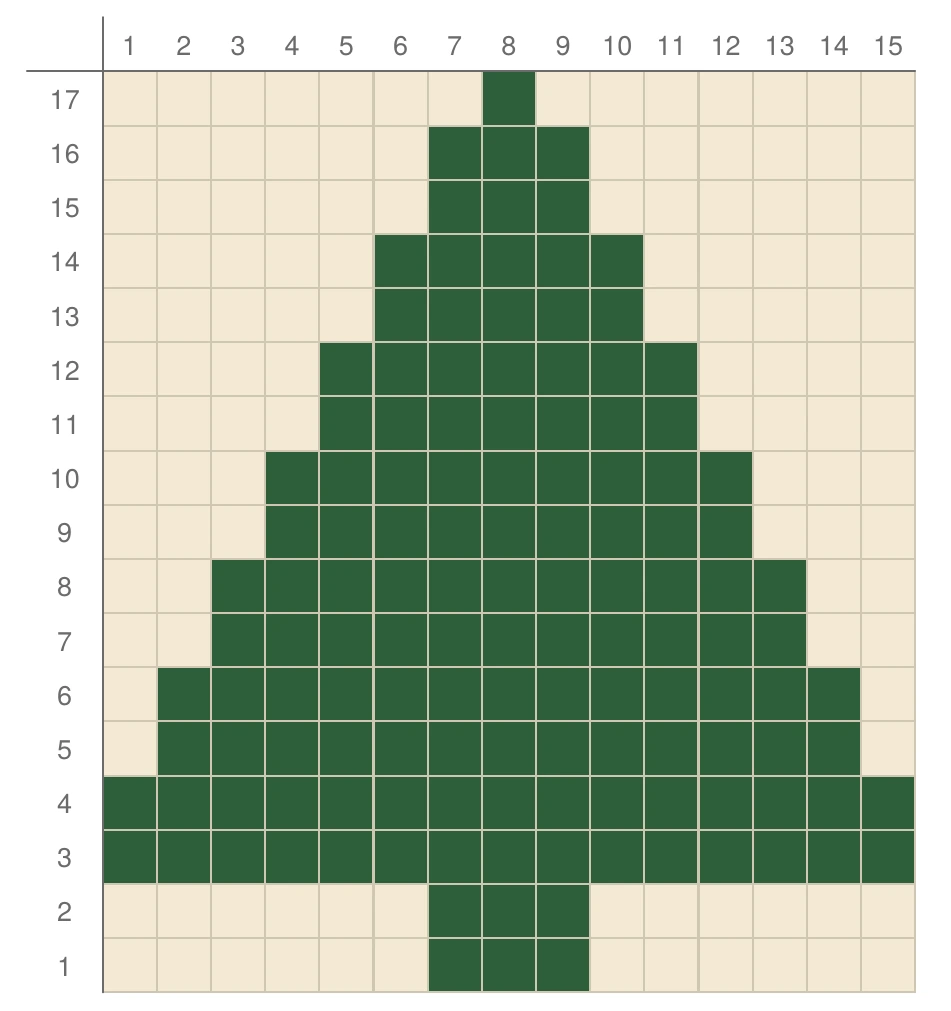
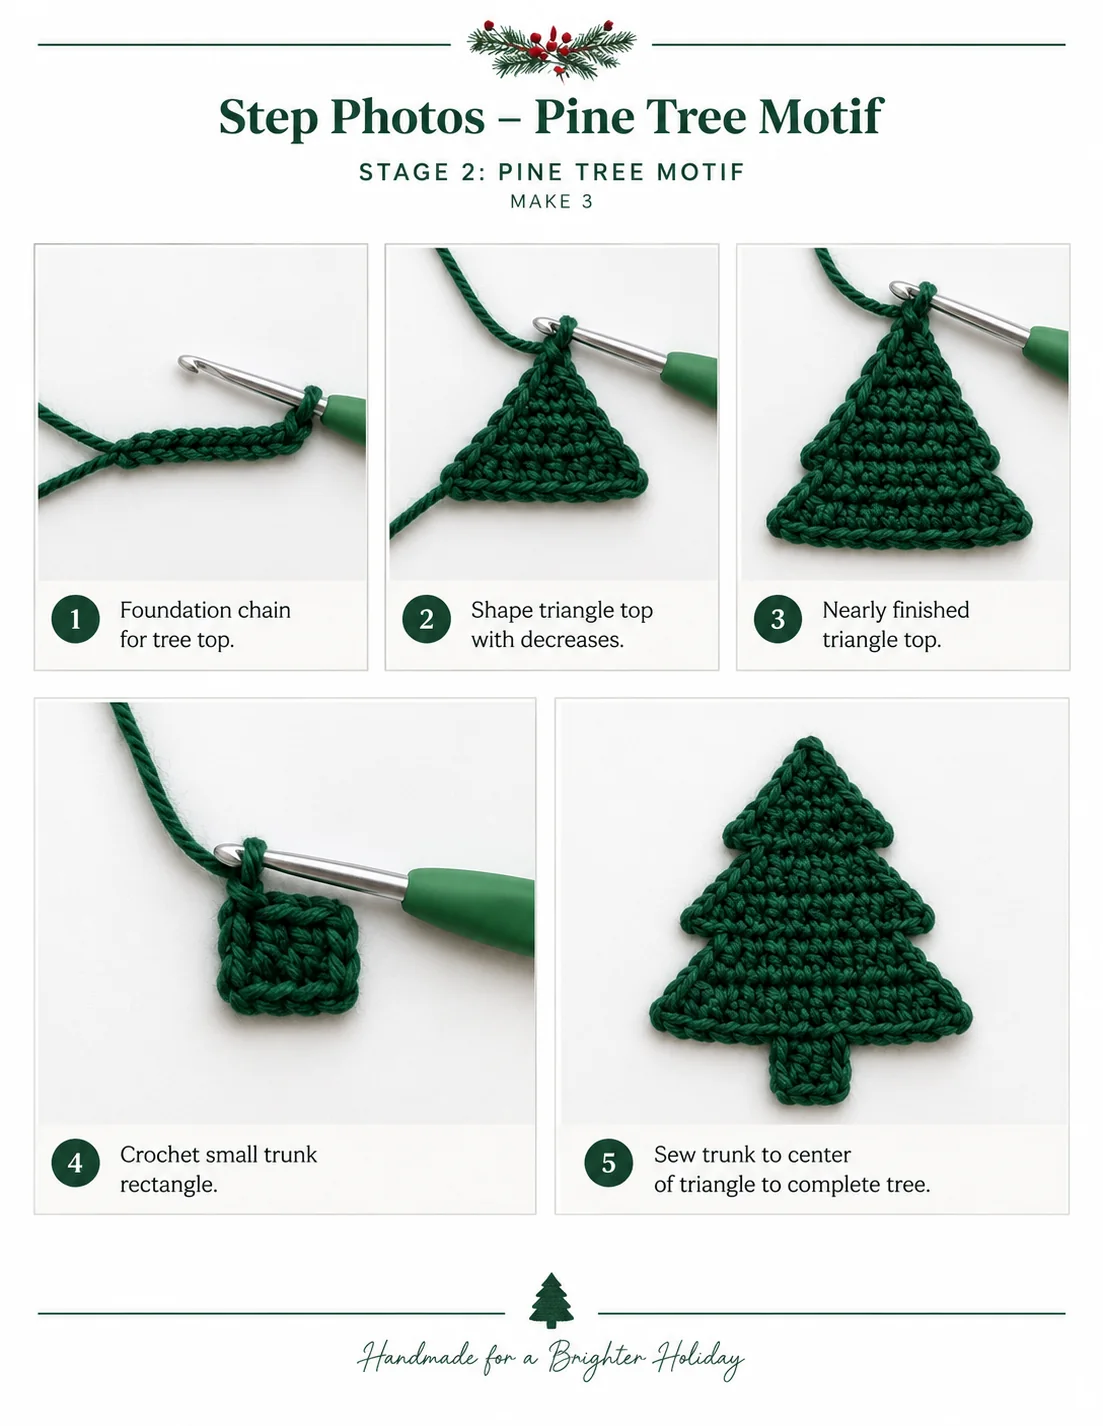
Each tree = one triangle top + one small trunk, both in Color B (Forest Green). The diagram shows the finished shape and size (about 15 sts wide x 17 rows tall).
Tree Top (triangle) – Color B
| Row 1 (RS) | Ch 16; sc in 2nd ch from hook and in each ch across. Turn. — 15 sc |
|---|---|
| Row 2 | Ch 1, sc in each st across. Turn. — 15 sc |
| Row 3 | Ch 1, sc2tog, sc to last 2 sts, sc2tog. Turn. — 13 sc |
| Row 4 | Ch 1, sc in each st across. Turn. — 13 sc |
| Row 5 | Ch 1, sc2tog, sc to last 2 sts, sc2tog. Turn. — 11 sc |
| Row 6 | Ch 1, sc across. — 11 sc |
| Row 7 | Ch 1, sc2tog, sc to last 2, sc2tog. — 9 sc |
| Row 8 | Ch 1, sc across. — 9 sc |
| Row 9 | Ch 1, sc2tog, sc to last 2, sc2tog. — 7 sc |
| Row 10 | Ch 1, sc across. — 7 sc |
| Row 11 | Ch 1, sc2tog, sc to last 2, sc2tog. — 5 sc |
| Row 12 | Ch 1, sc across. — 5 sc |
| Row 13 | Ch 1, sc2tog, sc to last 2, sc2tog. — 3 sc |
| Row 14 | Ch 1, sc across. — 3 sc |
| Row 15 | Ch 1, sc3tog. — 1 st. Fasten off. |
Trunk – Color B
- Ch 4. Row 1: sc in 2nd ch from hook and across. Turn. — 3 sc
- Rows 2–3: Ch 1, sc across. Turn. — 3 sc. Fasten off, leaving a long tail.
- Sew the trunk centered directly beneath the wide base of the triangle to complete the tree.
Step Photos · Pine Tree Motif
Love these little crocheted trees? Try the layered Christmas Tree Crochet Coaster, the Spiral Christmas Tree hanging ornament or our easy crochet Christmas baubles.
Stage 2 — Star Motif (make 2)
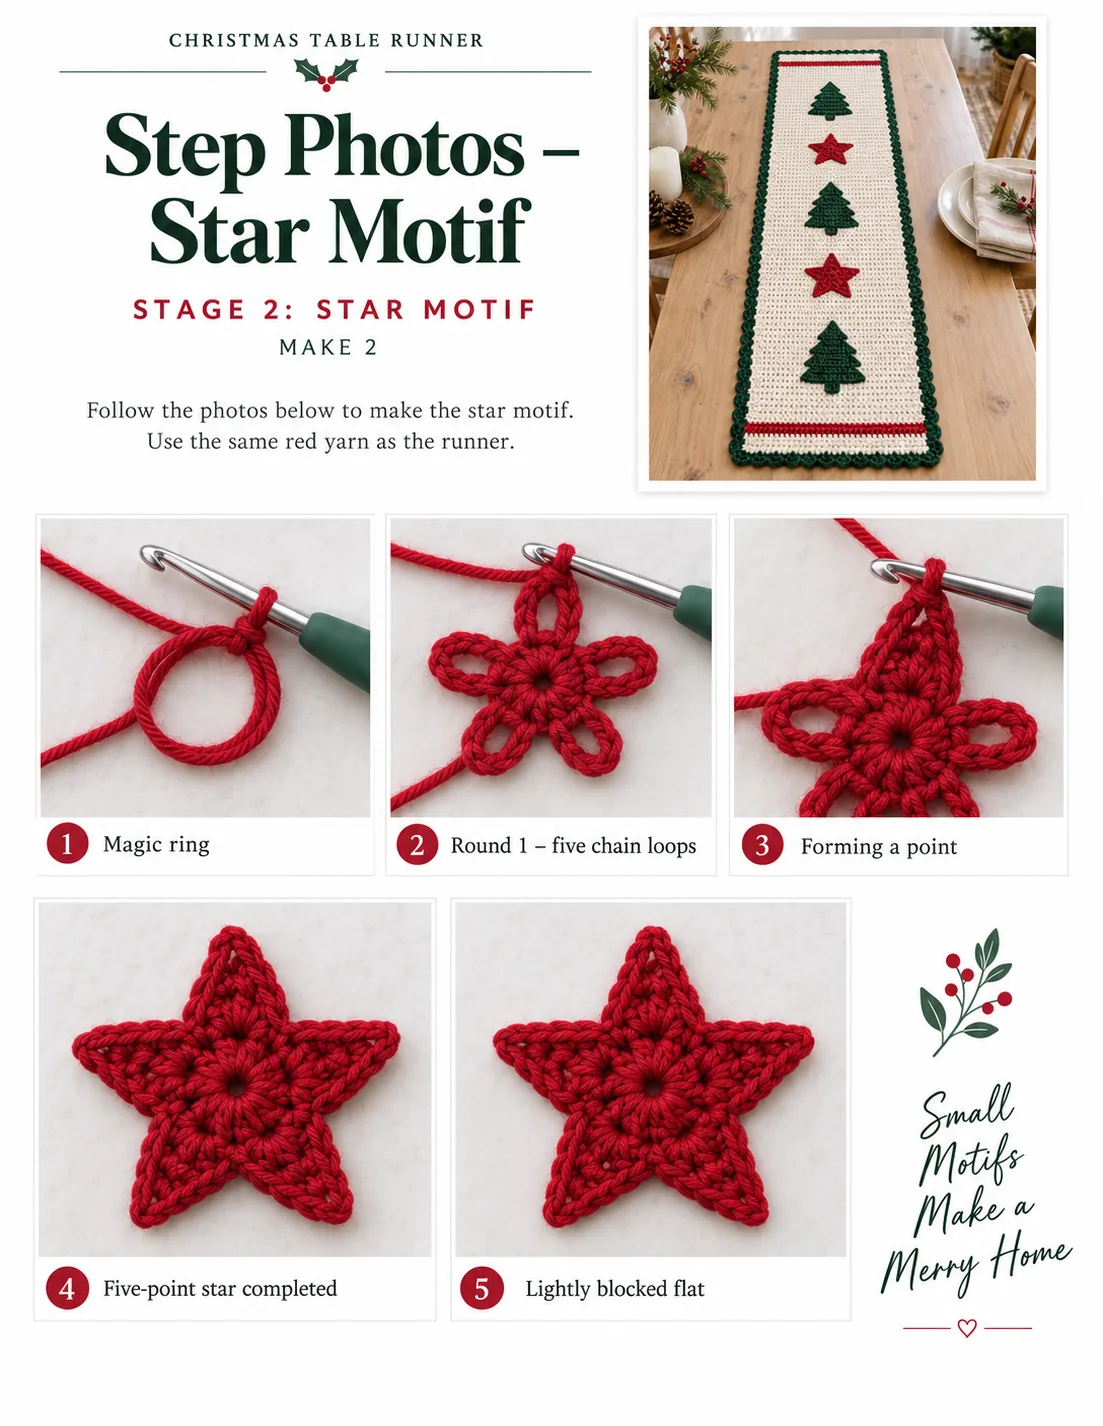
A five-point star worked in the round in Color C (Crimson Red). Finished star is about 3– 3½” (8–9 cm) across. The diagram shows the target shape.
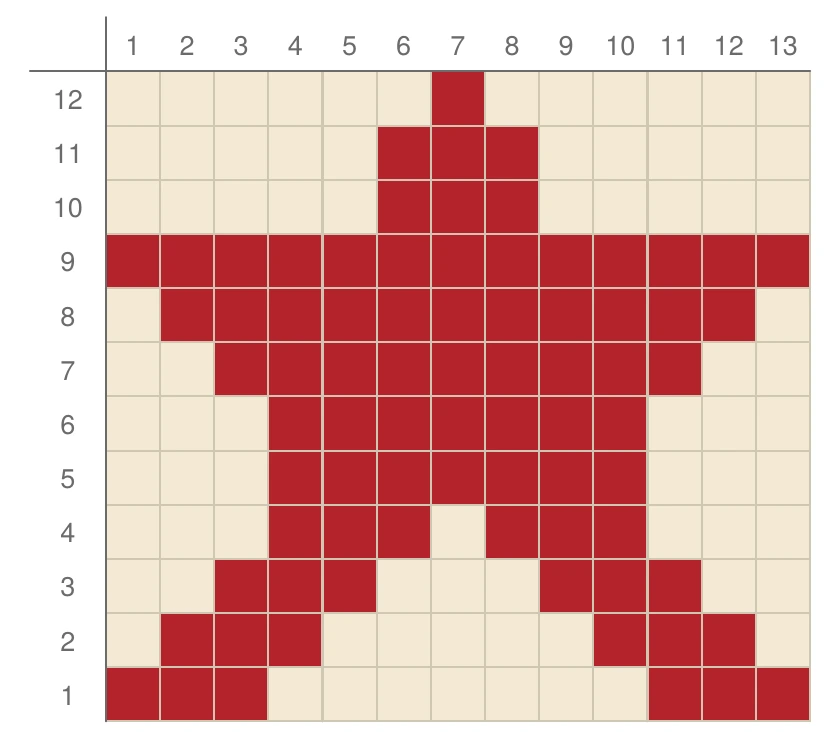
Star – Color C
- Rnd 1: Make a magic ring. Ch 1, then [sc into ring, ch 3] 5 times. Join with sl st to the first sc, and pull the ring closed. — 5 sc and 5 ch-3 loops.
- Rnd 2 (form the points): Sl st into the first ch-3 loop. Into that same loop work: (sc, hdc, dc, [ch 2, sl st in 2nd ch from hook — point tip], dc, hdc, sc). Then sl st into the next sc (between the loops). This makes one point.
- Repeat “into next ch-3 loop work the point, then sl st into next sc” for all 5 loops.
- Join with sl st to the base of the first point. Fasten off, leaving a long tail for sewing.
- Gently shape the five points and block lightly so they lie flat.
Tip: keep the stitches inside each loop snug so the tips stay pointed. If your star curls, block it firmly under a damp cloth.
Step Photos · Star Motif
Want more stars for the tree or garland? Make the easy Silmë Star ornament or the stuffed amigurumi star.
Stage 3 — Placement & Assembly
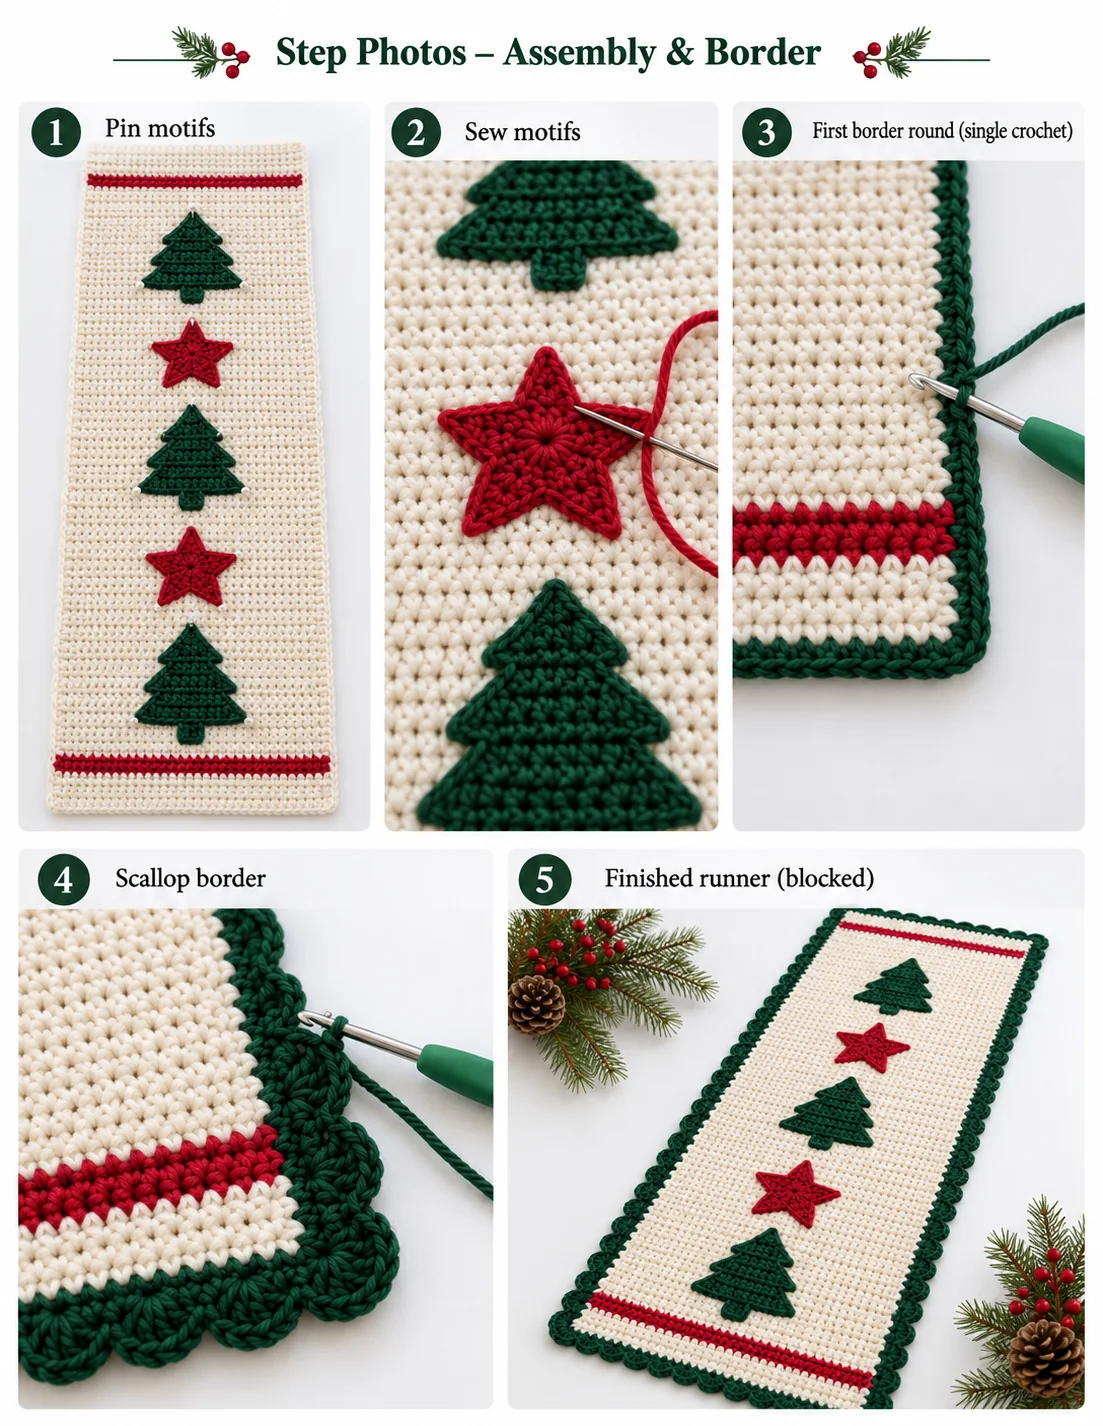
Sew the motifs to the cream field of the panel, centered left-to-right and spaced as shown. Panel runs from Row 1 (bottom) to Row 216 (top).
| Cream margin | Rows 213–216 |
| Red stripe | Rows 210–212 |
| Cream | Rows 207–209 |
| Tree #3 – center at ~Row 177 | sew in Rows 169–185 |
| Star #2 – center at ~Row 142 | sew in Rows 137–148 |
| Tree #2 – center at ~Row 108 | sew in Rows 100–116 |
| Star #1 – center at ~Row 73 | sew in Rows 68–79 |
| Tree #1 – center at ~Row 39 | sew in Rows 31–47 |
| Cream | Rows 8–10 |
| Red stripe | Rows 5–7 |
| Cream margin | Rows 1–4 |
Sewing the motifs
- Mark the panel’s horizontal center (between st 28 and st 29). Center each motif on this line so equal cream shows on both sides.
- Pin all five motifs in place first (bottom to top: Tree, Star, Tree, Star, Tree) and check they are straight and evenly spaced before sewing.
- Using the long tail and a tapestry needle, sew around the edge of each motif with small whip stitches in matching yarn. Keep the stitching flat but let the motif sit slightly raised for dimension.
- Weave in all tails on the back.
New to sewing crochet pieces together? Our guide to how to attach granny squares shows whip stitch and mattress stitch step by step, and the same neat stitching works for appliqued motifs.
Stage 4 — Scalloped Border
Worked with RS facing around the whole panel. Exact stitch counts are given so the border comes out the same every time.
Round 1 – Foundation (Color A, Cream)
Attach Color A at any corner. Ch 1, then work sc around the outer edge exactly as follows, placing 3 sc in each corner:
- Across each short edge (top & bottom): 56 sc (1 sc per stitch).
- Along each long edge: 192 sc, spaced evenly — work 1 sc in each of the next 8 row-ends, then skip the next row-end; repeat this 8-and-skip pattern 24 times (24 x 8 = 192 sc over all 216 rows).
- Each corner: 3 sc in the corner stitch/space.
- Join with sl st to the first sc. Fasten off Color A.
Round 1 total = (56 x 2) + (192 x 2) + (3 x 4 corners) = 508 sc. 508 divides evenly by 4, so the shells in Round 2 come out exactly even with no adjusting.
Round 2 – Shell Edge (Color B, Forest Green)
Join Color B to any sc. Each shell uses 4 base stitches, so 508 ÷ 4 = 127 shells exactly.
- Shell repeat: skip 1 sc, work 5 dc in the next sc, skip 1 sc, sl st in the next sc. (4 sts used, 1 shell made.)
- Repeat the shell around all 508 sc — 127 shells in total.
- The corner increases from Round 1 let a shell fan neatly around each corner. For the tidiest corners, arrange your start so a 5-dc shell falls on the middle sc of a corner group; the exact count keeps this consistent every time.
- Join with sl st to the base of the first shell. Fasten off and weave in all ends.
Finishing & Blocking
- Weave in all remaining tails on the wrong side.
- Block the runner: pin flat with the panel at 14″ x 48″ and the corners square; steam or wet-block, shaping the shells evenly. Let dry completely.
- Finished size after border: approximately 15½” x 49½” (39.5 x 126 cm). The border adds roughly ¾” to 1″ on each side, so your exact measurement will vary slightly with tension.
Step Photos · Assembly & Border
Finished the runner? Add a matching Christmas Tree Crochet Coaster set, a personalised Christmas Cracker Crown for each place setting, and a festive Holiday Spirits Bottle Bag for gifting.
Tips, Care & Final Checklist
Helpful Tips
- Cotton yarn gives crisp motifs and presses flat; acrylic is softer and more forgiving on tension.
- Make and block all 5 motifs before sewing — flat motifs are far easier to place evenly.
- Pin everything and stand back to check spacing before you sew a single stitch.
- Want a different length? Add or remove plain cream rows in Rows 11–206 (keep motifs evenly spaced) — just remember it changes the finished measurement. The Yarn Estimator can help you recalculate yardage.
- Keep the shell-round dc’s relaxed so the border doesn’t ripple or cup.
Care
Machine wash gentle, cold, in a mesh bag, or hand wash. Lay flat to dry and re-block if needed. Do not wring. Cool iron on the reverse if a touch-up is required.
Final Checklist
Thank you for choosing this pattern — happy crocheting, and enjoy your finished holiday runner! This pattern is for personal use only. You may sell finished items made from it; please credit the design. Please do not copy, share, resell, or redistribute the pattern file itself. All rights reserved.
Work out a fair price from materials, time and margin with the Crochet Pricing Calculator, and plan a batch of gifts with the Crochet Project Planner.
Christmas Tree & Star Table Runner FAQ
How big is the finished crochet table runner?
The finished runner is approximately 15½” x 49½” (39.5 x 126 cm) including the border. The panel itself is 14″ x 48″ (35.5 x 122 cm) before the border, and the border adds roughly ¾” to 1″ on each side.
What yarn and hook do I need?
Worsted-weight (Category 4) cotton or acrylic in three colors: about 520 yds of cream, 220 yds of forest green and 110 yds of crimson red, with a US G/6 (4.0 mm) hook or the size that matches gauge. See our best yarn for crochet projects guide, and use the Hook Size Converter for other hook systems.
Is this table runner pattern beginner friendly?
It is marked Intermediate, but the panel is plain single crochet and the motifs are made separately, so there is no color-carrying or tapestry crochet. Brush up with the 6 basic crochet stitches and how to read crochet patterns first if you need to.
Can I make the runner longer or shorter?
Yes. Add or remove plain cream rows in Rows 11–206 and keep the motifs evenly spaced; just remember it changes the finished measurement. The Yarn Estimator helps you adjust the yardage.
Should I use cotton or acrylic yarn?
Cotton gives crisp motifs and presses flat; acrylic is softer and more forgiving on tension. Either works for this pattern.
How do I wash and care for the runner?
Machine wash gentle, cold, in a mesh bag, or hand wash. Lay flat to dry and re-block if needed, do not wring, and use a cool iron on the reverse if a touch-up is required.
Can I sell runners made from this pattern?
The pattern notes say you may sell finished items made from it; please credit the design, and do not copy, share, resell or redistribute the pattern file itself. Use the Crochet Pricing Calculator to price your work.
More Free Christmas Crochet Patterns
Keep the holiday crafting going with these free patterns from Crochet Patterns Hub.
- All holiday crochet patterns
- Crochet gift patterns
- Crochet blanket patterns
- Seasonal crochet ideas
- All free crochet patterns
Plan Your Next Project With Our Free Tools
Everything below lives on one page — the Crochet Calculator & Tools — and works in your browser while you crochet.
Keep Learning
- How to read crochet patterns
- 6 basic crochet stitches
- Crochet for absolute beginners
- How to hold a crochet hook
- Best yarn for crochet projects
- How to attach granny squares
- Crochet stitch tutorials
- All crochet tutorials
Happy crocheting!
Made your Christmas table runner? Share it with us on Pinterest and browse more in our free crochet patterns.