

Handmade Christmas · Free amigurumi pattern
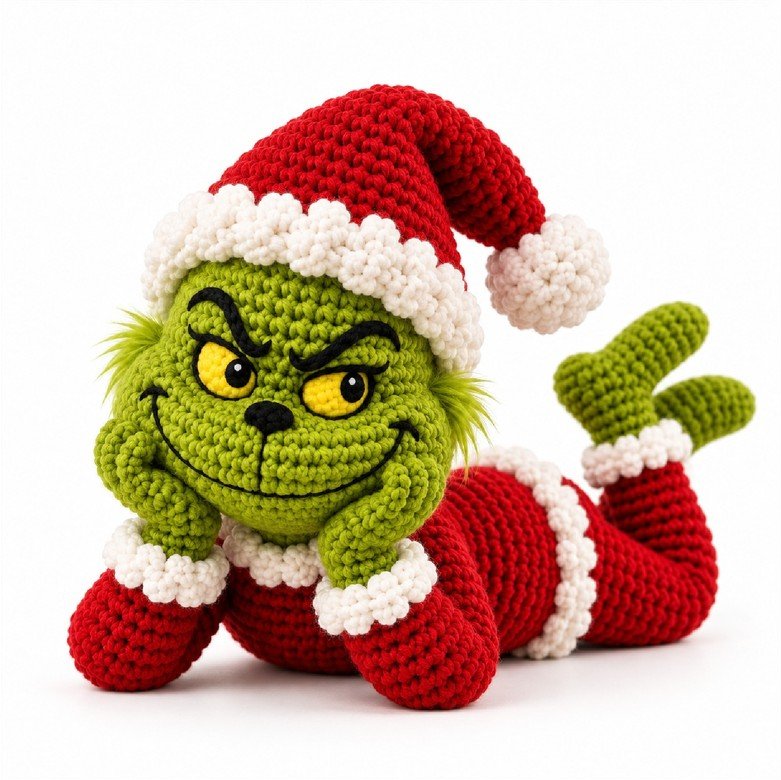
This free Christmas monster crochet pattern introduces Mr. Grumbles, the grouchiest and cosiest little amigurumi in the whole village. He has the scowl of a thundercloud and the squish of a warm marshmallow. Better still, he is about to become your favourite thing to crochet this winter.
Underneath that world-class grump is the softest heart around. He crosses his arms, rests his chin on his paws, kicks his little boots in the air and pretends he can’t stand a single ounce of holiday cheer. Meanwhile, he secretly loves every minute of it.
This pattern takes you through every stitch, from his big round head to the pom-pom on his slouchy Santa hat. The shaping is worked in simple spirals, the fluffy trims come from a satisfying little bobble stitch, and a bit of hidden wire lets him hold that signature “leave-me-alone” pose. If you love this one, browse all of our free crochet patterns, our other free amigurumi patterns or the full collection of free Christmas and holiday crochet patterns.
MR, inc/dec & colour changes
about 12.6 × 11 × 13.8 in
2.75 mm also works
100% mercerized cotton
a cosy weekend
spiral rounds, no joining
Not sure how to follow a written pattern? Our guide on how to read crochet patterns explains every abbreviation. For checking gauge, estimating yarn or decoding a tricky line, open the free Crochet Calculator & Tools page in another tab while you stitch.
Save this free pattern to your Pinterest board so you can find it before the holidays.
Save to PinterestFollow us on Pinterest
1Before You Begin
Mr. Grumbles is a poseable amigurumi, roughly 32 cm tall, lying on his elbows with his feet in the air. Along the way you will practise spiral rounds, colour changes, bobble-stitch trims, joining legs into a body, a simple wire armature and a little needle-sculpted, embroidered face that gives him all of his attitude.
comfortable with MR, inc/dec & colour changes
roughly 8–12 hours
hat tip to raised feet, approx.
New to amigurumi? Start with our guide to crochet for absolute beginners and the 6 basic crochet stitches. You only need single crochet, increases and decreases for most of this toy. The bobble trim is a variation of the double crochet, so it is easy to learn on a scrap first.
2Gauge, Tension & Size
Gauge is not fussy for amigurumi, but for the size shown, a 2.5 mm hook and DK cotton, your first 4 rounds of the head (a flat-ish circle of 24 stitches) should measure about 4–4.5 cm (1.6–1.8 in) across. The real test is simpler than numbers: hold your fabric up to the light. If you can’t see daylight or stuffing through it, your tension is spot on. Want to double-check? Use the gauge calculator on our crochet gauge calculator and tools page, or convert hook sizes if your hook is labelled differently.
Working in spirals
Every part except the odd note is worked in a continuous spiral — no joining, no turning. Pop a stitch marker in the first stitch of each round and move it up as you go, so you always know where a round begins.
Stuffing
Stuff firmly and gradually as each piece closes, especially the head. A soft head sags and loses the round shape that makes him cute. Add stuffing in small pinches and smooth it as you fill. The arms and legs stay lightly stuffed so they can bend and pose.
Clean colour changes
Change colour on the last pull-through of the final stitch in the old colour: work the stitch until 2 loops remain, then complete it with the new colour. Carry the old yarn loosely inside for a stitch or two, or fasten off and weave in — whichever keeps the inside tidy. On the white trims, this keeps the join invisible under the bobbles.
3Materials
- Yarn — sport-weight or DK, 100% mercerized cotton, in five colours (see the colour key below). One 50 g ball of each is plenty, with red being the most used. Not sure which to buy? Read our best yarn for crochet projects guide, then use the yarn estimator on the Crochet Calculator & Tools page.
- A little fuzzy green yarn — a small amount of brushed or mohair-blend green for the cheek tufts. Optional, but it is what gives him his wild hair.
- Crochet hook — 2.5 mm (a 2.75 mm also works); aim for a tight, gap-free fabric. Comfortable grip? See how to hold a crochet hook.
- Eyes — golden yellow, black and white yarn for the crocheted appliqué eyes. Prefer safety eyes? Use 12 mm yellow eyes, ideally with a slit/cat pupil.
- Toy stuffing — polyester fibrefill.
- Poseable wire — a couple of pipe cleaners or lengths of floral wire for the arms and neck.
- Finishing tools — tapestry needle, stitch marker and a slicker or pet brush for fluffing.
- For the face — a scrap of black yarn for the brows and mouth, plus a scrap for the nose.
4Abbreviations (US terms)
| MR | magic ring | dec | invisible decrease (see below) |
| ch | chain | sl st | slip stitch |
| sc | single crochet | hdc / dc | half double / double crochet |
| inc | increase — 2 sc in one stitch | FLO / BLO | front / back loop only |
| st(s) | stitch(es) | bobble | 5-dc bobble (see below) |
A number at the end of a round, like (18), is the total stitch count you should have when that round is finished. Count as you go — it’s the secret to a monster who actually looks like the photo. Need a quick refresher? Type any term into the abbreviation lookup on our crochet tools page, or read our pattern-reading tutorials.
Magic Ring (MR)
Start with an adjustable loop rather than a chain ring. It lets you cinch the centre completely closed, so no stuffing peeks out of his head, hands or nose. Work the first round of stitches into the loop, then pull the tail tight. If your circles ruffle or cup, our guide to increasing in a crochet circle explains why.
Invisible Decrease (dec)
Insert your hook into the front loops only of the next two stitches (2 loops on hook), yarn over and pull through both of those front loops, then yarn over and pull through the remaining 2 loops. This keeps decreases smooth and hides them — far tidier than a standard sc2tog on a stuffed toy.
5-DC Bobble — the fluffy trim
This is what makes all of Mr. Grumbles’ white fur look plush. In one stitch, work 5 half-finished double crochets (yarn over, insert, pull up a loop, yarn over, pull through 2 — leaving the last loop of each on the hook), then yarn over and pull through all 6 loops at once to pop the bobble to the front. A single sc between each bobble locks it in place. The foot cuffs start from a simple chain start, so keep that handy too.
5Making Mr. Grumbles · Parts 1–8
All parts are worked in a continuous spiral unless the pattern says otherwise. Check your stitch count at the end of each round, and keep the pattern decoder open if a line looks confusing.
Part 1 · HeadLeaf Green
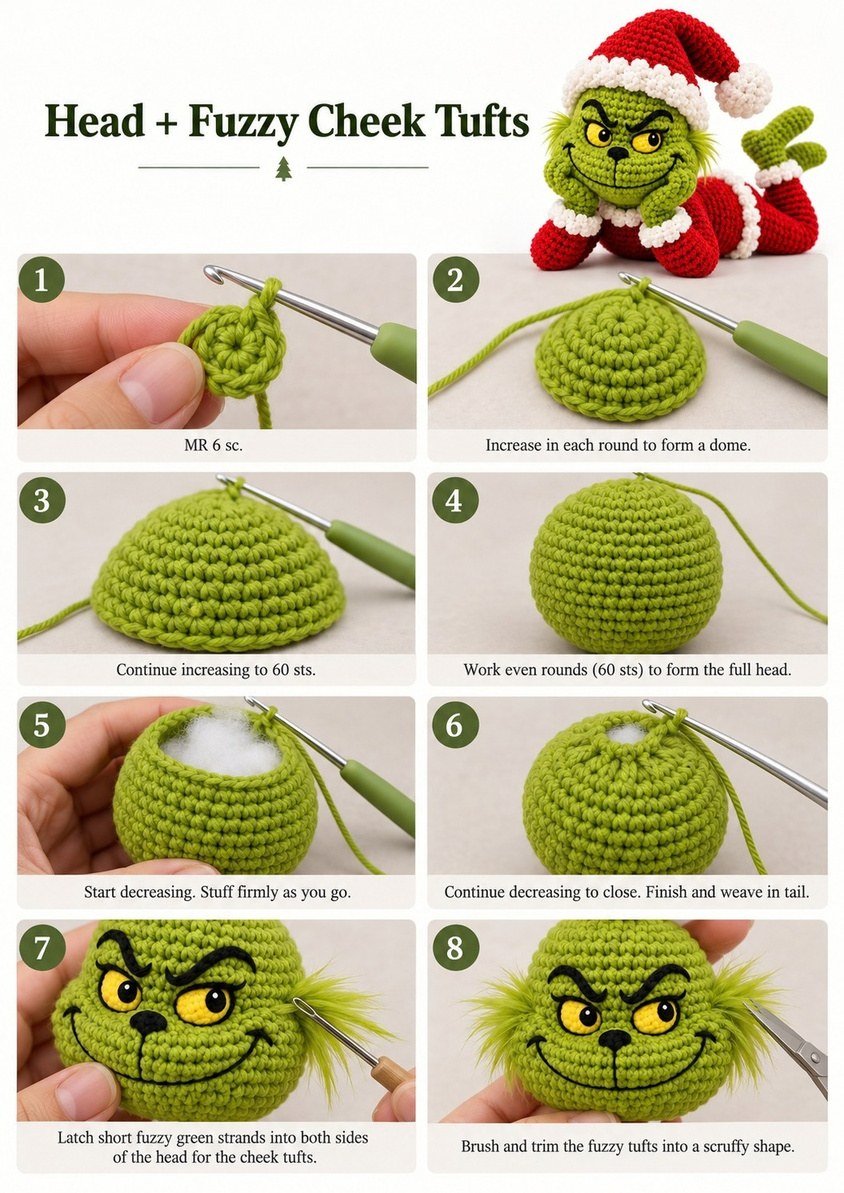
Worked from the crown down. This is his whole personality — keep it round and firm.
| Rnd | Instructions | Sts |
|---|---|---|
| 1 | 6 sc in MR | 6 |
| 2 | [inc] ×6 | 12 |
| 3 | [1 sc, inc] ×6 | 18 |
| 4 | [2 sc, inc] ×6 | 24 |
| 5 | [3 sc, inc] ×6 | 30 |
| 6 | [4 sc, inc] ×6 | 36 |
| 7 | [5 sc, inc] ×6 | 42 |
| 8 | [6 sc, inc] ×6 | 48 |
| 9 | [7 sc, inc] ×6 | 54 |
| 10 | [8 sc, inc] ×6 | 60 |
| 11–20 | sc in every st (10 rounds) | 60 |
| Rnd | Instructions | Sts |
|---|---|---|
| 21 | [8 sc, dec] ×6 | 54 |
| 22 | [7 sc, dec] ×6 | 48 |
| 23 | [6 sc, dec] ×6 | 42 |
| 24 | [5 sc, dec] ×6 | 36 |
| 25 | [4 sc, dec] ×6 — start stuffing firmly | 30 |
| 26 | [3 sc, dec] ×6 | 24 |
| 27 | [2 sc, dec] ×6 | 18 |
| 28 | [1 sc, dec] ×6 — top up the stuffing | 12 |
| 29 | [dec] ×6, fasten off & close | 6 |
Part 2 · Fuzzy Cheek TuftsFuzzy Green
His wild hair — the detail everyone falls for. Cut short lengths (about 4 cm) of the fuzzy green yarn. Using your hook, latch 3–4 strands into the stitches on each side of the head, roughly level with the eyes (where ears would sit). Once both sides are tufted, brush them out firmly with the slicker brush and trim to a scruffy, uneven shape.
Part 3 · Making His Face
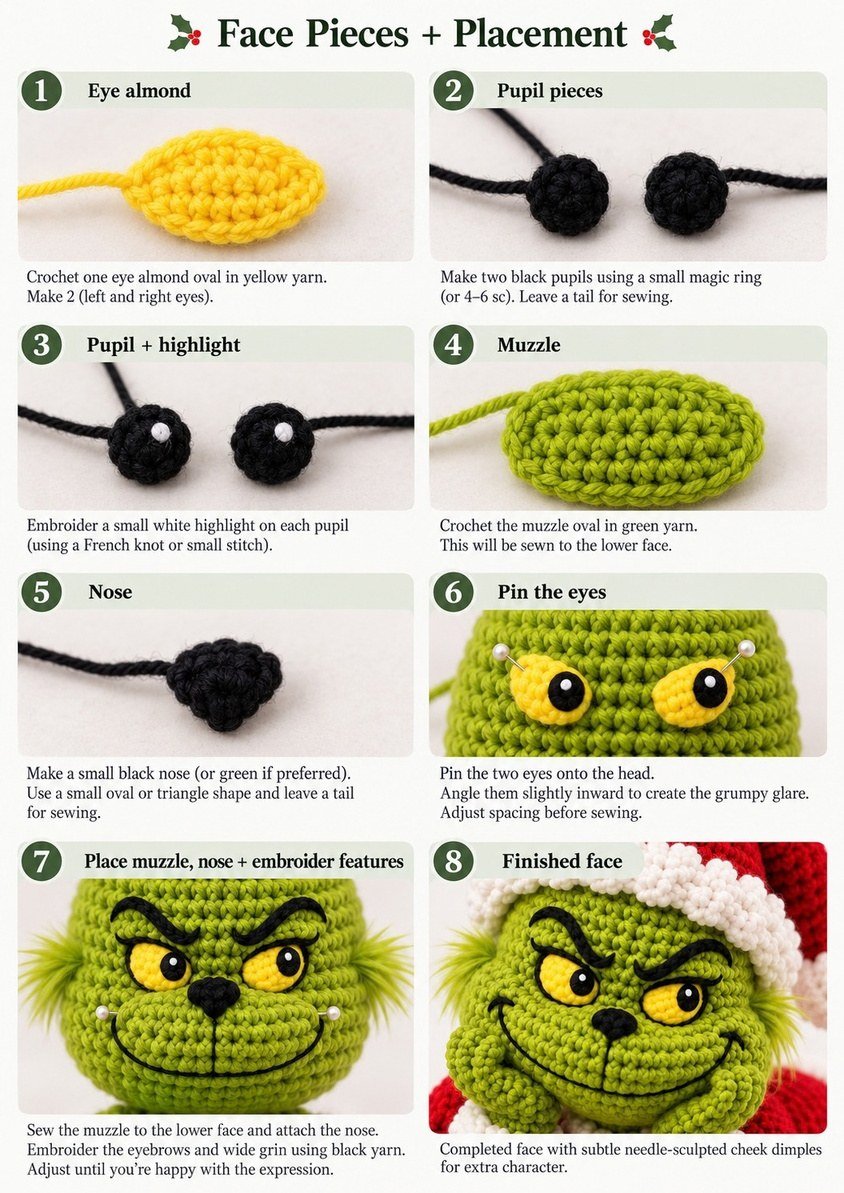
The face is what turns a green ball into Mr. Grumbles. These flat crocheted eyes — a golden almond, a bold pupil and a bright highlight — are the single biggest reason your finished monster will match the photo. Make the pieces here, then place them using the face map below.
Yellow eye almonds Make 2 · Golden Yellow
A flat oval worked around both sides of a starting chain — not stuffed.
| Rnd | Instructions | Sts |
|---|---|---|
| Ch 6 | then, working around the chain: | — |
| 1 | sc in 2nd ch from hook & next 3 ch (4 sc), 3 sc in last ch (outer corner); rotate to the free loops on the other side: sc in next 4, 2 sc in last ch (inner corner); sl st to first sc | 13 |
Fasten off, leaving a long tail. Pinch it into a soft almond with one end slightly more pointed. That pointed end faces the nose.
Black pupils Make 2 · Black
| Rnd | Instructions | Sts |
|---|---|---|
| 1 | 6 sc in MR, sl st to join, fasten off | 6 |
Want a bigger, bolder pupil? Add Rnd 2: [1 sc, inc] ×3 (9) before fastening off. Leave a tail for sewing.
White highlights Embroidered
No crochet needed — with white yarn, work one or two tiny straight stitches (or a small French knot) near the top edge of each pupil. This little glint is what brings his eyes to life; keep both highlights in the same corner so he looks in one direction.
Muzzle & cheeks Leaf Green
The forward-projecting lower face — this is the piece that stops him looking flat.
| Rnd | Instructions | Sts |
|---|---|---|
| Ch 6 | then, working around the chain: | — |
| 1 | sc in 2nd ch from hook & next 3 ch (4 sc), 3 sc in last ch; rotate: sc in next 4 free loops, 2 sc in last ch; join | 13 |
| 2 | [1 sc, inc] ×6, 1 sc | 19 |
Fasten off, long tail. This flat oval sews onto the lower front of the head with a little stuffing behind it, pushing the mouth and cheeks forward. The nose and grin sit on top of it.
Nose Black or Green
| Rnd | Instructions | Sts |
|---|---|---|
| 1 | 6 sc in MR | 6 |
| 2 | [1 sc, inc] ×3 | 9 |
| 3–4 | sc in every st | 9 |
Fasten off, leaving a tail. A tiny wisp of stuffing keeps its shape. A soft green nose blends like the reference; black gives extra cheek.
The face map — exactly where everything goes
Pin everything in place using the round numbers below and look at him from across the room before you sew. The whole character lives in a few millimetres, so a little patience pays off hugely.
- Eyes. Centre over Rnd 15–16. Inner (pointed) corners about 4 st apart; each almond spans ~5–6 st. Tilt each so the outer corner sits higher — that slant is the glare.
- Eyebrows. Sit at Rnd 13–14, just above the eyes. Each brow ~6–7 st long, angled down toward the centre so they almost meet. Low and steep = grumpier.
- Nose. Sits on the muzzle at ~Rnd 18–19, just below the eyes.
- Mouth. A wide grin ~16 st embroidered across the muzzle. Corners lift to about Rnd 19, dipping to Rnd 21 at the centre. Flick the corners up for the smug curl.
2. Project the muzzle: sew the muzzle pad to the lower face with a little stuffing behind it, then ease small stitches around its top edge so the mouth and cheeks stand clearly forward of the upper face.
3. Cheek dimples: pull a stitch from each mouth corner back into the muzzle to dimple it and puff the cheeks.
Part 4 · ArmsMake 2
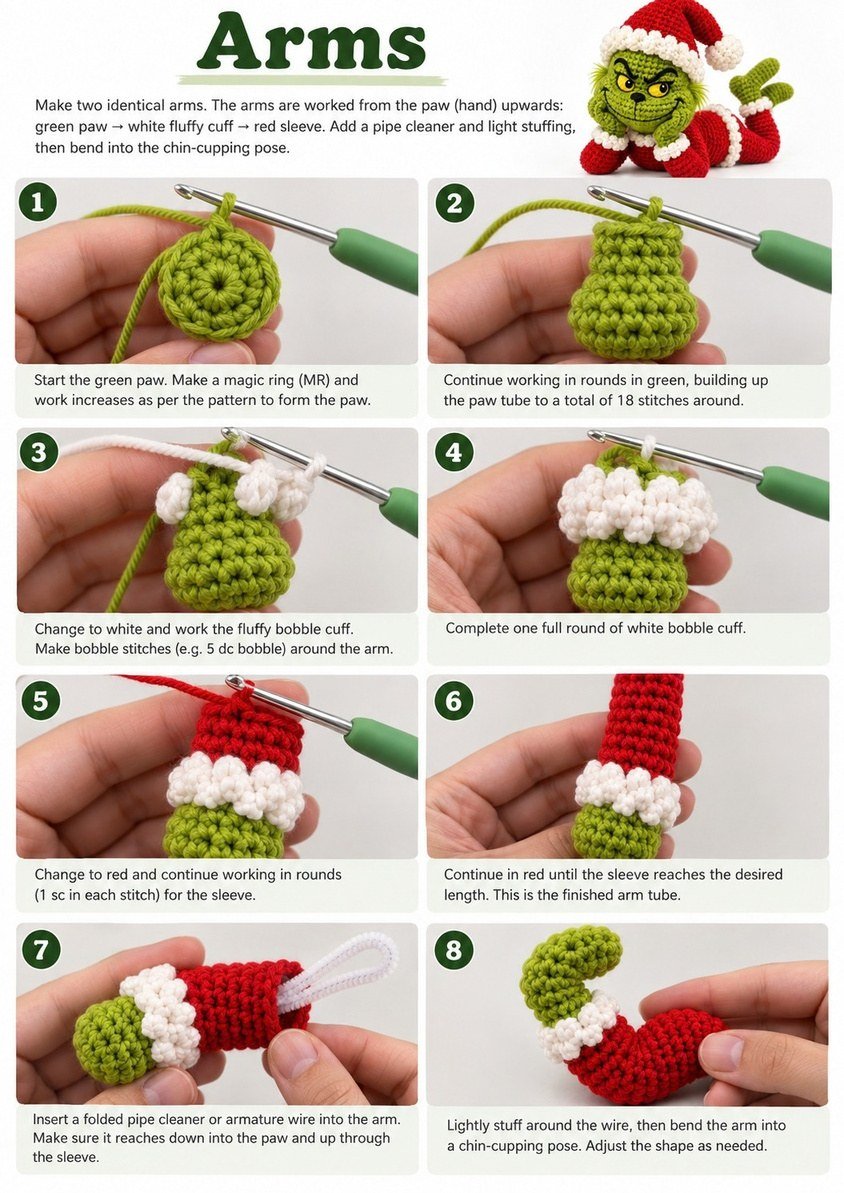
Green paw → white fluffy cuff → red sleeve. A hidden wire lets the paws cup his cheeks.
| Rnd | Instructions | Sts |
|---|---|---|
| Start with Leaf Green (the paw) | ||
| 1 | 6 sc in MR | 6 |
| 2 | [inc] ×6 | 12 |
| 3 | [1 sc, inc] ×6 | 18 |
| 4–7 | sc in every st (4 rounds) | 18 |
| Change to Pure White (the cuff) | ||
| 8 | [bobble, 1 sc] ×9 | 18 |
| Change to Christmas Red (the sleeve) | ||
| 9–17 | sc in every st (9 rounds) | 18 |
Fasten off with a long tail. Slide a folded pipe cleaner down the centre and stuff lightly around it, so the arm holds a bent, chin-cupping shape.
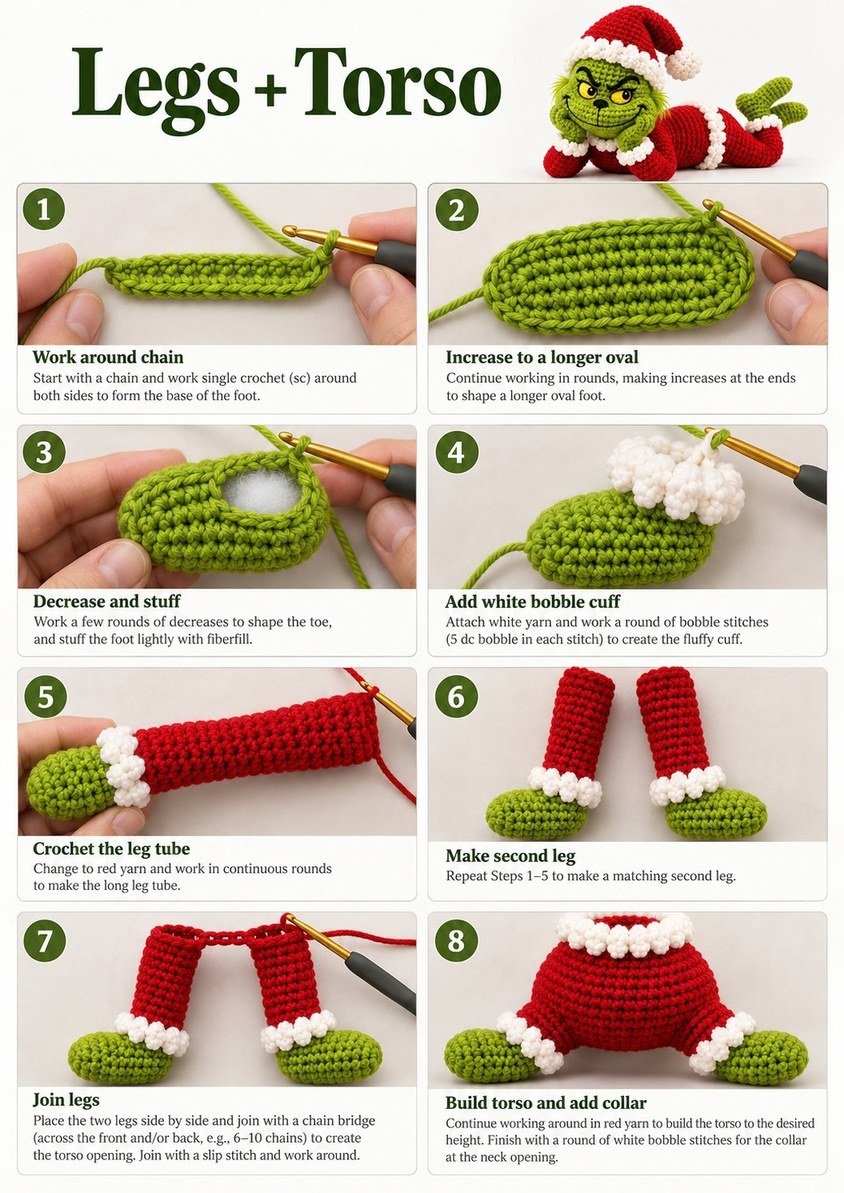
Part 5 · Legs & FeetMake 2
An elongated oval foot (worked around a chain) gives the reference’s stretched, curled-toe look. Then white cuff, then red leg.
| Rnd | Instructions | Sts |
|---|---|---|
| Start with Leaf Green (the foot) | ||
| Ch 8 | then, working around the chain: | — |
| 1 | sc in 2nd ch from hook & next 5 ch (6 sc), 3 sc in last ch; rotate: sc in next 6 free loops, 2 sc in last ch; join | 17 |
| 2 | [inc] ×2, 5 sc, [inc] ×3, 5 sc, [inc] ×2 | 24 |
| 3–4 | sc in every st (2 rounds) | 24 |
| 5 | [2 sc, dec] ×6 — lightly stuff the foot | 18 |
| 6 | sc in every st | 18 |
| Change to Pure White (the cuff) | ||
| 7 | [bobble, 1 sc] ×9 | 18 |
| Change to Christmas Red (the leg) | ||
| 8–21 | sc in every st (14 rounds) | 18 |
Leg 1: fasten off. Leg 2: keep the loop live and continue into the torso.
Part 6 · TorsoChristmas Red
Worked up from the joined legs to a neat neck opening, finished with a fluffy collar.
| Rnd | Instructions | Sts |
|---|---|---|
| Join | With Leg 2 live: ch 3, sc 18 around Leg 1, 3 sc along the chain, 18 sc around Leg 2, 3 sc along the far side of the chain | 42 |
| 2–6 | sc in every st (5 rounds) | 42 |
| 7 | [5 sc, dec] ×6 | 36 |
| 8–12 | sc in every st — begin stuffing the body | 36 |
| 13 | [4 sc, dec] ×6 | 30 |
| 14–16 | sc in every st | 30 |
| Change to Pure White (the collar) | ||
| 17 | in BLO, [bobble, 1 sc] ×15 | 30 |
| 18 | sc in every st, fasten off | 30 |
Finish stuffing firmly through the neck opening. The head sews on over this collar (see the assembly section).
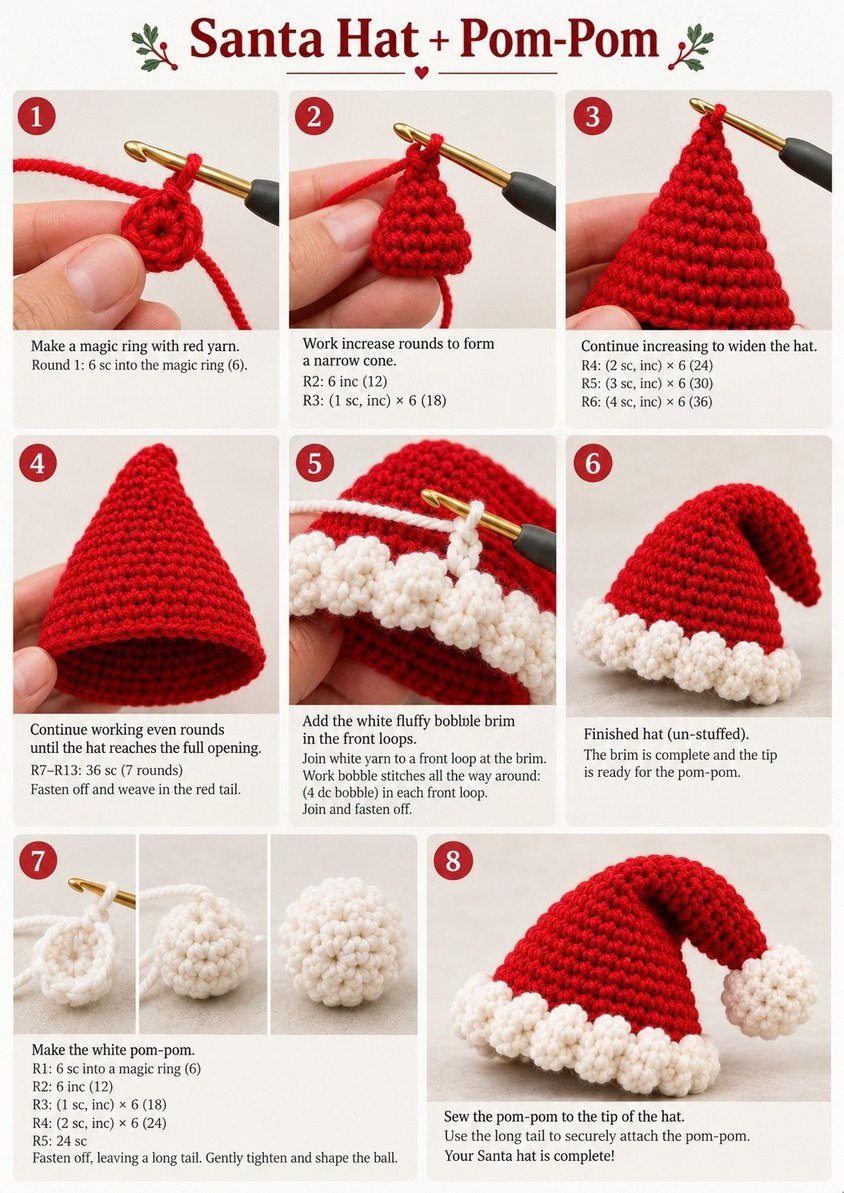
Part 7 · Santa HatChristmas Red
A slow start makes the long, floppy point; then it flares to sit over one eyebrow.
| Rnd | Instructions | Sts |
|---|---|---|
| Start with Christmas Red (the tip) | ||
| 1 | 4 sc in MR | 4 |
| 2 | [1 sc, inc] ×2 | 6 |
| 3 | [2 sc, inc] ×2 | 8 |
| 4 | [3 sc, inc] ×2 | 10 |
| 5 | [4 sc, inc] ×2 | 12 |
| 6 | [5 sc, inc] ×2 | 14 |
| 7 | [6 sc, inc] ×2 | 16 |
| 8 | [7 sc, inc] ×2 | 18 |
| 9 | [8 sc, inc] ×2 | 20 |
| 10 | [9 sc, inc] ×2 | 22 |
| 11 | [10 sc, inc] ×2 | 24 |
| 12 | [3 sc, inc] ×6 | 30 |
| 13 | [4 sc, inc] ×6 | 36 |
| 14 | [5 sc, inc] ×6 | 42 |
| 15 | [6 sc, inc] ×6 | 48 |
| 16 | [7 sc, inc] ×6 | 54 |
| 17 | [8 sc, inc] ×6 | 60 |
| 18–25 | sc in every st (8 rounds) | 60 |
| Change to Pure White (the fluffy brim) | ||
| 26 | in FLO, [bobble, 1 sc] around | 60 |
| 27 | sc in every st, fasten off | 60 |
Leave the hat unstuffed so the point flops. Bend the tip and let it droop to one side.
Part 8 · Pom-PomPure White
| Rnd | Instructions | Sts |
|---|---|---|
| 1 | 6 sc in MR | 6 |
| 2 | [inc] ×6 | 12 |
| 3 | [1 sc, inc] ×6 | 18 |
| 4–5 | sc in every st | 18 |
| 6 | [1 sc, dec] ×6 — stuff lightly | 12 |
| 7 | [dec] ×6, fasten off | 6 |
Close the hole and sew firmly to the very tip of the hat.
You now have every piece. Next comes the assembly, so keep going to the putting-it-together section below.
6Stitch-Count Map
Use this quick table to check every piece before you move on. If a count is off, grab the free crochet tools and decode the line, or recount from the last marked round.
| Part | Colour | Make | Rounds | Key count |
|---|---|---|---|---|
| Head | Leaf Green | 1 | 29 | 60 max, closed to 6 |
| Eye almonds | Golden Yellow | 2 | Ch 6 + 1 | 13 |
| Pupils | Black | 2 | 1 (optional 2) | 6 (or 9) |
| Muzzle | Leaf Green | 1 | Ch 6 + 2 | 19 |
| Nose | Black or Green | 1 | 4 | 9 |
| Arms | Green, White, Red | 2 | 17 | 18 |
| Legs & feet | Green, White, Red | 2 | 21 | 24 at the foot, 18 on the leg |
| Torso | Red, White | 1 | Join + 17 | 42 at the join, 30 at the collar |
| Santa hat | Red, White | 1 | 27 | 60 |
| Pom-pom | Pure White | 1 | 7 | 18 max, closed to 6 |
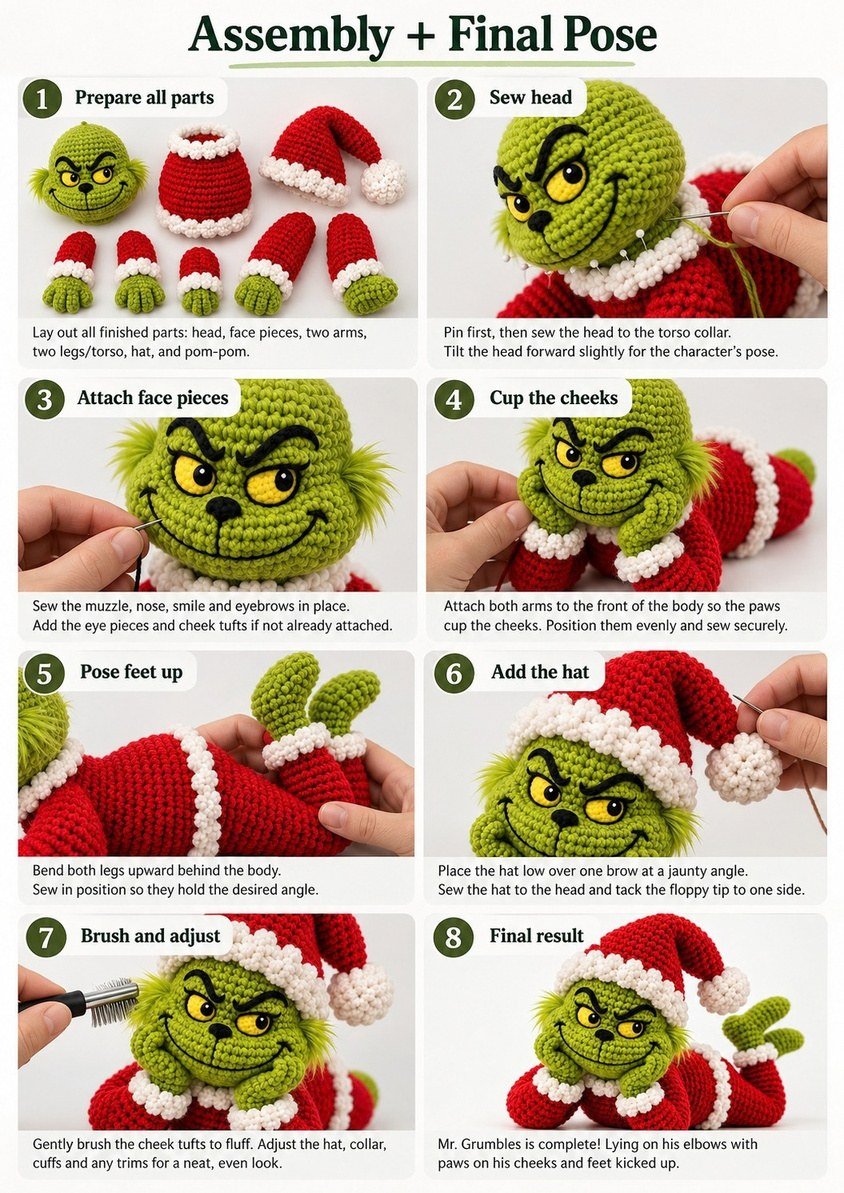
7Putting It Together (Assembly & Final Pose)
Lay every piece out and pin the whole monster together before you sew. Pinning first lets you nudge the angles until the pose reads right — a prone little grump, sprawled on his elbows, feet kicked up behind him.
- Settle the body. Lay the torso down belly-first, resting on where the elbows and knees will go.
- Attach the head. Sew it over the collar, tilted forward and slightly up, so his chin drops toward his hands.
- Position the arms. Bend the wired paws up and inward so the white cuffs cup his lower cheeks.
- Kick up the legs. Bend at the knee so the feet point up behind him.
- Crown him. Set the hat low over one brow, drooping right, pom-pom dangling.
- Fluff and finish. Brush the tufts and trims, and roll him between your hands to round him out.
- Head → body: sew the lower back of the head (around its Rnd 24–26) onto the collar ring (Torso Rnd 18, 30 st), tilted forward ~20°.
- Muzzle → face: centre the muzzle pad on the lower front of the head (over ~Rnd 18–24), lightly stuffed behind it so it projects; nose and grin sit on it.
- Arms → shoulders: attach each sleeve top (Arm Rnd 17) to the torso sides at about Rnd 14–15, ~5–6 st down from the neck, one either side of centre-front.
- Knee bend: fold each leg at about Rnd 14–16 of the red leg so the foot lifts and points up.
- Hat → head: sew the brim (Hat Rnd 27) around the head at about Rnd 8–11 from the crown, low over one brow; tack the tip down.
- Face: place eyes, brows, nose and mouth by the round numbers on the face map above.
8The Grump Masterclass
Two monsters from the same pattern can look completely different, and it almost always comes down to the face. Here is how to dial in his signature scowl.
Steeper inward slope = grumpier. Keep them low and close to the eyes.
Outer corners high, highlights in the same corner so he looks one way.
Wide and low with lifted corners — he’s plotting, not smiling.
The hair matters too: brush hard, trim scruffy. Perfect hair ruins the whole vibe.
Caring for your monster
- Spot clean only. Cotton amigurumi doesn’t love the washing machine — dab gently with a damp cloth and mild soap, then air dry.
- Not for babies. Anything with safety eyes, wire and small parts is a keepsake or a gift for older children and adults, not a baby toy.
- Re-fluff anytime. A quick brush brings his hair and trims back to life whenever he gets a little flat.
9Final Checklist
- Head is firm and round, with all 60 stitches counted at the widest point.
- Eyes are tilted so the outer corners sit higher, with both highlights in the same corner.
- Muzzle is stuffed lightly behind so it projects forward.
- Arms hold their bent, chin-cupping shape because the pipe cleaner reaches the paw.
- Legs bend at the knee and the toe tips curl up.
- Hat sits low over one brow and the pom-pom is stitched firmly.
- Tufts and trims are brushed out and trimmed scruffy.
Share your make on Pinterest and tag us, or save this pattern to your Christmas board for next year.
Pin this patternSee our Pinterest boards
10Frequently Asked Questions
How tall is the Mr. Grumbles crochet monster?
About 32 cm (12.6 in) tall from hat tip to raised feet, 28 cm wide and 35 cm deep in his lying pose, using DK cotton and a 2.5 mm hook. Sport-weight cotton makes him slightly smaller.
What yarn and hook should I use?
Use sport-weight or DK 100% mercerized cotton with a 2.5 mm hook (a 2.75 mm also works). Read our best yarn for crochet projects guide, or use the yarn estimator and hook converter on the crochet calculator and tools page.
Is this Christmas monster pattern beginner-friendly?
It is rated intermediate. You need the magic ring, increases, invisible decreases and colour changes. If you are new, start with our crochet for absolute beginners guide or try an easier make from our free amigurumi patterns first.
Can I sell the toys I make from this pattern?
Yes. You can sell the finished toys you make in small batches, and please credit the designer when you sell or share photos. Please do not copy, resell or share the pattern itself, republish the text, photos or wording, or claim the design as your own.
Is Mr. Grumbles safe for babies?
No. With wire, safety-eye options and small parts, he is a keepsake or a gift for older children and adults, not a baby toy.
11More Free Crochet Patterns & Tools
Thank you for choosing this pattern, and for giving one very grouchy little monster a brand-new home. Happy hooking and happy holidays! Keep going with these free Christmas makes, or head back to all free crochet patterns and the Holiday patterns collection.
- Nordic Santa Bear — cosy amigurumi teddy in a Santa hat
- Nordic Star Gnome — bendy star-hat Christmas gnome
- Winter Snow Angel — lace-winged Christmas ornament
- Spiral Christmas Tree — hanging amigurumi ornament
- Crochet Santa Hat — quick festive hat
- Crochet Christmas Baubles — easy tree decorations
- Christmas Table Runner — tree and star runner
- Crochet Ghost Witch — another spooky-cute amigurumi
Need help along the way? Use our Crochet Calculator & Tools for the gauge calculator, yarn estimator, US/UK pattern checker and abbreviation lookup. You can also follow us on Pinterest for new free patterns every week.